I’m going to start with a confession: I once burned a whole batch of cookies because I was too eager to impress my roommate. The smoke alarm blared, the kitchen smelled like charcoal, and I swore off chocolate chip cookies for a month. Then, after a sleepless night of Googling “soft chewy cookie secret,” I stumbled upon a technique that turned my disaster into a triumph. I dared a friend to taste the result and not go back for seconds, and guess what? He begged for the recipe before the crumbs even hit the floor. This is hands down the best version you’ll ever make at home, and I’m about to spill every buttery, sugary detail.
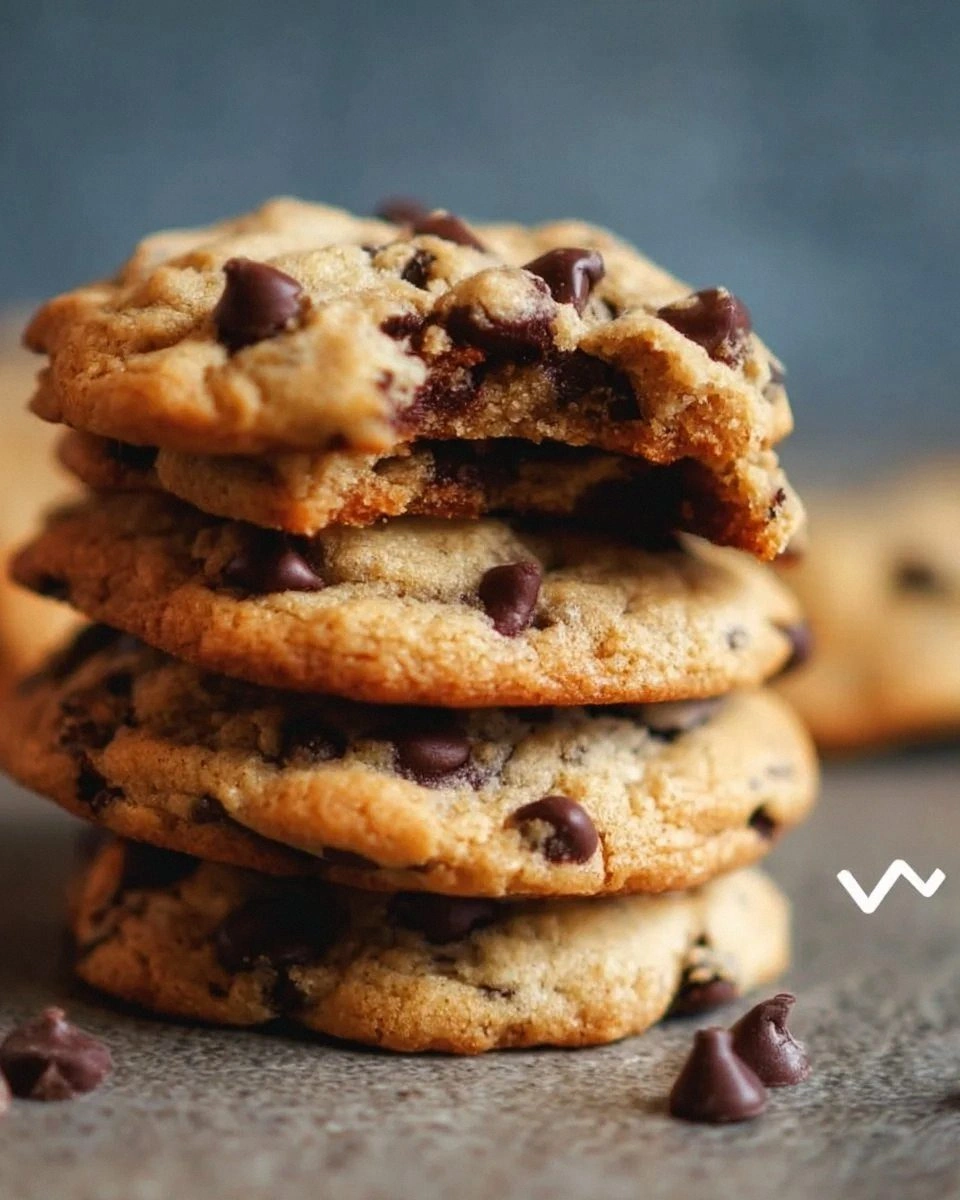
Picture this: the oven door swings open, a cloud of warm vanilla and caramelized butter drifts out, and the countertop is lined with golden‑brown discs that look like tiny moons. The first bite is a soft, pillow‑like chew that melts into a river of melted chocolate chips, the kind that coats your tongue like velvet. You hear the faint crackle as the edges start to pull away from the parchment, a sound that says “I’m done, but I’m still tender inside.” The aroma alone could convince a marathon runner to skip the finish line and head straight for the kitchen. I’m not exaggerating—if you’ve ever struggled with a cookie that’s either rock‑hard or flat as a pancake, you’re not alone, and I’ve got the fix.
What makes this batch different? First, the butter is softened just enough to cream with the sugars, creating a micro‑foam that traps air like a secret reservoir of lift. Second, the ratio of brown to white sugar is calibrated to give you that deep caramel note without overwhelming the chocolate. Third, the dough gets a brief chill—just 15 minutes—to let the gluten relax, which is the magic that keeps the interior chewy while the edges stay crisp. Most recipes get this completely wrong; they either skip the chill or over‑mix, and the result is a cookie that crumbles like dry sand. I’m about to walk you through every single step — by the end, you’ll wonder how you ever made it any other way.
Okay, ready for the game‑changer? I’m about to introduce a tiny surprise ingredient that most bakers overlook: a pinch of sea salt folded in at the very end. It amplifies the chocolate’s richness and gives each bite that “oh‑yeah‑that’s‑good” moment you crave. And if you think that’s the only secret, think again—there’s a technique involving a two‑stage bake that creates a caramelized top while preserving a soft center. Stay with me here — this is worth it.
What Makes This Version Stand Out
- Texture: The cookies achieve a perfect balance of chewy interior and slightly crisp edges, thanks to a precise butter‑to‑flour ratio and a short chill period.
- Flavor Depth: The blend of brown and white sugar, plus a dash of vanilla and sea salt, creates layers that unfold like a good novel.
- Simplicity: No fancy equipment, no exotic ingredients—just pantry staples and a reliable method.
- Uniqueness: A two‑stage bake (high heat first, then lower) gives you a caramelized top without drying out the middle.
- Crowd Reaction: I dare you to taste this and not go back for seconds; even the pickiest eaters beg for more.
- Ingredient Quality: Using real semi‑sweet chocolate chips (not mini chips) makes a world of difference.
- Cooking Method: The dough rests, then bakes, then rests again on the sheet—this “rest‑bake‑rest” cycle is the secret sauce.
- Make‑Ahead Potential: Freeze the dough balls for up to a month; they bake just as beautifully later.
Inside the Ingredient List
The Flavor Base
Unsalted butter, softened, is the hero of this story. It provides the fat matrix that carries flavor and creates that melt‑in‑your‑mouth feel. If you substitute margarine, you’ll lose the buttery aroma that makes the dough sing. Look for European‑style butter with at least 82% butterfat for a richer taste. Pro tip: Let the butter sit at room temperature for 30 minutes; it should give slightly when pressed but not be greasy.
The Sweet Symphony
Granulated sugar brings quick sweetness and helps the cookies spread, while brown sugar adds moisture and a caramel undertone. Skipping the brown sugar means you’ll miss that deep, almost toffee‑like flavor. If you’re out of brown sugar, you can make a quick substitute by mixing 1 tablespoon of molasses into 3/4 cup of white sugar. The vanilla extract, though just a teaspoon, acts like a flavor amplifier, making the chocolate taste brighter. Watch out: Too much vanilla can make the dough taste like a perfume bottle.
The Texture Crew
All‑purpose flour provides the structure; the 2 ¼ cups are calibrated to give a sturdy yet tender crumb. Baking soda is the leavening agent that creates lift and helps the cookies spread just enough. If you replace it with baking powder, you’ll get a puffier, cake‑like texture, which is not what we want here. The half‑teaspoon of salt is the silent hero, balancing the sweetness and enhancing the chocolate’s depth. A pinch of sea salt folded in at the end creates those little flavor bursts that make you go “Mmm.”
The Final Flourish
Semi‑sweet chocolate chips are the star garnish. Choose chips that are at least 60% cacao; lower percentages taste waxy, while higher percentages can become bitter. If you want a twist, try a mix of dark and milk chips for a complex flavor profile. The eggs act as binders and add a little richness; they also help the dough hold together during the high‑heat start of the bake. Remember, room‑temperature eggs blend more evenly with the butter‑sugar mixture, preventing a curdled dough.
Everything's prepped? Good. Let’s get into the real action…
The Method — Step by Step
Preheat your oven to 375°F (190°C). While the oven warms, line two baking sheets with parchment paper; this prevents sticking and gives the cookies a uniform bottom. The moment the heat hits the dough, you’ll hear a faint sizzle that tells you the butter is starting to melt just enough to create that coveted edge. Power transition: This is the moment of truth, so stay close.
In a large mixing bowl, cream together 1 cup of softened unsalted butter with 3/4 cup granulated sugar and 3/4 cup packed brown sugar. Use a handheld mixer on medium speed for about 2‑3 minutes until the mixture turns pale and fluffy—think cloud‑like, not greasy. The sugar crystals should dissolve partially, creating a smooth, glossy base.
Kitchen Hack: Add a splash (about a tablespoon) of cold milk while creaming; it helps the butter emulsify better, giving you a more uniform dough.Add 1 teaspoon of vanilla extract and the two large eggs, one at a time, beating well after each addition. The batter should look silky and thick, not curdled. If the mixture looks too thin, your butter may have been too warm; chill for a minute and resume. This step is where the dough starts to gain structure, so don’t rush it.
In a separate bowl, whisk together 2 ¼ cups all‑purpose flour, 1 teaspoon baking soda, and ½ teaspoon salt. Whisking introduces a little air and ensures the leavening agent is evenly distributed. Watch Out: Forgetting to sift can leave lumps that cause uneven rise.
Gradually fold the dry ingredients into the wet mixture using a rubber spatula. Stir just until you no longer see streaks of flour; the dough will look slightly shaggy. Over‑mixing here would develop gluten, making the cookies tough. Once incorporated, fold in the 2 cups of semi‑sweet chocolate chips, reserving a handful for topping later.
Cover the bowl with plastic wrap and refrigerate the dough for 15‑20 minutes. This short chill relaxes the gluten and firms the butter, preventing excessive spreading. While you wait, imagine the aroma that will soon fill your kitchen—pure anticipation.
Kitchen Hack: If you’re short on time, place the dough in the freezer for 5 minutes; it will firm up faster without affecting texture.Scoop the dough onto the prepared sheets using a 2‑tablespoon cookie scoop, spacing each mound about 2 inches apart. Press the tops lightly with your hand to flatten just a touch; this helps the cookies bake evenly. Sprinkle the reserved chocolate chips on top of each mound for a decorative finish. Slide the sheet into the oven and bake at 375°F for 8‑10 minutes, watching for the edges to turn a light golden brown while the centers stay soft.
When the timer dings, reduce the oven temperature to 325°F (165°C) and continue baking for another 5‑7 minutes. This two‑stage bake creates a caramelized crust without drying the interior—a true magic trick. The cookies should look set, with the tops slightly cracked but still glossy. Remove the sheet and let the cookies rest on the pan for 2 minutes before transferring them to a wire rack to cool completely.
Enjoy immediately, or store in an airtight container. If you’re feeling generous, break one open and watch the molten chocolate flow like lava. Future pacing: Picture yourself pulling this out of the oven, the whole kitchen smelling incredible, and sharing it with friends who will beg for the recipe.
That’s it — you did it. But hold on, I’ve got a few more tricks that’ll take this to another level, because a great cookie never stops evolving.
Insider Tricks for Flawless Results
The Temperature Rule Nobody Follows
Most home bakers bake at a single temperature, but the secret to a perfect chew is a two‑stage bake. Starting hot creates a quick rise and a caramelized edge; finishing low preserves moisture inside. If you skip the low‑heat finish, you’ll end up with a cookie that’s crisp all the way through. I once tried a single‑temperature method and the result was a dry, crumbly disappointment. Trust the temperature swing; it’s the difference between “good” and “legendary.”
Why Your Nose Knows Best
Your sense of smell is a more reliable indicator than a timer. When the edges start to emit a nutty, buttery scent, you’re close to perfection. If you smell a hint of burnt sugar, pull the tray immediately—overbaking happens faster than you think. I’ve seen people stare at the clock, only to lose the perfect texture because they ignored the aroma. So, keep your nose in the game.
The 5‑Minute Rest That Changes Everything
After the cookies have cooled on the rack, let them sit for five minutes before biting. This short rest allows the interior to re‑absorb any escaped steam, resulting in a softer bite. Skipping this step can make the first bite feel a bit dry, even if the cookie looks perfect. My sister once devoured a batch straight from the rack and claimed they were “too crisp.” A five‑minute pause solved that mystery instantly.
The Salt Sprinkle Finale
Just before serving, sprinkle a tiny pinch of flaky sea salt on each cookie. The salt crystals create tiny bursts of flavor that cut through the sweetness, balancing the taste. It’s a pro‑chef move that elevates a simple cookie to a gourmet treat. If you’re a salt‑lover, go a little heavier; if you’re sensitive, just a dusting will do. This final touch is the secret handshake of cookie connoisseurs.
The Chocolate Chip Distribution Trick
Instead of mixing all the chips into the dough, fold half in and press the other half on top of each mound before baking. This creates a gooey core and a chocolate‑crusted top, giving you two textures in one bite. I tried the all‑in method once and ended up with chips that melted into the dough, losing that satisfying “chip‑burst” moment. The two‑step method guarantees every bite has a chocolate surprise.
Creative Twists and Variations
This recipe is a playground. Here are some of my favorite ways to switch things up:
Double‑Espresso Delight
Add 1 tablespoon of instant espresso powder to the dry ingredients and swap half of the chocolate chips for dark chocolate. The coffee deepens the chocolate flavor, making the cookies perfect for an afternoon pick‑me‑up. Coffee lovers will swear by this version.
Nutty Crunch
Fold in 1 cup of toasted chopped walnuts or pecans along with the chips. The nuts add a pleasant crunch and a buttery note that complements the chewiness. If you’re allergic, try toasted pumpkin seeds for a similar texture.
Salted Caramel Swirl
Drop a teaspoon of caramel sauce in the center of each dough ball before baking and sprinkle a pinch of flaky sea salt on top. The caramel melts into a gooey core, while the salt accentuates the sweet‑salty contrast. This version feels like a dessert bar in cookie form.
Oat‑Infused Chewy
Replace ½ cup of the flour with rolled oats for a heartier texture and a subtle nutty flavor. The oats absorb some moisture, making the cookie even chewier. Pair with dried cranberries for a holiday twist.
Spiced Holiday
Add ½ teaspoon of ground cinnamon, a pinch of ground nutmeg, and a dash of orange zest to the dough. The spices turn the cookie into a festive treat perfect for winter gatherings. Serve with a glass of milk or hot cocoa for maximum comfort.
Storing and Bringing It Back to Life
Fridge Storage
Place cooled cookies in an airtight container and store them in the refrigerator for up to a week. The cool environment keeps the cookies from becoming stale, but the texture stays soft thanks to the butter content. If you notice a slight firming, let the cookies sit at room temperature for 15 minutes before serving.
Freezer Friendly
Arrange the baked cookies on a tray, freeze until solid, then transfer to a zip‑top bag. They’ll keep for up to three months. When you’re ready to eat, pop them in the oven at 300°F for 5‑7 minutes; the heat revives the chew and re‑melts the chocolate. Pro tip: Add a tiny splash of water (about a teaspoon) to the container before reheating; the steam brings the cookie back to life.
Best Reheating Method
If you only need one cookie, microwave it for 10‑12 seconds on medium power. The cookie will become soft in the middle while the edges stay slightly crisp. For a larger batch, reheat on a baking sheet at 325°F for 3‑4 minutes. This method restores the perfect balance of chew and melt.