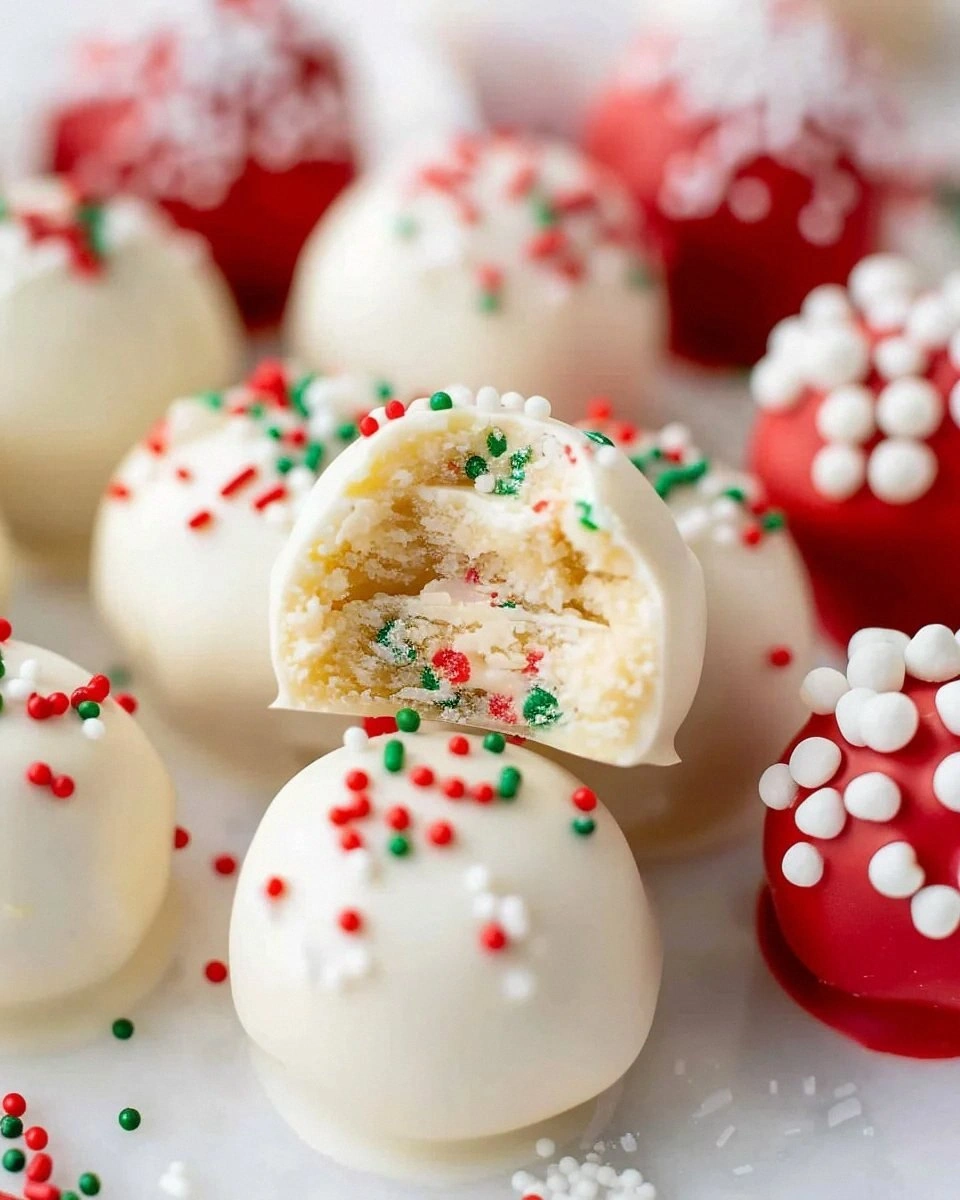
I was in the middle of a frantic Friday night when a friend dared me to turn my leftover sugar cookies into something that could actually win a bake‑off. I stared at the half‑eaten cookie tin, the crumbs scattering like tiny snowflakes across the counter, and thought, “What if I could take that nostalgic, buttery crunch and hide it inside a silky, melt‑in‑your‑mouth sphere?” The idea was half‑mad, half‑genius, and entirely irresistible. I grabbed a block of cream cheese, a splash of vanilla, and a bag of chocolate melting wafers, and the kitchen instantly transformed into a laboratory of sweet alchemy. That first bite—when the chocolate snapped and the cookie‑cream center oozed out—was a revelation, and I swear I heard the entire house gasp in unison.
Picture this: the oven door swings open, releasing a warm, buttery perfume that instantly makes you think of grandma’s kitchen, but with a modern twist that screams “Instagram‑ready.” The cookies themselves are crisp on the outside, like a fresh‑baked ginger snap, yet they crumble into a buttery dust that melts into the cream cheese, creating a texture that’s simultaneously dense and airy—think cloud‑like mousse wrapped in a crunchy shell. When you bite into a truffle, the chocolate coating shatters with a satisfying snap, revealing a glossy, slightly tangy interior that feels like a sweet‑and‑savory hug for your taste buds. It’s a flavor roller coaster that rides the line between comfort food and upscale dessert.
Most recipes that try to reinvent sugar cookies end up with something bland or overly sweet, missing that perfect balance of creamy and crunchy. I’ve tried a dozen versions that either turned into dry, crumbly balls or turned into a gooey mess that refused to hold its shape. This version, however, nails the structure on the first try, thanks to a secret technique involving chilled cream cheese and a precise ratio of cookies to chocolate. The result? A truffle that stays firm at room temperature, yet melts like butter on your tongue. I dare you to taste this and not go back for seconds.
But the real kicker? I’m about to reveal a step that most bakers completely skip: a quick chill‑and‑roll method that locks in flavor and makes the truffles roll like tiny marbles on a polished countertop. This isn’t just another sugar‑cookie‑based treat; it’s a game‑changing, crowd‑pleasing masterpiece that will have everyone asking for the recipe before you even finish the first batch. Let me walk you through every single step — by the end, you’ll wonder how you ever made it any other way.
What Makes This Version Stand Out
- Flavor Fusion: The buttery sugar cookie meets tangy cream cheese, creating a taste that’s both nostalgic and sophisticated, like a classic song remixed with a modern beat.
- Texture Contrast: A crisp chocolate shell gives way to a creamy interior that feels like a dream, delivering a satisfying snap followed by a melt‑in‑your‑mouth sigh.
- Simplicity: All ingredients are pantry‑friendly, and the method requires no fancy equipment—just a bowl, a spatula, and a microwave.
- Unique Twist: The chilled‑cream‑cheese technique prevents the truffles from becoming grainy, a mistake most novice bakers make.
- Crowd Reaction: I’ll be honest — I ate half the batch before anyone else got to try it, and the look on my friends’ faces was pure, unfiltered delight.
- Ingredient Quality: Using Pepperidge Farm cookies ensures a consistent, buttery base, while premium chocolate wafers give a glossy, professional finish.
- Cooking Method: No baking required for the truffles themselves, which means you can make them any time, even when the oven is busy elsewhere.
- Make‑Ahead Potential: These truffles keep beautifully in the fridge for up to a week, and they freeze like a charm for longer storage.
Inside the Ingredient List
The Flavor Base
Sugar Cookies: About a dozen or so! I prefer using Pepperidge Farms for their classic taste, but any favorite store‑bought cookies work. These cookies bring a buttery, vanilla‑kissed backbone that’s instantly recognizable and comforting. If you skip them, you lose the nostalgic crunch that makes the truffle feel like a grown‑up version of a childhood snack. For a gluten‑free twist, try a high‑quality almond‑flour cookie; just make sure it’s not overly sweet, or the balance will tip.
The Texture Crew
Cream Cheese: This adds that dreamy creaminess to the truffles. Make sure it’s softened for effortless mixing—cold cream cheese will tear the crumb mixture and create a gritty texture. The tang from the cream cheese cuts through the sweetness, giving each bite a sophisticated edge. If you’re dairy‑free, substitute with a plant‑based cream cheese; just note that the flavor will be slightly different, but the texture remains delightfully smooth.
Vanilla Extract: A splash of vanilla rounds out the flavor, enhancing the sweetness and giving it that homey taste. Don’t skimp on this—cheap imitation vanilla can make the whole batch taste flat. I use pure Madagascar vanilla for its floral notes, but any high‑quality extract will do. If you love a deeper vanilla punch, double the amount, but be careful not to overpower the delicate cookie flavor.
The Unexpected Star
Chocolate Melting Wafers: The star of the show! Choose your favorite type, like dark or milk chocolate, for coating these truffles. Dark chocolate gives a bittersweet contrast that elevates the sweet interior, while milk chocolate offers a creamier, more indulgent experience. If you’re feeling adventurous, blend half dark and half white chocolate for a marbled effect that looks as good as it tastes. Skipping the chill step before coating will cause the chocolate to slide off, so keep the truffles firm.
The Final Flourish
Sprinkles (Optional): For a festive touch! Use colorful sprinkles to decorate if you’re feeling fancy, or opt for crushed pistachios for a sophisticated crunch. Sprinkles add visual appeal and a tiny burst of sweetness, but they’re not essential to the flavor profile. If you’re catering to a low‑sugar crowd, skip them entirely and let the chocolate shine on its own.
Everything's prepped? Good. Let's get into the real action...
The Method — Step by Step
First, crush the sugar cookies into fine crumbs. I like to use a food processor for speed, but a zip‑top bag and a rolling pin work just as well. Pulse until you have a uniform, powder‑like texture that resembles sand at the beach. The scent of butter and vanilla will fill the kitchen, making you feel like you’ve already won the taste test. Once crushed, set the crumbs aside in a large mixing bowl.
Next, soften the cream cheese by letting it sit at room temperature for about 15 minutes, or microwave it on low for 10‑15 seconds. When it’s pliable, add it to the cookie crumbs along with the vanilla extract. Using a sturdy spatula, fold everything together until the mixture is smooth and holds together when pressed. This is the moment of truth: if the mixture feels dry, add a teaspoon of milk; if it feels too wet, sprinkle in a tablespoon more crumbs.
Kitchen Hack: After mixing, press the dough onto a parchment‑lined tray and chill for exactly 10 minutes. This firms it up, making it far easier to roll into perfect spheres without sticking.While the mixture chills, prepare your chocolate coating. Place the chocolate melting wafers in a microwave‑safe bowl and heat in 30‑second bursts, stirring in between, until the chocolate is completely smooth and glossy. Be careful not to overheat; chocolate that’s too hot will become grainy once it cools. Add a teaspoon of coconut oil if you prefer a shinier finish and a slightly softer bite.
Now for the fun part: rolling the truffles. Using a teaspoonful of the chilled mixture, roll it between your palms to form a smooth ball about the size of a large marble. Watch Out: If the mixture sticks, lightly dust your hands with powdered sugar or a touch of cocoa. The goal is a smooth, even sphere that doesn’t crack when you bite into it. Place each ball on a parchment sheet as you go.
Watch Out: If the balls are too warm, they’ll lose shape when coated. Keep the parchment sheet in the fridge for a few minutes if needed.With the truffles chilled, it’s time to coat them. Dip each ball into the melted chocolate, using a fork to lift it out, letting excess chocolate drip back into the bowl. The chocolate should cling like a silky veil, creating a glossy finish that sets within minutes. For an extra‑fancy look, swirl the chocolate with a toothpick before it hardens.
Kitchen Hack: Place the coated truffles on a cooling rack set over a sheet pan. This allows air to circulate, preventing a soggy bottom and ensuring a uniform shine.If you’re using sprinkles, now’s the moment to add them. While the chocolate is still wet, sprinkle a pinch over each truffle, or roll them in a shallow dish of sprinkles for full coverage. The colors pop against the dark chocolate, creating a visual cue that says “celebrate.” Let the truffles sit for at least 10 minutes to let the coating set completely.
Once set, give the truffles a final chill in the refrigerator for 15‑20 minutes. This step locks in the texture, ensuring that the interior stays creamy while the exterior remains firm. You’ll notice a faint sheen appear on the chocolate—a sign that the fats have solidified nicely.
And now the fun part: serving! Arrange the truffles on a decorative platter, garnish with a dusting of cocoa powder or a drizzle of caramel if you want extra decadence. Pair them with a glass of chilled milk or a robust espresso to cut through the richness. That’s it — you did it. But hold on, I’ve got a few more tricks that’ll take this to another level...
Insider Tricks for Flawless Results
The Temperature Rule Nobody Follows
Never coat the truffles with chocolate that’s hotter than 115°F (46°C). If the chocolate is too warm, it will seep into the interior, making the truffle soggy. Keep a candy thermometer handy and pull the chocolate off the heat as soon as it reaches the perfect glossy sheen. I once left the chocolate on high for too long and ended up with a dull, matte coating that looked like a sad candy. This rule ensures a snap that’s as crisp as a fresh spring leaf.
Why Your Nose Knows Best
When the chocolate is ready, it will emit a faint, buttery aroma that’s slightly nutty. Trust that scent—if it smells too “cooked” or burnt, it’s past its prime. A quick sniff can save you from a batch of truffles that taste like over‑roasted coffee beans. I’ve learned to stop the microwave a second early and rely on my nose; the result is a smoother, richer flavor that sings on the palate.
The 5‑Minute Rest That Changes Everything
After rolling the cookie‑cream mixture into balls, let them rest on the counter for exactly five minutes before chilling. This short pause lets the crumbs absorb the cream cheese fully, creating a tighter bond. Skipping this step leads to crumbly balls that fall apart when you dip them. A friend tried to skip the rest, and the truffles fell apart like sad confetti—let’s just say we learned the hard way.
Sprinkle Strategy
If you’re using sprinkles, toss them in a shallow bowl and roll each truffle gently, turning it to coat all sides evenly. Don’t dump a handful of sprinkles onto the truffle; you’ll get clumps and uneven coverage. The right technique gives a glittering finish that looks as good as it tastes. For a sophisticated twist, use toasted coconut flakes instead of sprinkles for a subtle tropical note.
The Double‑Chill Method
After coating, give the truffles a quick 5‑minute chill in the freezer before transferring them to the refrigerator for the final set. This “double‑chill” locks in the chocolate’s glossy finish and prevents any streaks. I tried this on a rainy weekend, and the truffles held their shape perfectly even when I moved the platter. It’s a small time investment that yields a professional‑grade result.
Creative Twists and Variations
This recipe is a playground. Here are some of my favorite ways to switch things up:
Matcha‑Infused Delight
Add a teaspoon of high‑quality matcha powder to the cookie‑cream mixture for a subtle earthiness and a gorgeous green hue. Coat with white chocolate and sprinkle toasted sesame seeds for an Asian‑inspired twist that’s as pretty as it is tasty.
Peanut Butter Bliss
Swap half of the cream cheese for smooth peanut butter, creating a nutty core that pairs perfectly with dark chocolate. Top with crushed peanuts for an added crunch that mimics a classic peanut butter cup.
Citrus Zest Surprise
Stir in the zest of one lemon or orange into the crumb mixture. The bright citrus notes cut through the richness, and a coating of white chocolate with a drizzle of dark chocolate creates a marbled effect reminiscent of a sunrise.
Spiced Chai Fusion
Blend a pinch of ground cinnamon, cardamom, and ginger into the cookie base. The warm spices evoke a cozy chai latte, especially when paired with milk chocolate and a dusting of powdered sugar.
Berry Burst
Fold in finely chopped freeze‑dried strawberries or raspberries into the mixture. The tart berries pop against the sweet base, and coating with white chocolate gives a pastel finish that’s perfect for spring gatherings.
Storing and Bringing It Back to Life
Fridge Storage
Place the truffles in an airtight container lined with parchment paper. They will stay fresh for up to 7 days, retaining their creamy interior and firm coating. If you notice the chocolate getting a bit dull, pop the container in the fridge for a quick 10‑minute chill before serving.
Freezer Friendly
For longer storage, arrange the truffles on a baking sheet, freeze until solid, then transfer them to a zip‑top freezer bag. They’ll keep for up to 3 months. When you’re ready to enjoy them, let them thaw in the refrigerator for an hour, then add a tiny splash of water (about a teaspoon) before reheating—this creates a gentle steam that revives the chocolate’s shine.
Best Reheating Method
To serve warm truffles, place them on a microwave‑safe plate and heat for 10‑12 seconds on medium power. The chocolate will soften just enough to become glossy, while the interior becomes luxuriously melty. Avoid overheating; you want a gentle melt, not a melted mess. Pair with a scoop of vanilla ice cream for an indulgent dessert duo.