I still remember the night I nearly burned down my kitchen trying to make a traditional apple crisp. There I was, juggling a screaming hot oven, a bubbling fruit filling, and a topping that somehow managed to be both soggy and burnt at the same time. The smoke alarm was serenading my neighborhood, my dinner guests were pretending not to notice the chaos, and I was frantically waving a dish towel at the ceiling like some sort of culinary exorcist. Fast forward through several failed attempts, a few choice words, and one very expensive oven repair bill later, and I discovered something that changed my dessert game forever: the air fryer apple crisp that I'm about to share with you.
Picture this instead: it's a random Tuesday evening, you're still in your work clothes, and that craving for something warm and cinnamon-spiced hits you like a freight train. Instead of preheating your entire kitchen for an hour-long baking ordeal, you toss a few ingredients together, slide them into your air fryer, and twenty-five minutes later you're holding a ramekin of pure autumn magic. The apples are tender and jammy, the topping is crispy and golden, and your kitchen smells like you've been slaving away for hours. I dare you to taste this and not go back for seconds — actually, I double dare you, because I've eaten half the batch straight from the serving spoon more times than I care to admit.
What makes this version absolutely life-changing isn't just the speed (though that's pretty spectacular). It's the way the air fryer creates this perfect storm of caramelized edges on the apples while keeping the centers perfectly tender, all while toasting the oat topping to crispy perfection. Most recipes get this completely wrong by drowning everything in butter and sugar, creating a mushy mess that tastes more like apple soup with gravel than the dessert of your dreams. This method? Pure magic. The hot circulating air creates those coveted crispy edges that shatter like thin ice when you dig in with your spoon, revealing molten fruit underneath that's been kissed by just enough sugar to intensify its natural sweetness.
I'll be honest — I ate half the batch before anyone else got to try it the first time I nailed this recipe. There I stood at my kitchen counter, supposedly "testing for doneness," but really I was having a moment with this dessert that would make a romance novelist blush. The combination of warm spices, tender fruit, and that buttery, crunchy topping had me weak in the knees. And now the fun part: I'm about to share every single secret I've discovered so you can experience this same moment of pure dessert bliss. Stay with me here — this is worth it.
What Makes This Version Stand Out
Speed Demon: While traditional apple crisp demands an hour of oven time plus preheating, this beauty is ready faster than you can watch an episode of your favorite sitcom. The air fryer's concentrated heat means you're not just saving time — you're actually getting better results. The apples cook through perfectly without turning to mush, and the topping achieves that elusive golden-brown color in record time.
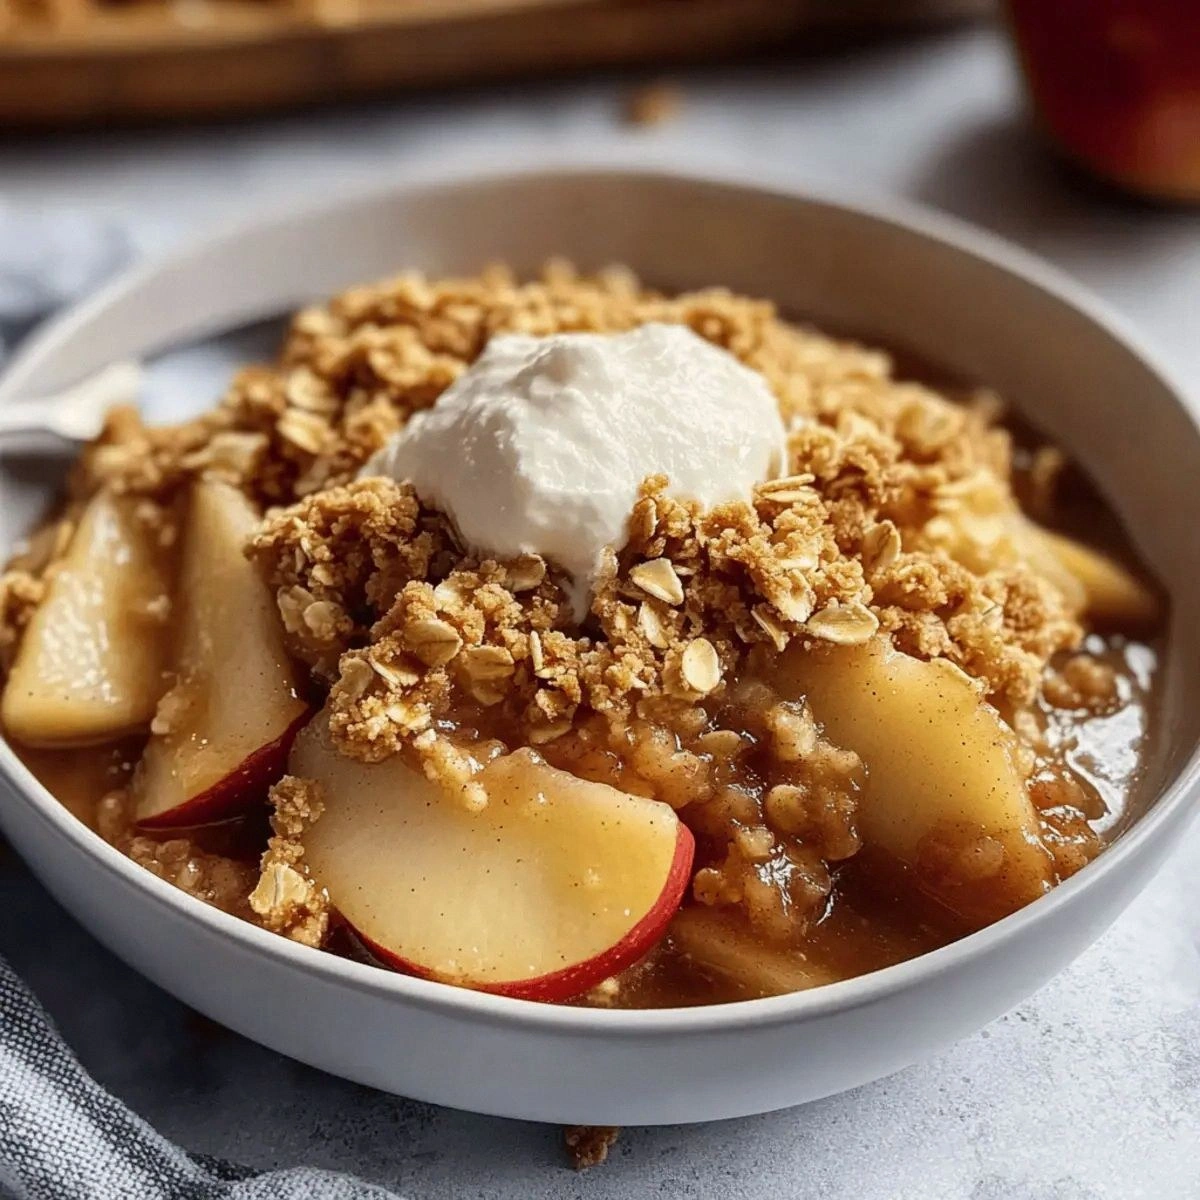
Texture Paradise: Most recipes leave you with a sad, soggy topping that separates from the filling like a bad breakup. This version creates distinct layers of crispy, crunchy, buttery topping that actually stays crisp even after sitting for a while. The contrast between the tender apples and the shatteringly crisp oat streusel will make you wonder why you ever bothered with the oven method.
Portion Control (Sort Of): The air fryer naturally encourages making smaller batches, which means you're less likely to eat an entire 9x13 pan in one sitting. Not that I'm speaking from experience or anything. Each ramekin becomes its own individual dessert, perfectly portioned for guilt-free indulgence or elegant dinner party presentation.
Year-Round Comfort: Unlike heavy winter desserts that weigh you down, this crisp feels appropriate whether it's peak apple season or the middle of July. The air fryer doesn't heat up your entire kitchen, making it perfect for those warm evenings when you want comfort food without the sauna effect of traditional baking.
Flavor Amplifier: The rapid air circulation intensifies flavors in a way that slow baking simply can't match. Your apples become more apple-y, your cinnamon more cinnamon-y, and your butter more buttery. It's like someone turned up the volume on every ingredient while keeping everything in perfect balance.
Foolproof Technique: If you've ever struggled with knowing when your crisp is done, you're not alone — and I've got the fix. The air fryer takes the guesswork out of the equation. No more opening the oven door every five minutes, no more wondering if the middle is cooked through. The consistent heat means perfect results every single time.
Weeknight Hero: This recipe transforms humble ingredients into something that tastes like it came from a fancy bistro. Your family will think you spent hours crafting dessert, when really you threw it together during a commercial break. Picture yourself pulling this out of the air fryer, the whole kitchen smelling like autumn and comfort, and watch everyone's faces light up.
Inside the Ingredient List
The Flavor Base
Let's start with the star of the show: apples. But not just any apples will do here. You want varieties that hold their shape under heat while still becoming spoon-tender. Granny Smiths are my go-to because their tartness creates the perfect counterpoint to the sweet topping, and they never turn mealy. Honeycrisp works beautifully too, bringing natural sweetness that means you can use less added sugar. Whatever you choose, go for firm, unbruised fruit — if they feel soft in the store, they'll turn to mush in the air fryer.
The granulated sugar isn't just there for sweetness; it's your secret weapon for drawing out the apples' natural juices and creating that luscious sauce. As it heats, it melts and combines with the fruit's moisture to form a glossy coating that clings to each piece like velvet. Skip it and you'll have dry, sad apples that taste more like healthy snack than dessert.
That squeeze of lemon juice might seem optional, but trust me — it's doing heavy lifting behind the scenes. It brightens all the other flavors, prevents the apples from browning while you prep, and adds a subtle tang that makes the whole dessert taste more complex than the sum of its parts. Fresh lemon juice is worth it here; the bottled stuff tastes like cleaning products and will ruin everything.
The Texture Crew
All-purpose flour forms the backbone of your topping, giving it structure and that perfect crumbly texture. Too much and you've got a dry, pasty mess; too little and everything falls apart. The ratio I've perfected creates those gorgeous clumps that shatter between your teeth while still holding together in the air fryer's aggressive heat.
Rolled oats bring the classic crisp texture we all crave, but they're doing more than just adding crunch. As they toast in the air fryer, they develop this incredible nutty flavor that makes the whole dessert taste more sophisticated. Don't even think about using quick oats — they turn to mush and ruin everything. Old-fashioned rolled oats or nothing.
Brown sugar is where the magic happens. Its molasses content adds depth and caramel notes that white sugar simply can't deliver. When it hits the hot air fryer, it melts and creates these little pockets of toffee-like goodness throughout the topping. Dark brown sugar will give you more intense flavor, light brown is more subtle — both work, so use what you have.
The Unexpected Star
Salt in dessert might seem counterintuitive, but it's the difference between a one-note sweet bomb and a complex, addictive dessert. Just a quarter teaspoon amplifies all the other flavors and prevents the dreaded sugar overload. It's like turning up the contrast on a photo — suddenly everything pops.
The butter is where things get interesting. Cold, cubed butter is the key to that perfect topping texture. As it melts in the air fryer, it creates steam pockets that make everything light and crispy while infusing the whole dessert with rich, buttery flavor. Don't melt it beforehand — cold butter is non-negotiable for the right texture.
The Final Flourish
Cinnamon is the warm hug that ties everything together. But here's what most recipes get wrong: they dump it in without thinking about how heat affects spice. The air fryer's intense heat can make cinnamon taste bitter if you use too much, which is why I've dialed it back to just one teaspoon. It's enough to add warmth without overwhelming the apples.
That cooking spray isn't just to prevent sticking — it's your insurance policy for even browning. A light mist on top of the crisp helps conduct heat across the surface, ensuring every bit of topping gets golden and crispy. Skip it and you'll end up with pale, sad spots that never quite cook through.
The Method — Step by Step
- Start by peeling and dicing your apples into half-inch pieces. This size is crucial — too big and they won't cook through in the air fryer time; too small and they'll turn to applesauce. As you cut, toss them immediately with the lemon juice to prevent browning. The acidulation also helps the apples hold their shape during cooking, so don't skip this step even if you're in a rush. You'll want about four cups of diced apple total, which usually means four medium apples, but trust your eyes more than your counting.
- In a medium bowl, combine the diced apples with the granulated sugar and cinnamon. Use your hands to toss everything together — yes, your hands. You need to feel when the sugar is evenly distributed and the cinnamon is clinging to every surface. The mixture should smell like autumn and look glossy from the sugar starting to draw out the apple juices. Let this sit for five minutes while you prep the topping; this brief rest allows the flavors to meld and the sugar to start dissolving.
- Now for the topping: in a separate bowl, combine the flour, oats, brown sugar, and salt. Whisk everything together with a fork to break up any clumps in the brown sugar and distribute the salt evenly. This step seems fussy but it's the difference between a topping that's uniformly flavored and one where you get a mouthful of salt in one bite and none in the next. The mixture should look like coarse sand and smell faintly of molasses from the brown sugar.
- Add the cold, cubed butter to the dry ingredients. Using your fingertips, rub the butter into the flour mixture using a snapping motion. You're looking for pieces ranging from pea-sized to coarse breadcrumb-sized. This variation in size creates the perfect texture — some bits melt completely to bind everything together, others stay intact for those coveted crispy chunks. Work quickly so the butter doesn't warm up too much; warm butter equals greasy, flat topping.
- Preheat your air fryer to 350°F for three minutes. While it's heating, divide the apple mixture between four six-ounce ramekins, pressing down gently to compact the fruit. You want them about three-quarters full — any more and the topping won't fit; any less and you'll have a sad, shallow dessert. The compacting helps the apples cook evenly and prevents them from shrinking away from the sides.
- Divide the topping mixture evenly among the ramekins, pressing down lightly to create a cohesive layer. Don't pack it too tightly — you want some air pockets so the hot air can circulate and create crispy bits. Lightly mist the tops with cooking spray; this helps with browning and prevents any dry floury spots. The ramekins should look like they're wearing little brown sugar hats.
- Place two ramekins in the air fryer basket, making sure they're not touching the sides or each other. Air flow is crucial here — if they're crowded, nothing will cook properly. Set the timer for 12 minutes, but don't walk away. Around minute 8, you should start smelling the most incredible aroma of toasting oats and caramelizing sugar. The edges should be bubbling and the topping just starting to turn golden.
- After 12 minutes, check the crisps. The topping should be golden brown and the apple mixture should be bubbling up around the edges. If the topping is browning too quickly, tent loosely with a small piece of foil. Continue cooking for another 3-5 minutes until the apples are tender when you insert a knife through a gap in the topping. The total time will depend on your specific air fryer and how tightly you packed the apples.
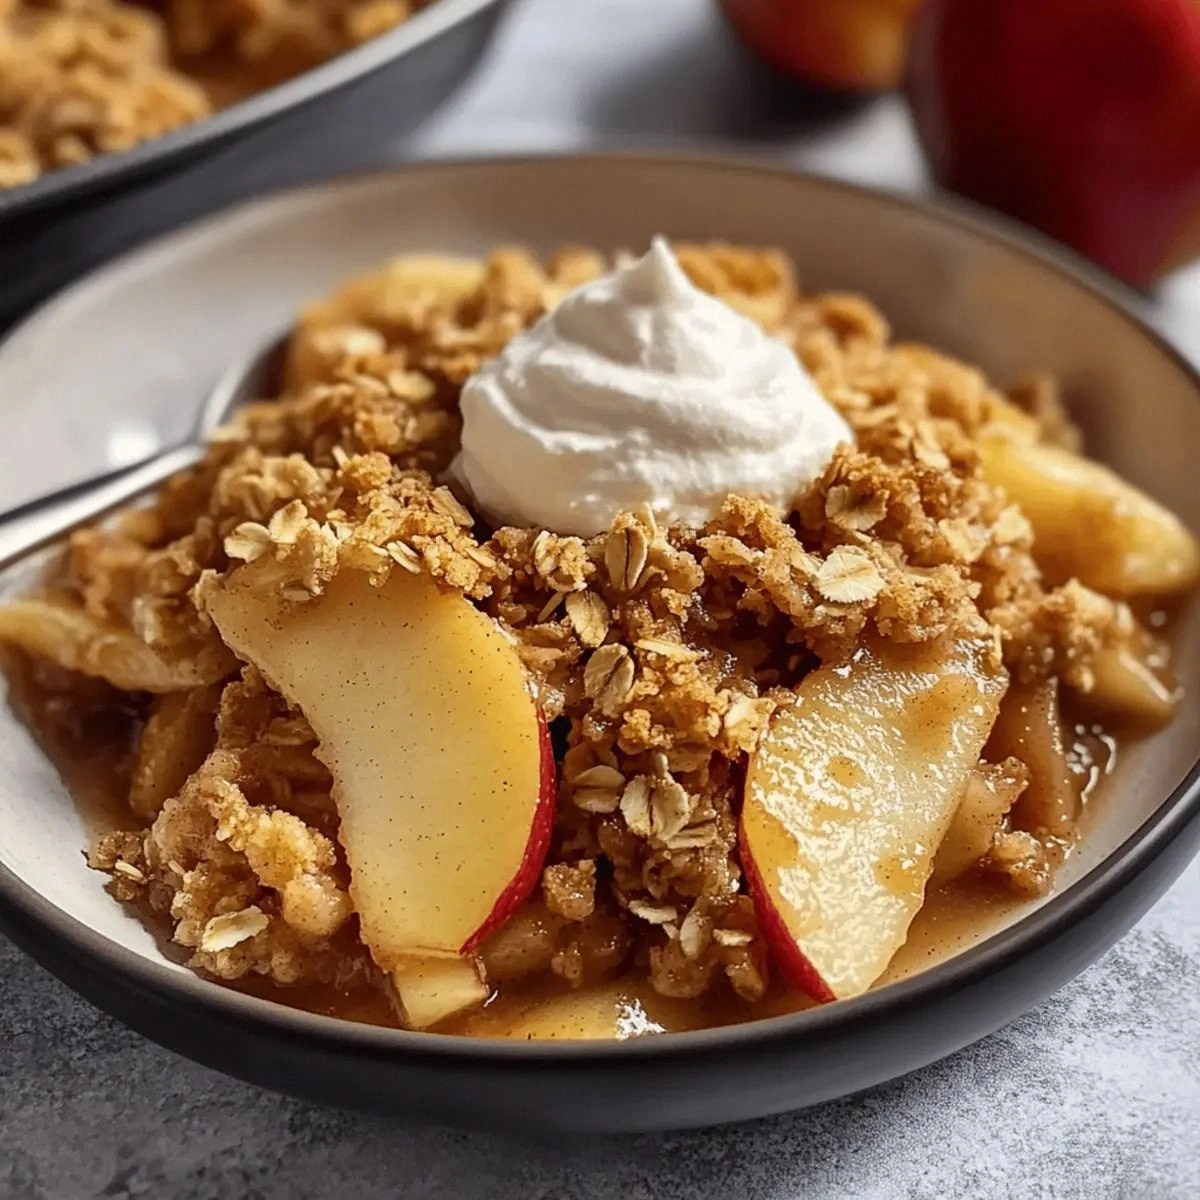
- Remove the ramekins carefully — they'll be hotter than you expect. Let them cool for at least five minutes; this rest allows the filling to thicken slightly and prevents molten apple lava from destroying your taste buds. Serve warm, ideally with a scoop of vanilla ice cream that melts into all the nooks and crannies. The contrast between the hot crisp and cold ice cream is pure dessert nirvana.
- If you're making more than two ramekins, repeat the process with the remaining ones. The second batch might cook slightly faster since your air fryer is already hot, so start checking a minute early. Any leftovers (ha!) can be covered and refrigerated, then reheated in the air fryer for 3-4 minutes at 325°F to restore the crispy topping.
Insider Tricks for Flawless Results
The Temperature Rule Nobody Follows
Here's the thing about air fryers: they lie. Not maliciously, but the temperature you set isn't always what you get. Mine runs 25 degrees hot, which meant my first few attempts had topping that went from golden to garbage in seconds. Get to know your machine by testing with a simple piece of bread — set it for 350°F and see how long it takes to toast. If it burns before three minutes, your air fryer runs hot; if it's still pale after five, it runs cold. Adjust accordingly and you'll never have another crisp fail.
A friend tried skipping this step once — let's just say it didn't end well. She blamed the recipe when really her air fryer was running 30 degrees hot, turning everything she made into charcoal. Don't be like Sarah. Know your machine, love your machine, and it'll reward you with perfect desserts every time.
Why Your Nose Knows Best
That moment when the aroma shifts from raw sugar to caramelizing goodness? That's your cue to pay attention. Your nose is actually a more accurate timer than any clock. When you start smelling that incredible toasty scent, set a timer for three minutes and start checking. This is the difference between a crisp that's perfectly golden and one that's edging toward bitter. Trust your senses — they evolved over millions of years for exactly this purpose.
I used to set a timer and walk away, only to return to topping that tasted like burnt coffee. Now I treat the air fryer like a meditation — I stay present, I smell, I listen (yes, you can hear when the sugars start to caramelize), and I never, ever get distracted by my phone. The dessert deserves your full attention for twenty-five minutes, and you deserve dessert that doesn't taste like disappointment.
The 5-Minute Rest That Changes Everything
Patience isn't just a virtue — it's the secret ingredient that separates good desserts from life-changing ones. When that timer dings, your instinct will be to dive in immediately. Resist. The filling needs those five minutes to thicken and settle, the topping needs time to set, and your mouth needs protection from third-degree burns. Plus, this is the perfect window to grab your ice cream, set the table, and build anticipation.
During this rest, magic happens. The bubbling juices calm down and start to gel slightly, creating that perfect spoon-coating consistency. The topping crisps up even more as steam escapes. And honestly, the anticipation makes everything taste better — it's like the dessert equivalent of letting wine breathe, except instead of decanting, you're just practicing the ancient art of not burning your face off.
The Apple Selection Secret
Not all apples are created equal, and choosing the wrong variety is the fastest way to disappointment. You want apples that strike the perfect balance between sweet and tart, with enough acid to stand up to sugar and enough structure to survive heat. My holy trinity is two Granny Smiths for tartness and structure, one Honeycrisp for sweetness, and one Fuji for complexity. This combination gives you layers of flavor that taste like you planned it, even if you just grabbed what looked good at the store.
Whatever you do, avoid Red Delicious like they're actual poison. They turn to mush, lose all flavor, and somehow manage to taste both bland and bitter simultaneously. It's like they were specifically bred to ruin desserts. If you can only find one type, Granny Smiths are your safest bet — they never let you down.
Creative Twists and Variations
This recipe is a playground. Here are some of my favorite ways to switch things up:
Bourbon Caramel Dream
Replace two tablespoons of the granulated sugar with dark brown sugar, and add a tablespoon of bourbon to the apple mixture. The alcohol cooks off, leaving behind this incredible depth and subtle warmth that makes people ask what your secret is. The bourbon enhances the caramel notes from the brown sugar, creating a dessert that tastes like it came from a fancy whiskey bar rather than your kitchen. Serve with a drizzle of caramel sauce if you're feeling extra.
Salted Maple New England
Swap the granulated sugar for pure maple syrup and add an extra pinch of salt to the topping. The maple brings this gorgeous amber flavor that pairs perfectly with apples, while the extra salt makes everything taste more intense. Use Grade B maple syrup if you can find it — it's got a stronger, more complex flavor that stands up to cooking. Top with maple-walnut ice cream and prepare for people to propose marriage.
Tropical Paradise
Add half a cup of diced fresh pineapple to the apple mixture and replace the cinnamon with a teaspoon of ground ginger. The pineapple adds natural sweetness and a subtle tang that makes the apples taste more apple-y somehow. The ginger brings warmth without the familiarity of cinnamon, creating a dessert that tastes like a tropical vacation. Top with coconut flakes during the last two minutes of cooking for extra island vibes.
Savory-Sweet Rosemary
Add a teaspoon of finely minced fresh rosemary to the topping mixture. I know it sounds weird, but the herbal notes make the apples taste more intensely apple, like how salt makes chocolate taste more chocolatey. The rosemary should be subtle — you're not making potpourri here — just enough to make people wonder what they're tasting. This version pairs beautifully with vanilla bean ice cream.
Cherry Almond Delight
Replace half the apples with pitted cherries and add a quarter teaspoon of almond extract to the fruit mixture. The cherries bring tartness and gorgeous color, while the almond extract makes everything taste like you spent way more time on this than you did. Add sliced almonds to the topping for extra crunch. This version is stunning for dinner parties and tastes like summer in a bowl.
Chocolate Lovers Anonymous
Add two tablespoons of cocoa powder to the topping mixture and sprinkle a tablespoon of mini chocolate chips over each crisp during the last two minutes of cooking. The chocolate gets melty and creates pockets of gooey richness throughout the crisp. Use dark chocolate for sophistication or milk chocolate for pure comfort food vibes. Either way, this is the version that converts chocolate haters to believers.
Storing and Bringing It Back to Life
Fridge Storage
Leftover crisps will keep in the refrigerator for up to four days, though honestly, I've never had them last that long. Cover each ramekin tightly with plastic wrap, pressing it directly against the surface to prevent the topping from absorbing moisture and going soggy. The key is cooling them completely before refrigerating — warm crisps plus cold fridge equals condensation, and condensation is the enemy of crispy topping. If you've made a large batch in a single dish, transfer individual portions to smaller containers to minimize the surface area exposed to air.
Freezer Friendly
These freeze beautifully for up to two months, making them perfect for emergency dessert situations. Let them cool completely, then wrap each ramekin in plastic wrap followed by foil. Label with the date because frozen apple crisps have a way of becoming mysterious ice blocks that you'll rediscover during late-night freezer raids. Thaw overnight in the refrigerator, then reheat according to the instructions below. The topping won't be quite as crisp as fresh, but it'll be about ninety percent as good, which is still better than most desserts.
Best Reheating Method
The air fryer is again your friend here. Reheat at 325°F for 3-4 minutes until warmed through and the topping is crisp again. Add a tiny splash of water before reheating — it steams back to perfection and prevents the edges from drying out. If you're using a microwave (I won't judge), do it in 20-second bursts and accept that the topping will be soft. But honestly, I've eaten these cold straight from the fridge and they're still delicious — the topping softens but the flavors meld together in this incredible way that might actually be better than fresh.