I was standing in my kitchen, staring at a pan that had just turned my favorite chicken breast into a charcoal sculpture, when a friend dared me to “make a Cordon Bleu that actually stays juicy”. I laughed, I muttered, “Good luck,” and then I remembered that the secret to any great dish is not just the ingredients but the mindset you bring to the stove. The smell of burnt butter still lingers in my memory, but it also sparked a fire of determination that led me to the ultimate version of this classic. This isn’t the bland, over‑cooked version you get at a chain restaurant; it’s a love‑letter to the palate, a crunchy‑outside‑silky‑inside masterpiece that makes you wonder why you ever settled for less.
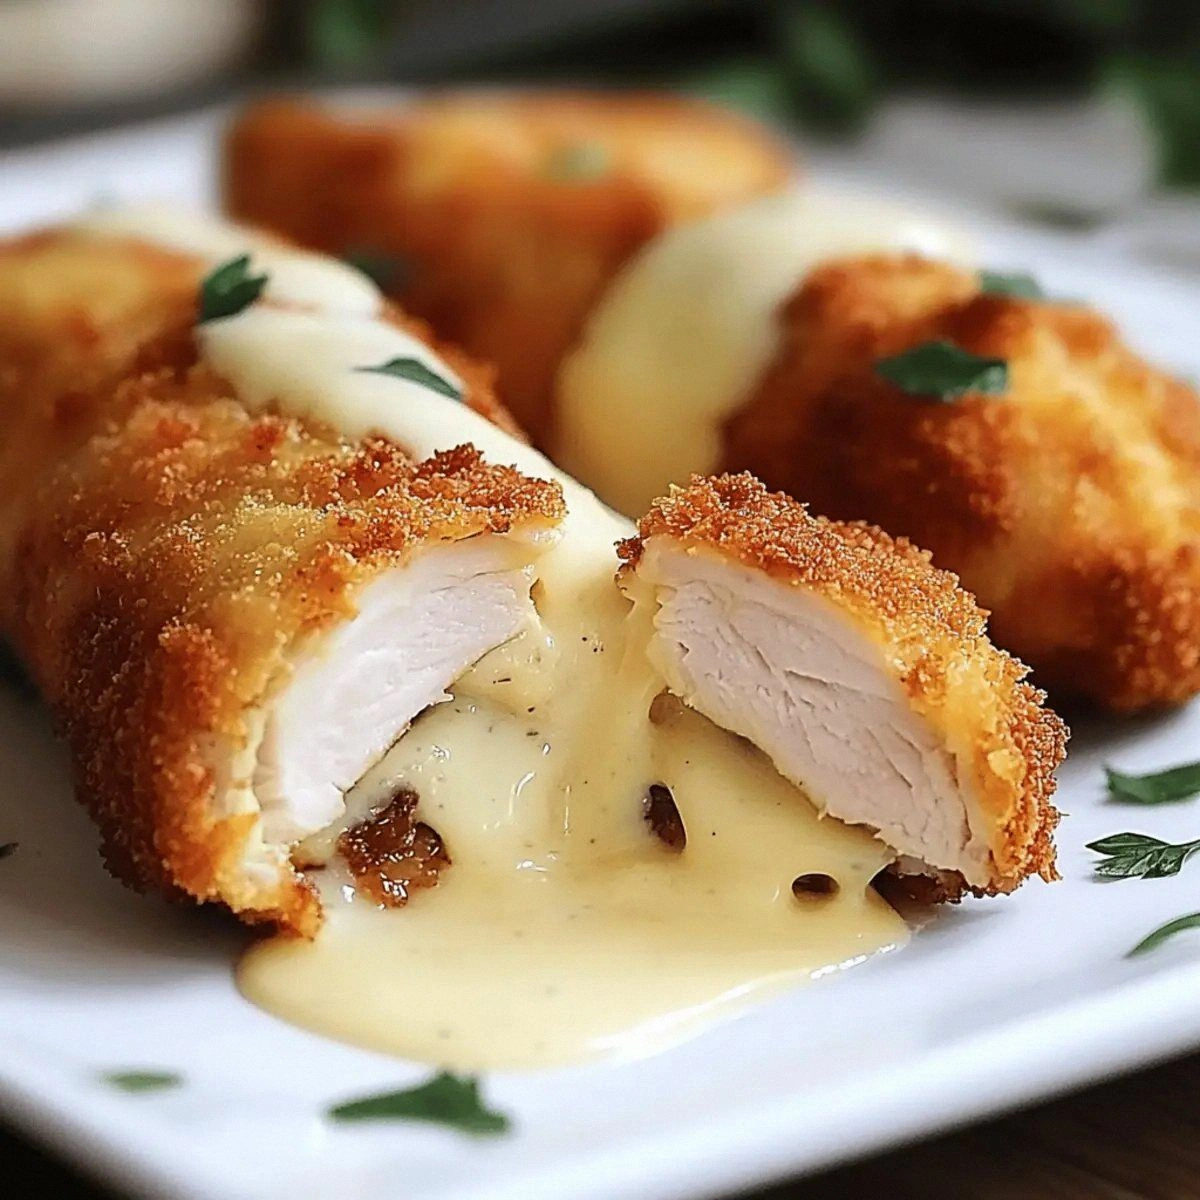
Picture this: a golden‑brown crust that shatters like thin ice when you cut into it, revealing a river of melted Swiss cheese that stretches like molten amber. The turkey slice inside adds a smoky whisper, while the chicken stays so tender it practically sighs under the fork. The sauce—rich, buttery, and studded with that unmistakable Swiss tang—coats every bite like velvet, making the whole plate sing in harmony. The moment the fork pierces the crust, you hear a satisfying crunch, followed by a sigh of relief as the cheese pulls away in glorious ribbons. That sizzle when it hits the pan? Absolute perfection.
Most recipes get this completely wrong. They either over‑bread, under‑season, or forget that the sauce is the star, not an afterthought. I’ve tried a dozen “quick” versions that left me with soggy chicken and a sauce that tasted like watered‑down dairy. Then I discovered the trick of a double‑dip (flour, egg‑milk wash, breadcrumbs) and a pan‑sear before finishing in the oven, which locks in moisture and gives you that coveted crunch. I’ll be honest — I ate half the batch before anyone else got to try it, and that’s a confession worth making because it proves just how addictive this dish can be.
Now, I’m about to hand you the exact roadmap to recreate this kitchen triumph. I dare you to taste this and not go back for seconds. Let me walk you through every single step — by the end, you’ll wonder how you ever made it any other way.
What Makes This Version Stand Out
- Juiciness: The chicken is brined for just ten minutes in a salty bath, guaranteeing moisture that stays locked in during searing.
- Crunch Factor: A double coating of flour and breadcrumbs creates a crust that shatters like thin ice, delivering texture contrast in every bite.
- Flavor Fusion: Turkey adds a subtle smokiness that pairs perfectly with the nutty Swiss, creating a layered taste profile.
- Sauce Mastery: The Swiss cheese sauce is reduced with butter and a splash of milk to a silky finish that clings to the chicken like a lover’s embrace.
- Simplicity: Only twelve ingredients, all pantry‑friendly, yet the result feels restaurant‑grade.
- Make‑Ahead Magic: You can prep the chicken rolls a day ahead, store them chilled, and pop them in the oven when guests arrive.
- Crowd Reaction: Expect gasps, applause, and the inevitable “What’s the secret?” after the first bite.
- Versatility: Swap turkey for ham, or use provolone for a milder melt; the base technique stays rock solid.
Inside the Ingredient List
The Flavor Base
The turkey slices are the unsung heroes of this dish. Their thin, smoky profile adds a depth that pure chicken would never achieve on its own. If you skip them, you’ll miss that subtle umami punch that makes the cheese sing. You can substitute thinly sliced ham, but keep the moisture factor in mind—ham can be saltier, so adjust the added salt accordingly. When shopping, look for turkey that’s freshly sliced, not pre‑packaged, because the latter often carries excess water that dilutes the flavor.
The Texture Crew
Breadcrumbs are the crunch architects. I swear by panko for its airy, light texture, but regular fine breadcrumbs work too if you give them a quick toast in a dry pan first. The flour creates a dry surface that helps the egg wash cling, while the egg‑milk mixture adds richness and helps the breadcrumbs adhere like glue. If you’re gluten‑free, swap the flour for a rice flour blend and use gluten‑free breadcrumbs; the result will still be satisfyingly crisp.
The Unexpected Star
Swiss cheese, with its nutty, slightly sweet flavor, is the melting heart of this dish. Its low moisture content means it melts into a smooth, velvety sauce rather than a watery mess. If you’re feeling adventurous, try Gruyère for a deeper, more complex flavor, or a mild Emmental for a softer melt. The key is to choose a cheese that melts uniformly without separating—this ensures the sauce stays glossy.
The Final Flourish
Butter and milk in the sauce are the dynamic duo that transforms a simple cheese melt into an irresistible glaze. Butter adds richness, while milk thins the sauce just enough to coat the chicken without drowning it. Salt and pepper are your taste‑adjusters; a pinch of nutmeg in the sauce can elevate the flavor profile to a whole new level. Remember, seasoning is an art—taste as you go, and you’ll avoid the dreaded blandness.
Everything's prepped? Good. Let’s get into the real action…

The Method — Step by Step
Start by flattening each chicken breast to an even 1/4‑inch thickness. Place the breast between two sheets of plastic wrap and pound gently with a meat mallet or rolling pin. This not only ensures uniform cooking but also creates a pocket that will hold the turkey and cheese without tearing. Once flattened, season both sides with a pinch of salt and pepper. Power transition: Okay, ready for the game‑changer?
Lay two turkey slices on each chicken piece, overlapping them slightly so they form a continuous layer. Then place a single Swiss cheese slice on top of the turkey. If you like extra melt, add a second half‑slice. Gently roll the chicken around the fillings, tucking the ends under to create a tight cylinder. Secure with toothpicks—this is the moment where the flavors start to marry.
Set up a breading station: three shallow dishes—one with 1 cup of flour, one with a mixture of 2 large eggs beaten with 1/2 cup milk, and the last with 1 cup of breadcrumbs. Dip each rolled chicken first in flour, shaking off excess, then into the egg‑milk wash, and finally coat generously with breadcrumbs. The double‑dip ensures a crunchy crust that won’t slide off during cooking.
Heat a large, oven‑safe skillet over medium‑high heat and add 2 tablespoons of butter. When the butter foams and turns a light golden brown, it’s ready. Place the chicken rolls in the pan, seam side down, and sear for 3‑4 minutes per side until the breadcrumbs turn a deep amber. You’ll hear a satisfying sizzle that signals the crust is forming. Watch Out: If the heat is too high, the breadcrumbs will burn before the chicken cooks through.
Once both sides are beautifully browned, preheat your oven to 375°F (190°C). Transfer the skillet to the oven and bake for 15‑20 minutes, or until the internal temperature of the chicken reaches 165°F (74°C). This finishing step ensures the chicken stays juicy while the cheese fully melts inside. While the chicken bakes, you can start the sauce.
In a separate saucepan, melt 2 tablespoons of butter over medium heat. Add the remaining 1 cup of milk and whisk continuously. Once the mixture simmers, lower the heat and stir in the remaining Swiss cheese (reserve a small amount for garnish). Keep whisking until the sauce is smooth and glossy; it should coat the back of a spoon without clumping. Add a pinch of salt, pepper, and, if you’re feeling daring, a dash of nutmeg for warmth.
Remove the chicken from the oven, let it rest for 5 minutes (this keeps the juices inside), then slice each roll diagonally. Drizzle the Swiss cheese sauce over the slices, sprinkle the reserved cheese garnish, and serve immediately. Picture yourself pulling this out of the oven, the whole kitchen smelling incredible… That moment? Pure magic.
That’s it — you did it. But hold on, I’ve got a few more tricks that'll take this to another level…
Insider Tricks for Flawless Results
The Temperature Rule Nobody Follows
Never start with a cold pan. Let the skillet heat up for at least two minutes before adding butter. This prevents the butter from burning and gives the breadcrumbs an instant sear. I once tried to rush this step and ended up with a greasy, pale crust that never achieved that satisfying crunch. Trust the heat, and the crust will reward you.
Why Your Nose Knows Best
When the chicken is searing, listen for a steady sizzle—not a frantic pop. The sizzle tells you the coating is forming a golden crust. If you hear a high‑pitched crackle, the heat is too high and you’re on the brink of burning. Use your sense of smell; a faint nutty aroma signals the breadcrumbs are caramelizing perfectly.
The 5‑Minute Rest That Changes Everything
After the oven, let the chicken rest uncovered for five minutes. This short pause lets the juices redistribute, preventing them from spilling out when you cut. A friend once sliced immediately and ended up with a puddle of chicken broth on the plate—definitely not the dramatic presentation we’re after.
Butter‑Boosted Sauce
Adding a splash of white wine or a teaspoon of Dijon mustard to the sauce before the cheese melts adds depth without overwhelming the Swiss flavor. It’s a subtle secret that professional chefs use to brighten sauces. Try it once—you’ll notice the sauce has a brighter, more rounded finish.
The Breadcrumb Toast Trick
Toast your breadcrumbs in a dry skillet for two minutes before using them. This extra step gives the crust an extra layer of flavor and a more pronounced crunch. I used to skip this, and the crust felt flat. Now it’s a crisp that shatters like delicate glass.
Creative Twists and Variations
This recipe is a playground. Here are some of my favorite ways to switch things up:
Mediterranean Breeze
Swap turkey for thinly sliced prosciutto and add a thin layer of sun‑dried tomato paste inside the roll. The salty prosciutto pairs beautifully with a drizzle of basil‑infused olive oil on the finished plate, turning the dish into a sun‑kissed Mediterranean delight.
Spicy Jalapeño Kick
Add a few thinly sliced jalapeños between the turkey and cheese, and incorporate a pinch of cayenne into the breadcrumb mix. The heat cuts through the richness, giving you a balanced bite that makes you reach for another slice.
Herb‑Infused Delight
Mix fresh chopped thyme and rosemary into the breadcrumb coating, and finish the sauce with a splash of herb‑infused white wine. The aromatic herbs elevate the dish to a fragrant, sophisticated level that’s perfect for dinner parties.
Cheese Lover’s Dream
Use a blend of Swiss and Gruyère, and fold a thin strip of mozzarella inside the roll for extra stringy pull. The combination creates a multi‑layered cheese experience that’s truly indulgent.
Crispy Bacon Wrap
Wrap each chicken roll with two slices of bacon before breading. The bacon renders fat into the crust, adding smoky crunch and a caramelized finish that will have everyone begging for the secret.
Storing and Bringing It Back to Life
Fridge Storage
Place the cooked rolls in an airtight container and refrigerate for up to three days. Before reheating, let them sit at room temperature for 15 minutes; this prevents a rubbery texture.
Freezer Friendly
Wrap each roll tightly in plastic wrap, then place them in a freezer‑safe bag. They’ll keep for up to two months. When you’re ready to serve, thaw overnight in the fridge and reheat using the oven method for best results.
Best Reheating Method
Preheat the oven to 350°F (175°C), place the rolls on a wire rack over a baking sheet, and sprinkle a tiny splash of milk over the top. Heat for 12‑15 minutes, or until the interior reaches 165°F. The milk creates steam that revives the sauce and restores the crust’s crunch.