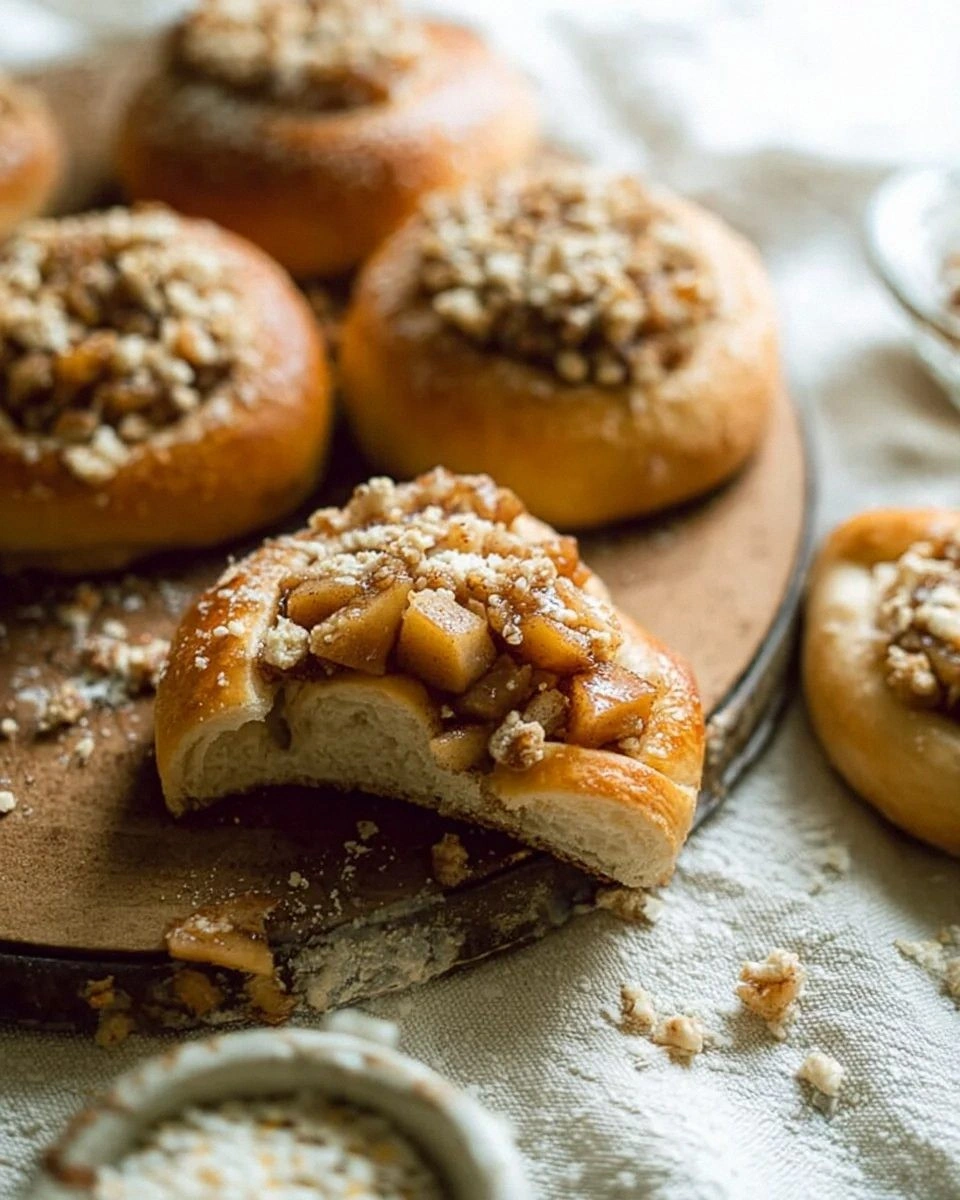
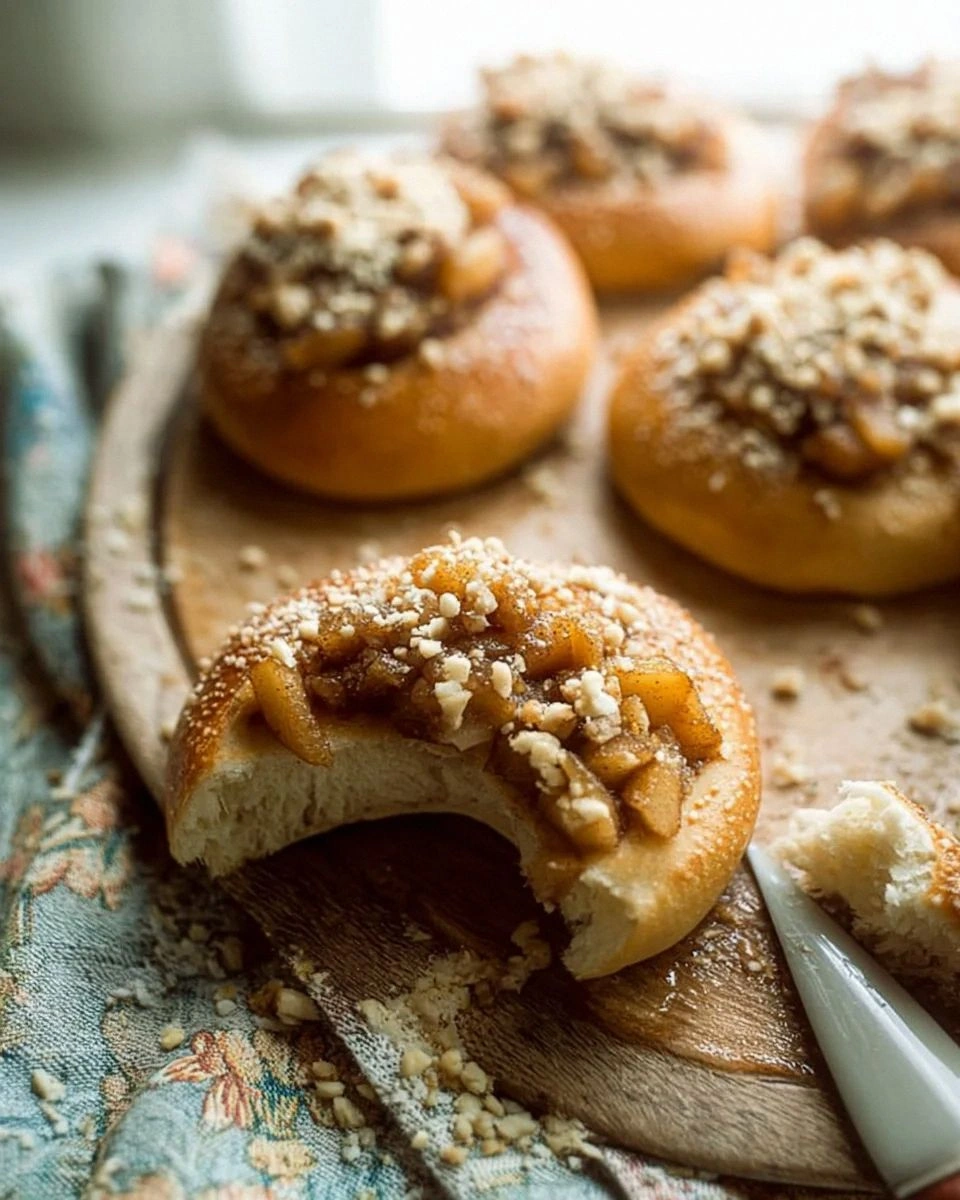
I’ll be honest — I ate half the batch before anyone else got to try it. It all started on a rainy Thursday when my kitchen smelled like a bakery that had just been robbed of its butter. I was halfway through a failed attempt at a vegan cinnamon roll, the dough was a sad, rubbery slab, and my patience was thinner than the crust on a store‑bought croissant. Then a friend dared me: “Make something that looks like a cheesecake but tastes like a bun.” I laughed, I accepted, and I dove headfirst into a culinary experiment that would become the most talked‑about brunch item on my Instagram feed. The result? A soft, buttery brioche that cradles a silky apple‑cheesecake filling, all without a single animal product. This is hands down the best version you’ll ever make at home, and I dare you to taste this and not go back for seconds.
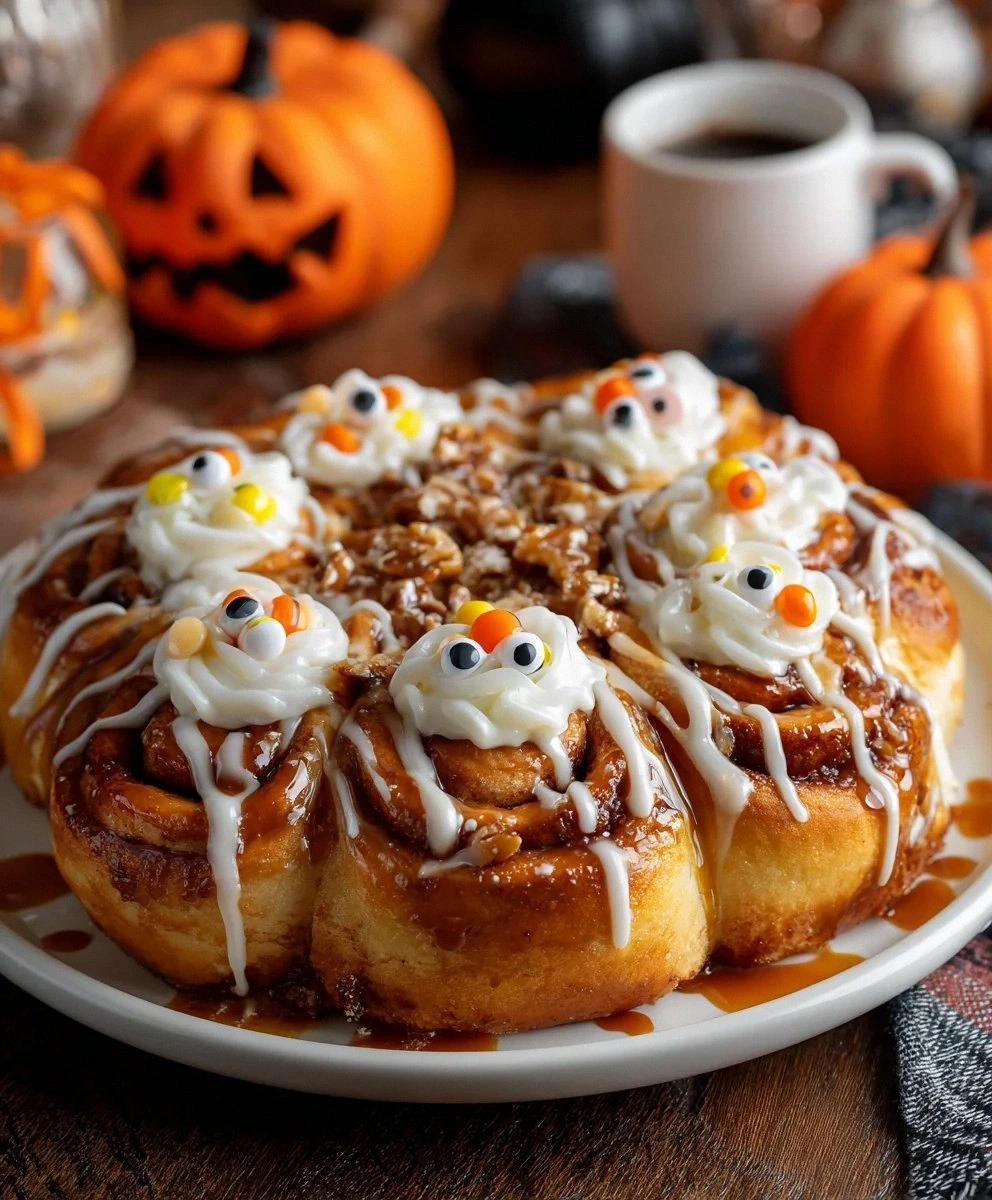
Picture yourself pulling these golden‑brown beauties out of the oven, the whole kitchen smelling like a caramel‑apple orchard meets a French patisserie. The buns glisten with a light glaze, the tops are brushed to a perfect mahogany, and the aroma of toasted butter and sweet apples makes you want to hug the oven door. When you slice one open, the inner cheesecake oozes out like a sunrise over a misty lake, creamy, tangy, and just sweet enough to make you close your eyes in bliss. The texture contrast is pure magic: the outer brioche is pillowy, almost melt‑in‑your‑mouth, while the filling is dense yet airy, a perfect marriage of crumbly crust and smooth custard. Most recipes get this completely wrong, either ending up with a soggy bun or a filling that curdles. Here’s what actually works.
The secret isn’t just in the ingredients, it’s in the technique. I’m talking about a cold‑ferment for the dough, a gentle steam bath for the filling, and a strategic glaze that locks in moisture while giving you that irresistible shine. I also threw in a surprise twist: a splash of almond milk infused with vanilla and a whisper of lemon zest that cuts through the sweetness and brightens the whole experience. This next part? Pure magic. And now the fun part. Let me walk you through every single step — by the end, you’ll wonder how you ever made it any other way.
What Makes This Version Stand Out
- Flavor Explosion: The apple‑cheesecake filling is spiked with a hint of cinnamon and nutmeg, delivering a cozy, autumn‑like warmth that pairs flawlessly with the buttery brioche.
- Texture Symphony: A light, airy crumb on the outside, a tender, slightly chewy interior, and a silky, custard‑like center that holds its shape without leaking.
- Simplicity Meets Sophistication: Despite the gourmet vibe, the ingredient list is pantry‑friendly and the steps are straightforward enough for a weekend baker.
- Unique Twist: A dash of lemon juice in the filling lifts the sweetness, preventing it from becoming cloyingly sugary.
- Crowd‑Pleaser: Whether you’re serving brunch, a tea party, or a dessert table, these buns disappear faster than you can say “vegan”.
- Ingredient Quality: Using high‑quality vegan butter and a good plant‑based cream cheese makes the difference between “good” and “wow”.
- Cooking Method: A gentle rise in the fridge develops flavor, while a quick bake at a high temperature creates that coveted crust.
- Make‑Ahead Potential: You can assemble the buns a day ahead, refrigerate, and bake fresh in the morning for a stress‑free breakfast.
Inside the Ingredient List
The Flavor Base
The backbone of any great brioche is the butter‑sugar‑yeast trio. I use unsalted vegan butter, which melts into the dough like liquid gold, creating those delicate layers that give the bun its signature fluff. If you skip the butter, you’ll end up with a dry, dense crumb that feels more like a biscuit than a brioche. For a dairy‑free alternative, you can swap the butter for coconut oil, but expect a faint coconut flavor that might clash with the apple filling. Choose a butter that’s at least 80% fat for the richest mouthfeel; lower‑fat versions can make the dough too wet and hard to handle.
The Texture Crew
Flour is the structural hero here. I rely on a blend of all‑purpose flour and a touch of bread flour to give the dough enough gluten to rise high without becoming tough. If you’re gluten‑intolerant, a mix of gluten‑free flour and xanthan gum can work, but the texture will be slightly different—think more cake‑like than brioche‑like. The plant‑based milk (almond or oat) adds moisture and a subtle nutty note, while the yeast is the life force that makes the dough rise. Forgetting to proof the yeast properly is a common pitfall; always dissolve it in warm (not hot) liquid and wait for it to become foamy before mixing.
The Unexpected Star
Vegan cream cheese is the secret weapon that turns a regular apple filling into a cheesecake experience. It provides that tangy depth and creamy body you’d expect from dairy cream cheese, but without any animal products. If you can’t find a plain version, a flavored one (like chive) can add an interesting twist, but be mindful of the added herbs that could overwhelm the apple. For a lower‑fat option, blend silken tofu with a splash of lemon juice and a pinch of nutritional yeast; the result is still creamy but with a lighter mouthfeel.
The Final Flourish
A light glaze of maple syrup and melted vegan butter brushed on the buns just before the final bake gives them that irresistible glossy finish and a hint of caramelized sweetness. Skip this step and you’ll end up with a dull, matte bun that looks like it belongs in a grocery store aisle rather than a boutique bakery. For an extra touch of elegance, sprinkle a pinch of flaky sea salt on top of the glaze; the salty‑sweet contrast will make your taste buds dance.
Everything's prepped? Good. Let's get into the real action…
The Method — Step by Step
In a small bowl, combine 1 tsp active dry yeast with ¼ cup warm almond milk (around 105°F). Let it sit for 5‑7 minutes until it becomes foamy. This is the moment of truth: if you don’t see bubbles, your yeast is dead and you’ll end up with a flat bun.
Kitchen Hack: Warm your almond milk in the microwave for 15 seconds, then stir in the yeast; this ensures an even temperature and faster activation.In the bowl of a stand mixer, whisk together 2 cups all‑purpose flour, ½ cup bread flour, 2 tbsp sugar, and ½ tsp salt. Add the melted vegan butter (softened but not liquid) and the yeast mixture, then pour in the remaining ¼ cup almond milk. Mix on low speed for 2 minutes, then increase to medium for 5 minutes until the dough pulls away from the sides and forms a smooth ball.
Transfer the dough to a lightly oiled bowl, cover with plastic wrap, and let it rise at room temperature for 45 minutes, or until doubled in size. Watch Out: If your kitchen is cold, extend the rise time or place the bowl in a turned‑off oven with the light on.
While the dough rises, prepare the cheesecake filling. In a medium saucepan, combine 1 cup vegan cream cheese, ¼ cup maple syrup, 1 tsp vanilla extract, ½ tsp ground cinnamon, ¼ tsp nutmeg, and a pinch of salt. Heat over low‑medium heat, stirring constantly, until the mixture is smooth and just starts to bubble.
Watch Out: Over‑cooking will cause the cream cheese to separate; keep the heat gentle and stop as soon as it becomes glossy.Dice 2 medium apples into small cubes (about ½‑inch). Toss the apples with 1 tbsp lemon juice, 1 tbsp cornstarch, and a pinch of cinnamon. The lemon juice prevents browning and the cornstarch will thicken the juices during baking, ensuring the filling stays creamy.
Fold the apple mixture into the warm cream cheese mixture until evenly distributed. Let the filling cool to room temperature; this prevents the dough from melting when you assemble the buns.
Punch down the risen dough and turn it onto a lightly floured surface. Divide the dough into 8 equal portions (about 120 g each). Flatten each piece into a disc, then place a generous spoonful (≈ 2 tbsp) of the apple‑cheesecake filling in the center. Bring the edges together, pinching to seal, and shape into a smooth bun.
Place the formed buns on a parchment‑lined baking sheet, leaving about 2 inches between each. Cover loosely with a clean kitchen towel and refrigerate for 30 minutes. This cold‑proof step creates a tighter crumb and a shinier crust.
Preheat your oven to 375°F (190°C). Meanwhile, melt 2 tbsp vegan butter with 1 tbsp maple syrup; brush this glaze over the chilled buns. Bake for 20‑25 minutes, or until the tops are a deep golden brown and the buns sound hollow when tapped.
Kitchen Hack: For an extra glossy finish, brush the buns with a second layer of glaze 5 minutes before they’re done, then broil for 30 seconds.Remove the buns from the oven and let them cool on a wire rack for 10 minutes before serving. The filling will set slightly, giving you clean slices that hold their shape. That sizzle when the glaze hits the hot buns? Absolute perfection.
That's it — you did it. But hold on, I've got a few more tricks that'll take this to another level...
Insider Tricks for Flawless Results
The Temperature Rule Nobody Follows
Never underestimate the power of a cool dough. After the first rise, refrigerate the dough for at least 30 minutes before shaping. This step relaxes the gluten, making the dough easier to handle and resulting in a more tender crumb. I once tried to skip this step in a rush, and the buns turned out dense, like a stale biscuit. Trust me, a brief chill is worth the extra 10 minutes.
Why Your Nose Knows Best
When the dough is ready for the second rise, give it a gentle poke. If the indentation springs back slowly, the dough is perfectly proofed. If it snaps back quickly, it’s under‑proofed; give it a few more minutes. Conversely, if the dent stays, you’ve over‑proofed and the buns may collapse. Your nose will also tell you when the glaze is ready: a light caramel aroma means the sugars have reached the perfect stage.
The 5‑Minute Rest That Changes Everything
Once the buns come out of the oven, let them rest for exactly five minutes before slicing. This short pause allows the steam inside to redistribute, preventing the filling from oozing out too quickly. A friend tried cutting them immediately and ended up with a mess of cheesecake spilling onto the counter. Five minutes is all it takes to lock in that luscious interior.
Glaze Timing Trick
Apply the glaze while the buns are still warm but not hot. If the buns are scorching, the glaze will melt away; if they’re too cool, it won’t adhere properly. The sweet spot is about 5 minutes after removing from the oven. This ensures a glossy finish that stays put even after a day in the fridge.
Steam Power
If you want an even softer crumb, place a shallow pan of water on the lower rack of the oven while baking. The steam creates a slightly humid environment, which delays crust formation just enough to let the interior expand fully. Be careful not to open the oven door too often, or you’ll lose that steam and the buns may turn out crusty instead of tender.
Creative Twists and Variations
This recipe is a playground. Here are some of my favorite ways to switch things up:
Berry‑Burst Brioche
Swap the apple for a mix of fresh blueberries and raspberries, and add a tablespoon of orange zest to the filling. The berries burst during baking, creating pockets of juicy surprise that contrast beautifully with the buttery bun.
Chocolate Hazelnut Dream
Fold in ¼ cup chopped toasted hazelnuts and 2 tbsp cocoa powder into the cream cheese mixture. Top each bun with a drizzle of vegan chocolate ganache after baking for a decadent, dessert‑first experience.
Spiced Pumpkin Delight
Replace the apples with canned pumpkin puree (½ cup) and add pumpkin pie spice (¼ tsp each of cinnamon, ginger, cloves, and nutmeg). This variation shines in the fall and pairs wonderfully with a dollop of coconut whipped cream.
Savory Herb Infusion
Omit the maple syrup and add 1 tbsp chopped fresh rosemary to the dough. Fill with a mixture of vegan cream cheese, caramelized onions, and a splash of balsamic reduction for a brunch‑worthy savory bite.
Citrus Zest Surprise
Add 1 tbsp orange zest to the filling and finish the buns with a light dusting of powdered sugar mixed with a pinch of lemon zest. The citrus lifts the sweetness and gives the buns a bright, spring‑time feel.
Storing and Bringing It Back to Life
Fridge Storage
Place the cooled buns in an airtight container and store them in the refrigerator for up to 4 days. The glaze may firm up slightly, but a quick microwave (10‑15 seconds) or a brief reheat in a 300°F oven for 5 minutes will revive the softness.
Freezer Friendly
Wrap each bun individually in parchment paper, then seal them in a freezer‑safe zip‑top bag. They’ll keep for up to 2 months. When ready to eat, thaw overnight in the fridge, then warm them in a 350°F oven for 8‑10 minutes. Adding a tiny splash of water to the pan before reheating creates steam that restores the interior’s moisture.
Best Reheating Method
For the ultimate texture, use a steam oven or a conventional oven with a pan of water on the lower rack. Heat the buns at 325°F for 8 minutes, and finish with a 2‑minute broil to re‑glaze the tops. This method brings back the original shine and keeps the filling luxuriously creamy.