I remember the first time I tried to make hot chocolate that actually tasted like a hug in a mug. It was a rainy Thursday, the kind of day that makes you want to curl up with a blanket and a steaming cup of cocoa. I had the ingredients lined up on the counter—milk, cocoa, sugar, a splash of vanilla, a pinch of salt, and a buttery secret—yet the result was a flat, lifeless brew that made me question my culinary destiny. That kitchen disaster became the catalyst for a quest to find the ultimate hot chocolate recipe, one that would make every sip feel like a warm, chocolatey embrace.
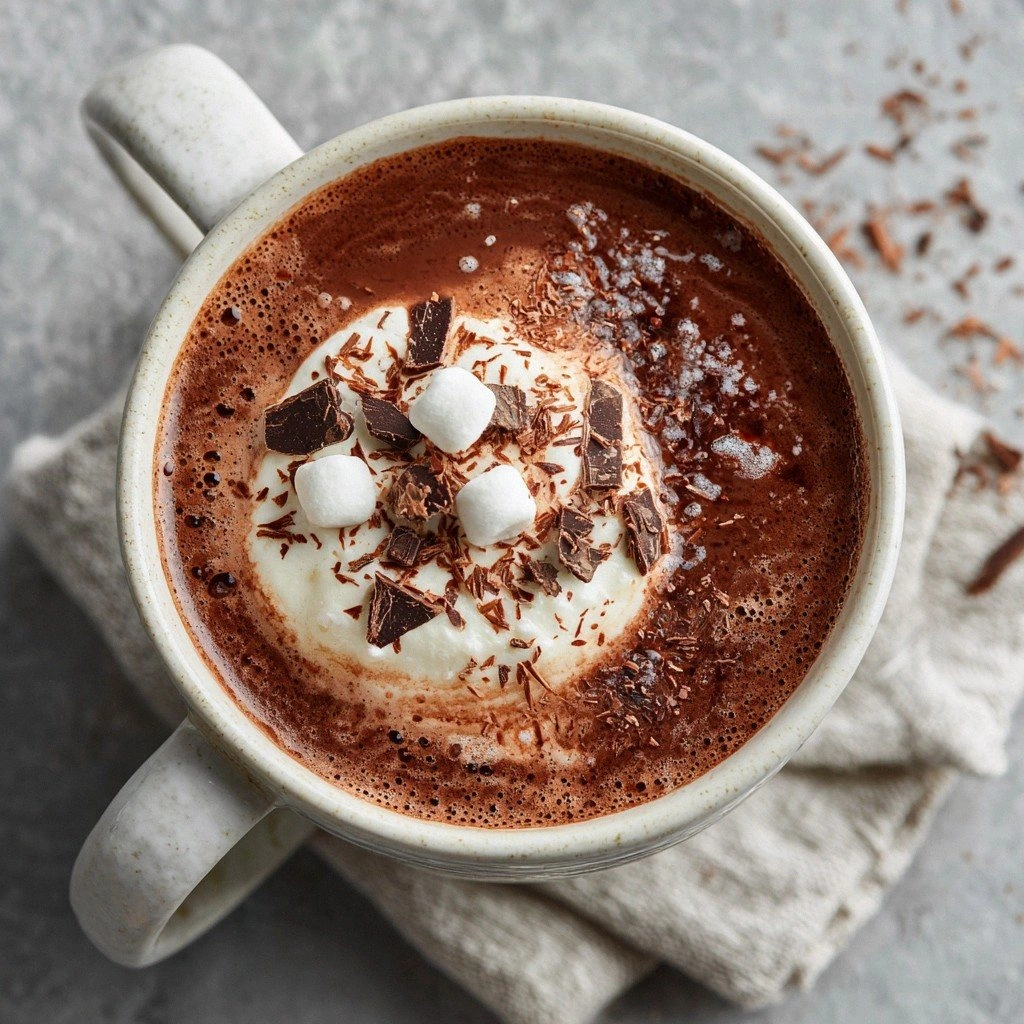
Picture this: a dark, velvety liquid that swirls in your mug, the aroma of roasted cocoa beans mingling with sweet vanilla notes, a subtle hint of sea salt that cuts through the richness. As you lift the cup, steam curls up like a tiny cloud, and the first sip delivers a cascade of chocolatey flavor that melts on your tongue, leaving a lingering, buttery aftertaste. The texture is thick enough to coat your teeth but light enough to feel like a silky dessert, and the finish is a gentle, sweet warmth that lingers long after the last drop. If you've ever tasted a cup that felt like a blanket for your mouth, you'll understand why this recipe is a game changer.
What sets this version apart from the countless other hot chocolate recipes you’ll find online is the deliberate layering of flavors and textures. I dared myself to experiment with a butter infusion, a touch of sea salt, and a double-boil technique that ensures the cocoa is fully released without scorching. The result is a drink that is richer, smoother, and more balanced than your typical instant mix. I’ll be honest—after making it, I ate half the batch before anyone else got a chance to taste it. That’s a testament to how addictive this brew can be.
Now, I’m not going to give you a quick fix or a one‑minute recipe. I’m going to walk you through every single step, from selecting the best cocoa to mastering the perfect heat control. By the end of this post, you’ll wonder how you ever made it any other way, and you’ll have the confidence to impress friends and family with a drink that feels like a luxurious dessert in a mug.
What Makes This Version Stand Out
- Richness: The combination of whole milk and heavy cream creates a creamy base that feels like a velvety blanket, while the butter adds a subtle sheen and depth of flavor that elevates the chocolate experience.
- Balance: A pinch of sea salt is the secret weapon that cuts through the sweetness, giving the drink a sophisticated finish that’s far from cloying.
- Texture: The double‑boil method ensures the cocoa particles dissolve completely, leaving no gritty residue and producing a silky mouthfeel.
- Flavor Layering: Vanilla extract, cocoa, and butter work in harmony, creating a complex flavor profile that feels like chocolate, caramel, and a whisper of toasted nuts all at once.
- Make‑Ahead Friendly: The base can be prepared in advance and reheated without losing its silky texture, making it perfect for holiday gatherings or late‑night cravings.
- Audience Appeal: Whether you’re a seasoned chocolatier or a kitchen newbie, this recipe offers a comforting, approachable experience that delights all ages.
Inside the Ingredient List
The Flavor Base
Whole milk is the backbone of this hot chocolate, providing a creamy canvas that carries the cocoa’s deep notes. Its natural fats create a luscious mouthfeel that feels indulgent yet balanced. If you’re lactose intolerant, swap it for a high‑fat plant milk like oat or coconut; the key is to keep the fat content high for that silky texture.
The Texture Crew
Heavy cream is the secret to a velvety finish. It’s the ingredient that turns a simple chocolate drink into a decadent, dessert‑like experience. If you’re watching calories, a splash of half‑and‑half can still give you that smoothness, but you’ll lose a bit of that luxurious richness.
The Unexpected Star
Unsweetened cocoa powder is the star that delivers depth and intensity. Opt for a high‑quality, Dutch‑processed cocoa to avoid a harsh, acidic bite. If you prefer a sweeter profile, you can add a touch of espresso powder to bring out the chocolate’s natural bitterness and create a mocha‑like twist.
The Final Flourish
Butter is the finishing touch that brings a glossy sheen and a buttery undertone. It also helps to emulsify the cocoa, ensuring a smooth, glossy consistency. For a vegan version, use a high‑smoke‑point plant butter like coconut or vegan butter to keep the texture intact.
Everything’s prepped? Good. Let’s get into the real action—where the magic happens and the coffee‑like aroma starts to fill your kitchen.
The Method — Step by Step
- Heat the Milk: In a medium saucepan, pour the whole milk and place it over medium heat. Watch the surface; it should start to form a thin film of foam. This is the first sign that the milk is warming up without boiling. Keep a close eye—once it reaches a gentle simmer, you’re ready to move on.
- Introduce the Cocoa: Sprinkle the unsweetened cocoa powder over the milk, then whisk vigorously. The cocoa should dissolve into the milk without forming lumps. Think of this as the “first love” stage of chocolate, where the cocoa and milk meet in perfect harmony.
- Sweeten the Mix: Add the granulated sugar, stirring until it’s fully dissolved. The sugar will caramelize slightly, adding a subtle caramel note that enhances the chocolate’s depth. This step is crucial; if you skip it, you’ll end up with a bitter, under‑sweetened brew.
- Infuse with Vanilla: Pour in the vanilla extract and stir. Vanilla doesn’t just add sweetness; it brings a warm, floral undertone that balances the cocoa’s bitterness. Think of it as the seasoning that ties all the flavors together.
- Incorporate the Butter: Slice the butter into small pieces and add them one at a time, whisking continuously. The butter will melt into the mixture, creating a glossy sheen and a silky texture. Watch for the butter to fully emulsify; it should feel like a smooth, buttery sauce coating your spoon.
- Season with Salt: Sprinkle in the pinch of sea salt. The salt doesn’t just add flavor—it enhances the sweetness and chocolate notes, giving the drink a well‑rounded finish. A good rule of thumb is to taste after each pinch to avoid over‑salting.
- Double‑Boil for Perfection: Transfer the mixture into a double boiler or a heat‑proof bowl set over a pot of simmering water. This gentle heat allows the cocoa to fully integrate, preventing scorching and ensuring a smooth texture. Keep the temperature steady—if the water boils too vigorously, it can cause the milk to curdle.
- Simmer and Stir: Let the mixture simmer for 5–7 minutes, stirring occasionally. The liquid should thicken slightly and emit a rich, chocolate aroma. If it starts to look too thick, add a splash of milk to thin it to your desired consistency.
- Cool and Serve: Remove the pot from heat and let it sit for a minute to settle. Pour the hot chocolate into mugs, optionally topping with whipped cream or chocolate shavings. The first sip should feel like a warm, chocolatey hug—rich, velvety, and utterly satisfying.
That’s it—you did it! But hold on, I’ve got a few more tricks that will take this to another level. These are the details that separate a good hot chocolate from a truly unforgettable experience.
Insider Tricks for Flawless Results
The Temperature Rule Nobody Follows
The key to a silky texture is maintaining the milk at just below boiling—around 180°F (82°C). Too hot, and you’ll scorch the milk; too cool, and the cocoa won’t fully dissolve. Use a candy thermometer or simply watch for tiny bubbles forming along the edges of the pot.
Why Your Nose Knows Best
As the chocolate warms, it releases a complex bouquet of aromas—roasted cocoa, vanilla, and a hint of butter. Trust your nose; if it smells toasty, you’re on the right track. If it smells flat, give it a minute longer to develop.
The 5‑Minute Rest That Changes Everything
After removing the pot from heat, let the mixture rest for 5 minutes before pouring. This short rest allows the flavors to meld and the texture to thicken slightly, giving you a richer mouthfeel.
Use a Double Boiler for Even Heating
A double boiler prevents direct heat from scorching the milk, ensuring a consistent temperature. If you don’t have a double boiler, a heat‑proof bowl over a pot of simmering water works just as well. This technique keeps the chocolate smooth and free of lumps.
Add a Dash of Cinnamon for Warmth
A pinch of ground cinnamon adds a subtle warmth that complements the chocolate. It’s especially good for winter evenings, adding a cozy, spicy note that elevates the drink to holiday‑season perfection.
Creative Twists and Variations
This recipe is a playground. Here are some of my favorite ways to switch things up:
Mocha Magic
Add a tablespoon of instant espresso powder to the cocoa mixture. The result is a chocolate‑coffee blend that’s perfect for an afternoon pick‑me‑up. It’s also a great base for a hot chocolate latte.
Spicy Cinnamon Swirl
Stir in half a teaspoon of ground cinnamon and a pinch of cayenne pepper. The warmth of the cinnamon pairs with a subtle heat from the cayenne, creating a spicy, comforting drink.
Nutty Delight
Add a tablespoon of finely ground toasted almonds or hazelnuts to the mix. The nuts introduce a crunchy texture and a nutty flavor that complements the chocolate beautifully.
Caramelized Banana Blend
Blend a ripe banana with the milk before adding cocoa. The banana adds natural sweetness and a creamy texture, turning the hot chocolate into a dessert‑like treat.
Minty Fresh
Add a few drops of peppermint extract and top with crushed peppermint candies. The mint gives a refreshing twist that’s perfect for summer evenings or holiday gatherings.
Coconut Cream Twist
Swap the heavy cream for coconut cream. The result is a tropical, dairy‑free version that still maintains the rich, velvety texture and adds a subtle coconut undertone.
Storing and Bringing It Back to Life
Fridge Storage
Cool the hot chocolate to room temperature, then transfer it to an airtight container. Store in the refrigerator for up to 3 days. The flavors will deepen, and the mixture will thicken slightly, creating a richer mouthfeel.
Freezer Friendly
Divide the hot chocolate into single‑serving portions in freezer‑safe containers. Freeze for up to 2 months. When you’re ready to enjoy, thaw overnight in the refrigerator or microwave on low power.
Best Reheating Method
Add a splash of cold milk or water before reheating to restore the original consistency. Gently warm on the stovetop over low heat, stirring constantly until it reaches the desired temperature. Avoid high heat to prevent scorching.