I was halfway through a marathon Netflix binge when my roommate strutted into the kitchen, eyes wide, clutching a bag of sea‑salted caramel popcorn and shouting, “You have to try this!” I laughed, grabbed a spoon, and took a bite—only to realize my taste buds had been robbed of the perfect balance of sweet, salty, and buttery bliss. That moment sparked a reckless, midnight experiment that ended with a kitchen coated in glossy caramel and a batch of tiny chocolate cups that could make even the toughest dessert critic weep with joy. I dared myself to create a no‑bake version that would rival any bakery’s glossy, over‑the‑top caramel cups, and after a few frantic tastings (and a few secret nibblings), I finally nailed the formula.
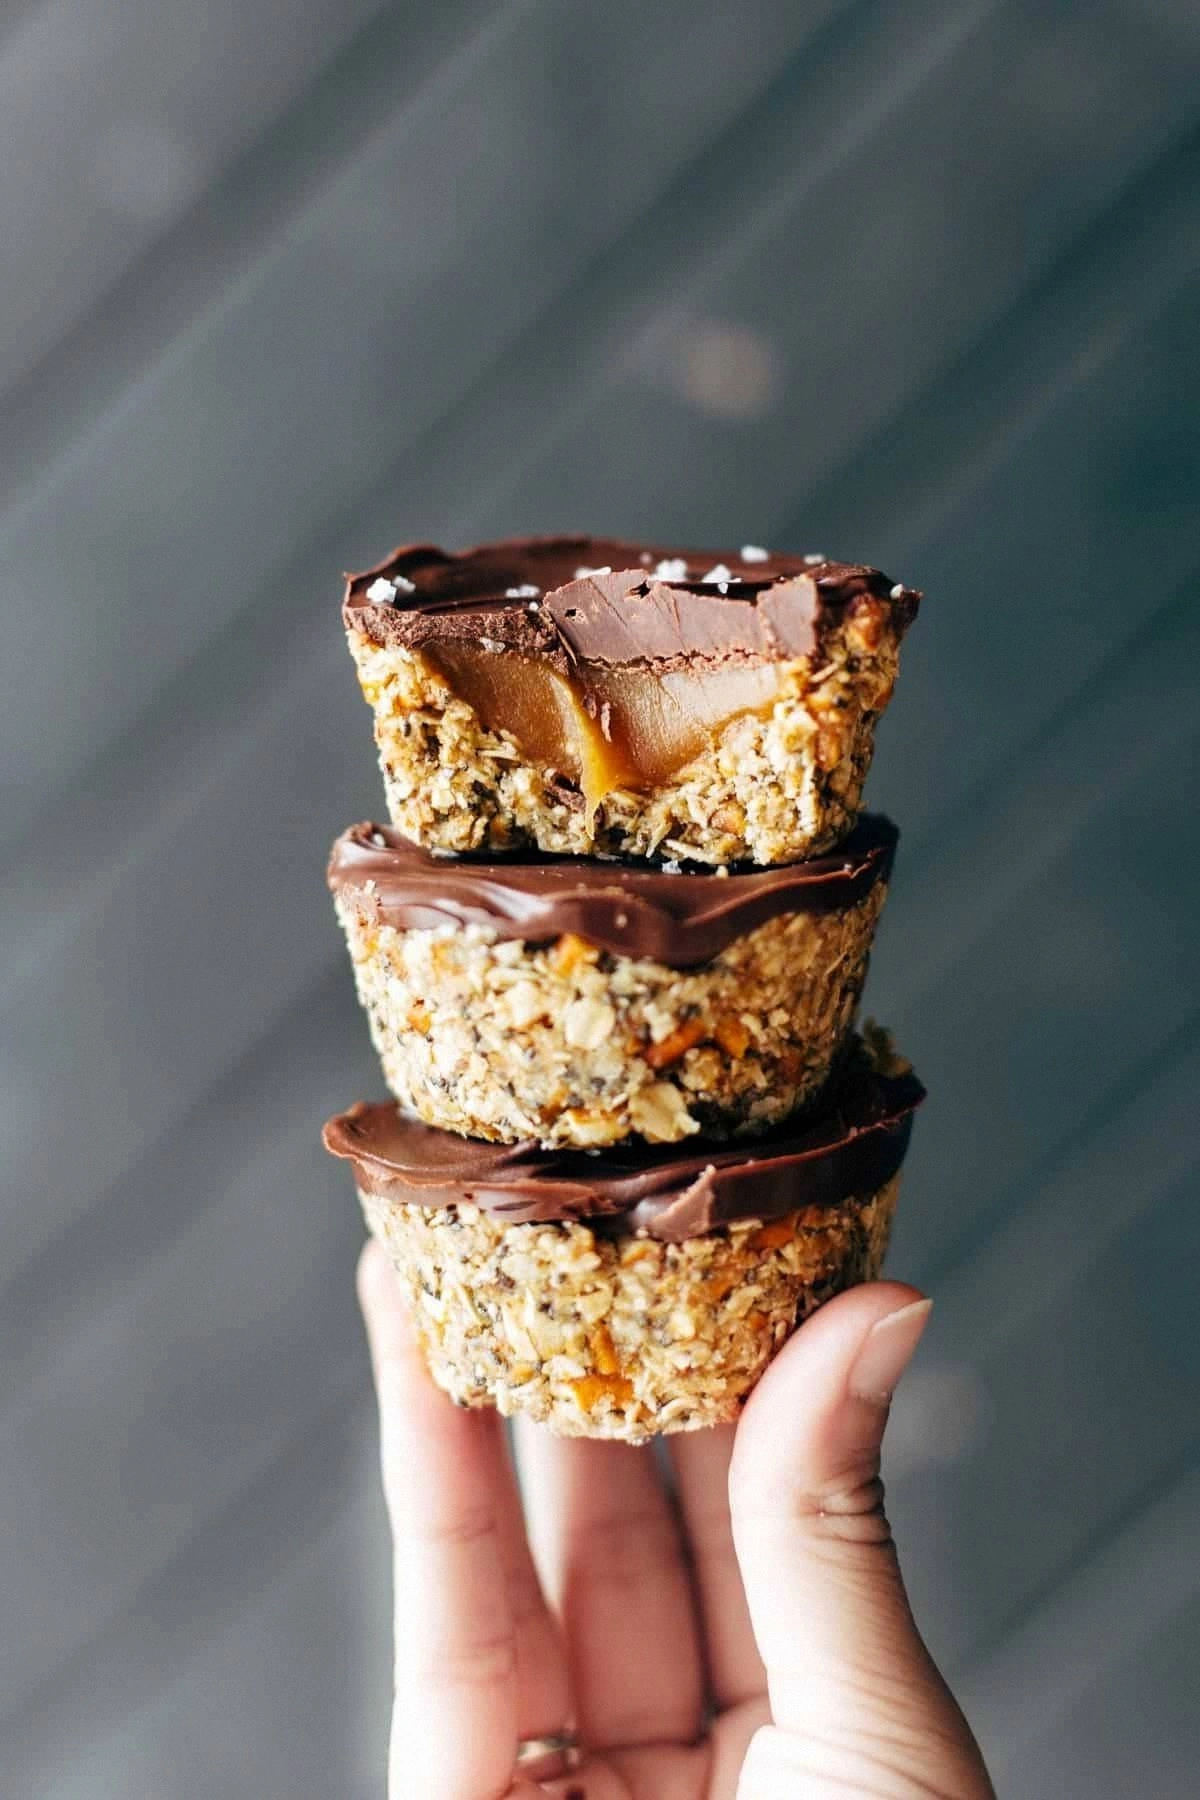
Picture this: a glossy, dark chocolate shell that cracks just enough to reveal a molten salted caramel core, its aroma wafting through the house like a warm hug on a chilly evening. The first bite delivers a silky, buttery caramel that slides across your tongue, punctuated by a whisper of sea salt that makes the sweetness sing rather than scream. You can hear the gentle “pop” of the chocolate giving way, feel the cool, smooth interior against the warmth of your mouth, and taste the delicate dance of flavors that feels both nostalgic and brand‑new. It’s the kind of dessert that makes you stare at the empty plate, wondering how something so simple can feel so indulgent.
Most recipes out there either overcomplicate the caramel, turning it into a burnt mess, or they rely on a stovetop that leaves you staring at a bubbling pot, praying you don’t scorch the sugar. I’ve been there—watching the caramel turn from amber to charcoal in seconds, feeling the panic rise like a soufflé. This version, however, sidesteps the drama entirely with a no‑bake approach that uses just the right amount of heat to coax the sugar into a golden, glossy river without ever flirting with bitterness. The secret? A splash of light corn syrup that keeps the caramel buttery smooth, and a careful temperature dance that lets the chocolate set perfectly without a furnace.
And now, I’m ready to spill the beans (and the caramel) with you. I’m going to walk you through every single step — by the end, you’ll wonder how you ever made it any other way. Okay, ready for the game‑changer?
What Makes This Version Stand Out
- Flavor Harmony: The caramel’s buttery depth meets a precise pinch of sea salt, creating a sweet‑salty duet that sings without overwhelming.
- Texture Contrast: A crisp, glossy chocolate shell gives way to a luxuriously smooth, melt‑in‑your‑mouth caramel center that feels like velvet.
- Zero‑Bake Simplicity: No oven, no stovetop drama—just a saucepan, a whisk, and a few minutes of focused love.
- Ingredient Quality: Using high‑quality dark chocolate and real sea salt elevates the humble cup into a gourmet experience.
- Crowd‑Pleaser Factor: Guests can’t help but stare, sniff, and dive in, often demanding seconds before the host even offers.
- Make‑Ahead Magic: These cups keep for days, and the flavors actually improve as the caramel settles.
- Portion Control: Miniature sizes satisfy cravings without the guilt of a giant dessert.
- Customizable Canvas: Swap chocolate types, add spices, or drizzle extra toppings—your imagination is the limit.
Inside the Ingredient List
The Flavor Base
First up, the caramel. We’re using packed brown sugar because its molasses‑rich depth creates that classic caramel flavor without needing any artificial flavorings. If you skip the sugar, you’ll end up with a bland syrup that lacks that deep, caramelized aroma that makes you close your eyes and sigh. For a twist, you can substitute dark brown sugar for a richer, slightly bitter note that pairs beautifully with dark chocolate.
Heavy cream is the secret sauce that turns the sugar into a velvety custard. The fat content coats each sugar molecule, preventing crystallization and ensuring a smooth finish. Skipping the cream or using low‑fat milk will result in a grainy texture that feels like sand in your mouth. When possible, choose cream that’s at least 35% fat for the best mouthfeel.
The Texture Crew
Our chocolate shell relies on dark chocolate chips (at least 60% cacao). The higher cocoa content gives a slight bitterness that balances the sweet caramel, while the cocoa butter ensures a glossy snap. If you opt for milk chocolate, expect a softer shell that may melt faster—great for a summer treat, but not for that perfect bite‑through contrast.
Unsalted butter is added both to the chocolate and the caramel. In the chocolate, it thins the mixture just enough to coat the silicone molds evenly, while in the caramel, it adds richness and a creamy mouthfeel. Using salted butter would throw off the delicate salt balance we’re aiming for, so keep it unsalted.
The Unexpected Star
Light corn syrup might sound like a gimmick, but it’s the unsung hero that prevents the caramel from crystallizing. Its glucose molecules interfere with sugar crystal formation, keeping the caramel fluid and glossy. If you don’t have corn syrup on hand, a drizzle of honey works in a pinch, though the flavor will be subtly different.
And then there’s the sea salt. A teaspoon of fine sea salt dissolved into the caramel lifts the sweetness and adds a briny pop that makes the palate reset after each bite. A sprinkle of flaky sea salt on top just before the chocolate sets adds a delightful crunch and visual sparkle.
The Final Flourish
We finish with vanilla extract, a mere teaspoon, to round out the flavor profile with a warm, aromatic undertone. The silicone cupcake liners (or mini molds) are essential because they let you pop the cups out without breaking the delicate shells. If you don’t have silicone, line a muffin tin with parchment paper and press the chocolate mixture into the paper cups, but the release won’t be as clean.
Everything's prepped? Good. Let's get into the real action...
The Method — Step by Step
Gather all your ingredients and set out a heat‑proof bowl, a small saucepan, a whisk, and your silicone liners. This may sound like a prep‑heavy step, but trust me, having everything within arm’s reach prevents panic when the caramel starts to bubble. Give the chocolate chips a quick flick through a sieve to break up any clumps; this ensures an even melt. Once your workspace looks like a culinary command center, you’re ready to move forward.
Start the caramel by combining the brown sugar, corn syrup, and a pinch of sea salt in the saucepan over medium‑low heat. Stir constantly with a silicone spatula; you’ll hear a faint sizzle as the sugar begins to dissolve. When the mixture turns a deep amber and starts to emit a buttery perfume, it’s time to add the butter in small cubes, letting each piece melt before adding the next. That moment when the butter disappears and the mixture becomes a glossy river? Pure magic.
Watch Out: If the caramel starts to smoke, immediately remove it from heat and whisk vigorously; the smoke indicates it’s nearing a burnt stage, which will ruin the flavor.Once the butter has fully incorporated, pour in the heavy cream while whisking continuously. The mixture will bubble fiercely—don’t be alarmed, this is the caramel tightening up. Keep whisking until the sauce thickens slightly and coats the back of a spoon; this usually takes about 2‑3 minutes. Then, stir in the vanilla extract and the remaining teaspoon of sea salt, tasting to ensure the balance is just right. If the caramel feels too thick, a splash more cream will loosen it without compromising flavor.
While the caramel rests for a few minutes, melt the dark chocolate chips and 2 tbsp of unsalted butter together in a double boiler. Keep the heat low and stir constantly; you’ll notice the mixture turning from a grainy mess into a silky, glossy sheen. Once fully melted, remove from heat and let it cool for a minute—this prevents the chocolate from scorching the caramel when you combine them later.
Now, the assembly begins. Spoon a thin layer of melted chocolate into each silicone liner, using the back of a spoon to spread it up the sides, creating a “cup” shape. The chocolate should be glossy and thick enough to hold its shape once set. Tap the tray gently on the counter to smooth out any air bubbles; you’ll hear a faint pop as they escape. This step is crucial because any air pockets will become visible cracks once the chocolate hardens.
Kitchen Hack: If your chocolate sets too quickly, gently re‑warm the bowl over a simmering pot of water for 10 seconds; this restores fluidity without melting the chocolate completely.After the chocolate layer has firmed up slightly (about 2‑3 minutes at room temperature), spoon a generous dollop of the warm caramel into the center of each cup. The caramel should be pourable but thick enough to hold its shape; if it’s too runny, let it cool a few more minutes. Sprinkle a pinch of flaky sea salt on top of each caramel mound—this adds a tiny crunch and a burst of briny flavor that cuts through the sweetness.
Finally, seal each cup with a second layer of melted chocolate, covering the caramel completely. Use a small offset spatula or the back of a spoon to smooth the top, ensuring there are no exposed caramel edges. The double‑layer technique creates a protective shell that keeps the caramel from leaking and gives you that satisfying snap when you bite in.
Place the assembled cups in the refrigerator for at least 30 minutes, or until the chocolate is fully set. Patience is key—rushing this step results in a softer shell that can crack under pressure. When the chocolate is firm, gently pop each cup out of its silicone liner by pressing the bottom; they should release with a graceful “pop.”
Arrange the finished cups on a serving platter, drizzle a thin ribbon of melted chocolate over the tops for a glossy finish, and—if you’re feeling extra fancy—add a tiny sprinkle of crushed toasted almonds for texture. Serve immediately or store as instructed below. I dare you to taste this and not go back for seconds; the combination of salty caramel and dark chocolate is practically addictive.
Watch Out: When drizzling the final chocolate, work quickly; the chocolate can set too fast, leading to uneven ribbons.
That's it — you did it. But hold on, I've got a few more tricks that'll take this to another level...
Insider Tricks for Flawless Results
The Temperature Rule Nobody Follows
Never let caramel exceed 240°F (115°C) before adding the cream. Going higher causes the sugar to break down into bitter compounds, ruining the delicate balance. I once let it creep to 260°F, and the result tasted like burnt toast—no one wants that. Use an instant‑read candy thermometer and pull the pan off the heat the moment you see the caramel reach the right temperature. This tiny precision step makes the difference between “good” and “mind‑blowing.”
Why Your Nose Knows Best
While the chocolate is melting, trust the scent as your guide. A faint nutty aroma signals that the cocoa butter is fully emulsified; if you smell a sharp, burnt odor, you’ve over‑heated it. I’ve saved countless batches by stopping the melt the instant the chocolate smells like a freshly opened bar of premium dark chocolate. Your nose is a more reliable thermometer than any gadget when it comes to chocolate.
The 5‑Minute Rest That Changes Everything
After you’ve mixed the caramel, let it sit for exactly five minutes before adding the cream. This pause allows the sugar crystals to settle, preventing a gritty texture later on. Skipping this rest is a common mistake that leads to a grainy caramel that feels like sandpaper on the palate. Set a timer, sip a coffee, and come back ready to whisk in the cream for a silky finish.
Seal the Deal with a Double Chocolate Coat
The secret to a crack‑proof cup is the second chocolate layer. It not only locks in the caramel but also adds structural integrity, so the cups hold up when you transport them to a party. If you only use a single layer, the cups can flex and crack under pressure. Double‑coating is the pro’s trick for a flawless, glossy exterior that looks bakery‑ready.
Cool‑Down Hack for Perfect Release
After refrigeration, give the silicone molds a quick 10‑second dip in warm water (not hot!) before attempting to pop the cups out. The brief warmth loosens the chocolate’s grip without melting it, resulting in a clean release every time. I’ve seen beginners wrestle with stubborn cups that snap the chocolate—this quick dip eliminates that drama.
Creative Twists and Variations
This recipe is a playground. Here are some of my favorite ways to switch things up:
Espresso‑Infused Caramel
Replace 1 tbsp of corn syrup with 1 tbsp of strong espresso. The coffee notes deepen the caramel, creating a mocha‑like experience that pairs beautifully with dark chocolate. Coffee lovers will swear by this version, and it’s perfect for brunch‑time indulgence.
Spicy Chili Kick
Add a pinch of cayenne pepper to the caramel mixture before stirring in the cream. The subtle heat awakens the palate and makes the sweet‑salty combo feel unexpectedly bold. Serve these at a dinner party for a surprise “wow” factor that gets people talking.
White Chocolate Dream
Swap the dark chocolate for high‑quality white chocolate and add a teaspoon of lemon zest to the caramel. The citrus brightens the buttery caramel, while the white chocolate adds a creamy, melt‑in‑your‑mouth texture. This version feels like a summer dessert, perfect for picnics.
Nutty Crunch
Fold finely chopped toasted hazelnuts or pistachios into the caramel before filling the cups. The nuts add an unexpected crunch that contrasts with the silky caramel, and their buttery flavor amplifies the overall richness. Garnish with a few extra nuts on top for visual appeal.
Berry‑Burst Surprise
Stir in a tablespoon of raspberry or strawberry jam into the caramel for a fruity twist. The tartness of the berries cuts through the sweetness, creating a balanced bite that feels fresh and sophisticated. Pair with a dollop of whipped cream for an elegant dessert.
Vegan Friendly
Replace the heavy cream with full‑fat coconut milk and use dairy‑free dark chocolate. The coconut adds a subtle tropical note, while the dairy‑free chocolate keeps the texture decadently smooth. This version proves you don’t need dairy to achieve indulgent perfection.
Storing and Bringing It Back to Life
Fridge Storage
Place the cups in an airtight container and refrigerate for up to five days. The chocolate stays firm, and the caramel continues to mellow, developing even richer flavors. If the cups look a little dry on the surface, give them a quick brush of melted chocolate before serving.
Freezer Friendly
These beauties freeze wonderfully. Wrap each cup individually in parchment paper, then seal the whole batch in a zip‑top freezer bag. They’ll keep for up to two months. When you’re ready to enjoy them, transfer to the fridge for an hour, then let them sit at room temperature for 10 minutes before serving.
Best Reheating Method
To revive the caramel’s luscious flow, place the cup on a microwave‑safe plate, add a tiny splash (about 1 tsp) of water around the edges, and microwave on low for 10‑15 seconds. The water creates steam, gently warming the caramel without melting the chocolate shell. This trick brings the caramel back to a perfect, spoon‑able consistency.