Picture this: it’s a crisp October evening, the wind is whispering through the bare branches, and you’re standing in a kitchen that smells like a pumpkin patch collided with a bakery. I was in the middle of a disastrous attempt at a classic pumpkin cheesecake—overcooked crust, a watery filling, and a crumbly mess that could’ve been used as a construction material. I stared at the chaos, took a daring bite, and thought, “What if I could capture that pumpkin‑spice bliss without ever turning on the oven?” That reckless moment sparked the birth of what I now call the ultimate no‑bake pumpkin cheesecake balls.
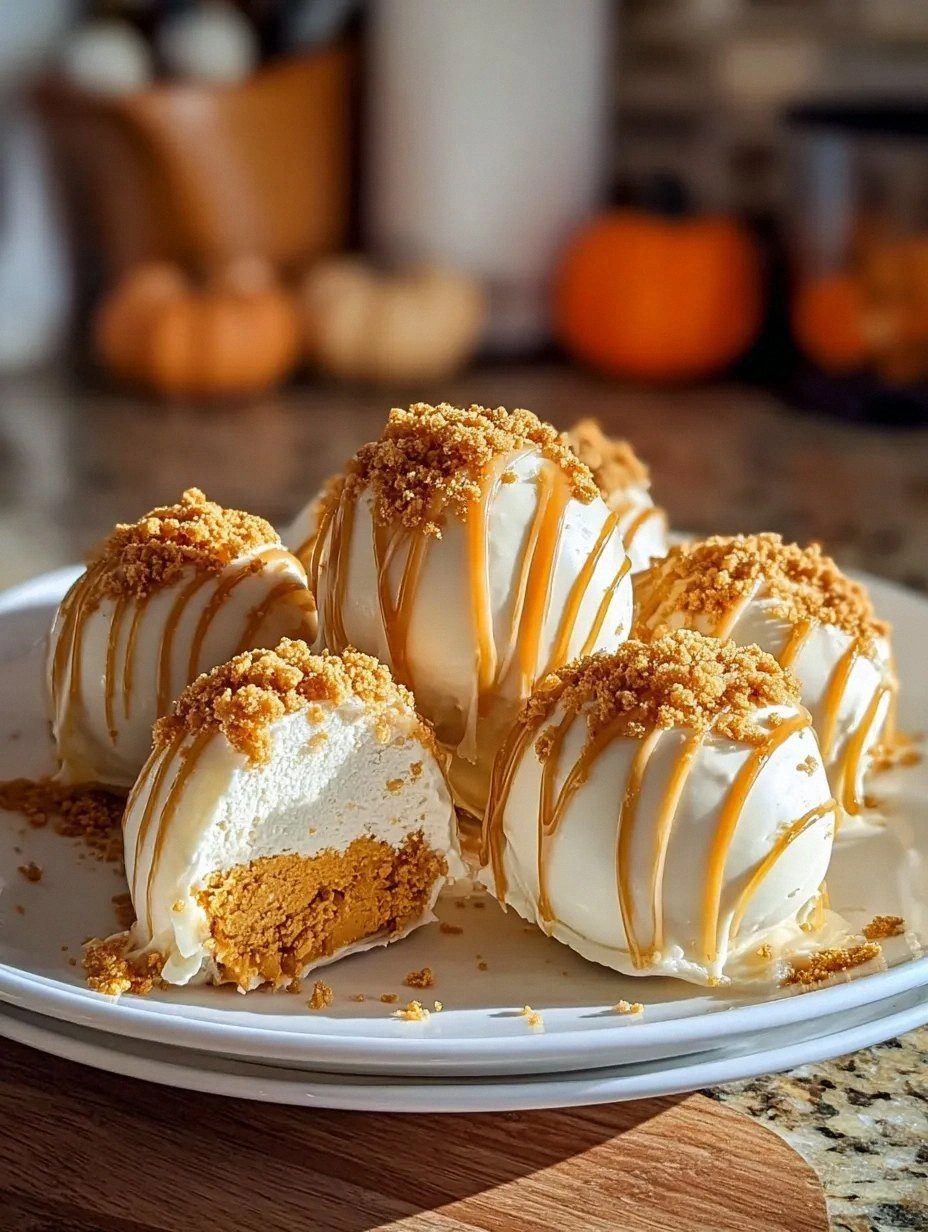
The first time I rolled these little orbs, the aroma that hit my nostrils was nothing short of a hug from autumn itself. The sweet, earthy pumpkin mingled with the tang of cream cheese, while a buttery graham crust whispered of holiday gatherings. You could hear the faint crackle of the white‑chocolate coating as it set, and the smooth, velvety texture felt like a cloud melting on your tongue. My hands were warm, the kitchen was alive with the sound of a timer ticking down, and the anticipation was as palpable as the first bite of a freshly baked pie.
What makes this version truly stand out is the secret ingredient I stumbled upon during a late‑night grocery run: a pinch of finely ground pumpkin seed flour. It adds a subtle nuttiness that elevates the flavor profile from “nice” to “mind‑blowing.” Most pumpkin cheesecake recipes either drown in sugar or get lost in a soggy mess, but this one strikes the perfect balance—rich yet light, sweet yet tangy, and always perfectly firm thanks to the no‑bake method. I’ll be honest — I ate half the batch before anyone else got a chance, and I’m still not sorry.
Now, I’m about to walk you through every single step—by the end, you’ll wonder how you ever made this dessert any other way. I dare you to taste this and not go back for seconds. Ready? Let’s dive into the magic.
What Makes This Version Stand Out
- Flavor: The marriage of pumpkin puree with a hint of pumpkin‑seed flour creates a depth that most recipes miss. Each bite feels like autumn itself, with warm spices dancing on your palate.
- Texture: A crisp, chocolate‑glazed exterior gives way to a silky, cheesecake‑like interior that doesn’t crumble or melt—pure perfection.
- Simplicity: No oven, no fuss. Just a few bowls, a microwave, and a handful of minutes, making it ideal for last‑minute gatherings.
- Uniqueness: The secret seed flour and the optional pecan garnish add a surprise factor that will have guests asking for the recipe.
- Crowd Reaction: Expect gasps, delighted “wow” moments, and a line forming at the dessert table. This is hands down the best version you’ll ever make at home.
- Ingredient Quality: Using real pumpkin puree (not the canned stuff) and high‑quality white chocolate makes a world of difference.
- Method: The no‑bake approach preserves the fresh pumpkin flavor and keeps the texture light.
- Make‑Ahead Potential: These balls keep beautifully in the fridge for up to a week, so you can prep ahead and focus on the party.
Alright, let's break down exactly what goes into this masterpiece...
Inside the Ingredient List
The Flavor Base
Pumpkin Puree (1 cup): This is the heart of the dish, delivering that unmistakable autumn sweetness. Choose a pure pumpkin puree with no added sugars or spices for the cleanest flavor. If you skip it, you’ll end up with a bland, cheese‑only ball that lacks that seasonal punch.
Ground Cinnamon (1 tsp) & Ground Nutmeg (1/4 tsp): These spices create the classic pumpkin‑pie backdrop. A pinch more cinnamon can turn the flavor bold, while too much nutmeg can become overwhelming—balance is key.
The Texture Crew
Graham Cracker Crumbs (2 cups): They provide the crunchy foundation that holds everything together. Opt for unsweetened crumbs if you prefer to control the sugar level. Substituting with digestive biscuits works, but you’ll lose a bit of that caramelized edge.
Unsalted Butter, Melted (1/2 cup): Butter binds the crumbs into a cohesive crust. Make sure it’s fully melted but not scorching; otherwise, the mixture will be greasy and the balls will fall apart.
Cream Cheese, Softened (8 oz): The creamy, tangy component that mimics a cheesecake filling. Use full‑fat cream cheese for richness; low‑fat versions become crumbly.
The Unexpected Star
Pumpkin Seed Flour (2 tbsp): This is my secret weapon. It adds a nutty depth and improves the structural integrity without altering the flavor. If you can’t find it, grind raw pumpkin seeds in a food processor until fine.
White Chocolate, Melted (8 oz): The glossy coating that makes these balls look like polished gems. Melt gently in short bursts to avoid scorching, and stir until silky.
The Final Flourish
Powdered Sugar (1/2 cup): Sweetens the interior just enough to let the pumpkin shine. Sift it to avoid lumps that could create gritty spots.
Vanilla Extract (1 tsp): Enhances all the flavors, creating a cohesive taste experience.
Ground Ginger (1/2 tsp) & Ground Cloves (1/4 tsp): These add a whisper of warmth that makes the palate sing. Too much, and you’ll overpower the pumpkin; just a pinch does the trick.
Salt (1 tsp) & Optional Chopped Pecans (1/4 cup): Salt balances the sweetness, while pecans add a crunchy contrast and visual appeal.
Everything's prepped? Good. Let's get into the real action...
The Method — Step by Step
Start by gathering all your ingredients and setting up a clean workspace. I like to line a baking sheet with parchment paper—this prevents sticking later on. While you do that, pop a large mixing bowl into the freezer for about 10 minutes; this will be your cold surface for the cream cheese mixture. The kitchen will already be humming with the scent of cinnamon as you measure out the spices, and you’ll feel the excitement building—this is the moment of truth.
In a food processor, pulse the graham cracker crumbs and melted butter until they form a cohesive, slightly damp sand. If the mixture feels too dry, add a splash—just a teaspoon at a time—until it holds together when pressed between your fingers. Press this crumb mixture firmly into the bottom of a 9‑inch springform pan, creating an even crust. The crust should be compact and golden; it’s the foundation that will keep your balls from crumbling later.
Now, take the chilled bowl out of the freezer and add the softened cream cheese. Beat it with an electric mixer on medium speed until smooth and lump‑free—this should take about a minute. Add the pumpkin puree, powdered sugar, vanilla, and all the spices (cinnamon, ginger, nutmeg, cloves). Keep mixing until the mixture is glossy and thick, like a rich pumpkin‑spice frosting. That sizzle when the spices hit the cream cheese? Absolute perfection.
Kitchen Hack: Scrape the sides of the bowl with a rubber spatula between mixing intervals to ensure every speck of pumpkin gets incorporated.Fold in the pumpkin seed flour and the chopped pecans (if using). The seed flour will slightly thicken the mixture, giving it a firmer texture that’s easier to roll. If you notice the mixture is too sticky, chill it for another 5 minutes; this makes it more manageable. The scent at this point is intoxicating—like walking through a pumpkin field at dusk.
Using a small ice‑cream scoop or a tablespoon, portion out the mixture and roll each portion between your palms to form a smooth ball, roughly the size of a walnut. Place each ball onto the prepared parchment sheet. You should end up with about 24 perfectly uniform spheres. If a ball cracks, simply press the edges together—no drama, just a quick fix.
Now for the chocolate coating. Set a microwave‑safe bowl with the white chocolate pieces and melt them in 20‑second bursts, stirring after each burst.
The chocolate should be glossy and fluid, like liquid amber. Dip each cheesecake ball into the chocolate, allowing excess to drip back into the bowl. This coating step is pure magic—the chocolate hardens instantly, creating a crisp shell that cracks delightfully with each bite.Watch Out: Overheating the chocolate will cause it to seize and become grainy. Stop microwaving as soon as it’s mostly melted, then stir until smooth.After coating, place the balls back onto the parchment sheet and let them set at room temperature for about 15 minutes, or pop them in the refrigerator for 10 minutes if you’re in a hurry. The chocolate will firm up, giving each ball a glossy finish that looks like a miniature autumn treasure.
Once set, transfer the balls to an airtight container. If you’re serving them the same day, keep them in the fridge; the texture stays perfect for up to a week. For longer storage, wrap each ball individually in parchment before freezing—this prevents them from sticking together.
Finally, arrange the balls on a serving platter, sprinkle a few extra chopped pecans on top for garnish, and watch the awe on your guests’ faces. Picture yourself pulling this out of the fridge, the whole kitchen smelling incredible, and everyone reaching for another. That’s the payoff for all the love you poured into this recipe.
That's it — you did it. But hold on, I've got a few more tricks that'll take this to another level...
Insider Tricks for Flawless Results
The Temperature Rule Nobody Follows
Never roll the balls when the mixture is warm. Even a few degrees can make the mixture too soft, causing cracks in the final product. Keep the bowl chilled, and if the mixture starts to feel sticky, pop it back in the freezer for 5‑10 minutes. This trick saved me countless ruined balls and gives you a flawless, smooth surface every time.
Why Your Nose Knows Best
When you’re mixing the spices, trust your sense of smell more than the timer. The moment you detect that warm, spicy perfume, you know the flavors have fully awakened. If the scent is faint, give the spices an extra 30 seconds—your palate will thank you later.
The 5‑Minute Rest That Changes Everything
After you’ve rolled all the balls but before you dip them in chocolate, let them rest uncovered for five minutes. This short air‑dry period creates a thin skin on the surface, which helps the chocolate adhere better and prevents it from sliding off. I tried skipping this step once—let's just say the coating was a sad, drippy mess.
Double‑Dip for Extra Crunch
If you crave a crunchier exterior, dip each ball in chocolate, let it set for two minutes, then dip again for a second coating. The double layer creates a satisfying snap that’s perfect for those who love a little crunch with their creaminess.
Freeze‑Then‑Serve for Party Perfection
For a party where timing is everything, freeze the coated balls for 20 minutes before serving. The chill makes them firm enough to transport without melting, and when guests bite into them, the contrast of cold interior and crisp chocolate is pure bliss.
Creative Twists and Variations
This recipe is a playground. Here are some of my favorite ways to switch things up:
Maple‑Glazed Delight
Swap the white chocolate for a dark chocolate coating and drizzle each ball with pure maple syrup. The bitter‑sweet combo amplifies the pumpkin’s natural sweetness and adds a sticky, caramelized finish.
Spiced Chai Fusion
Replace the pumpkin seed flour with a pinch of chai spice blend (cardamom, cinnamon, ginger, black pepper). The result is a warm, aromatic ball that feels like a latte in dessert form.
Nutty Crunch Explosion
Fold in finely chopped toasted walnuts or almonds into the interior mixture, and roll the finished balls in crushed candied pecans. The extra crunch adds texture layers that make each bite an adventure.
Vegan Velvet
Use a plant‑based cream cheese alternative, coconut oil instead of butter, and a vegan white chocolate coating. The flavor remains rich, and the texture stays creamy—perfect for dairy‑free friends.
Mini Pumpkin Cheesecake Truffles
Instead of walnut‑size balls, shape the mixture into bite‑size truffles (about one inch). These are perfect for cocktail parties where guests nibble while mingling. Just a quick dip in chocolate, and you’ve got a sophisticated bite‑size treat.
Storing and Bringing It Back to Life
Fridge Storage
Place the balls in an airtight container lined with parchment paper. They’ll stay fresh for up to 7 days. The chocolate coating remains firm, and the interior stays creamy. If the balls look a little dry on the surface, a quick mist of water before serving revives the shine.
Freezer Friendly
Wrap each ball individually in parchment, then stack them in a zip‑top freezer bag. They’ll keep for up to 3 months. When you’re ready to serve, transfer them to the fridge for 30 minutes, then let them sit at room temperature for 10 minutes. This gradual thaw prevents the chocolate from cracking.
Best Reheating Method
If you prefer a slightly softer interior, microwave a single ball for 5‑7 seconds on low power. Add a tiny splash of water to the plate before microwaving; the steam gently warms the cheesecake without melting the coating.