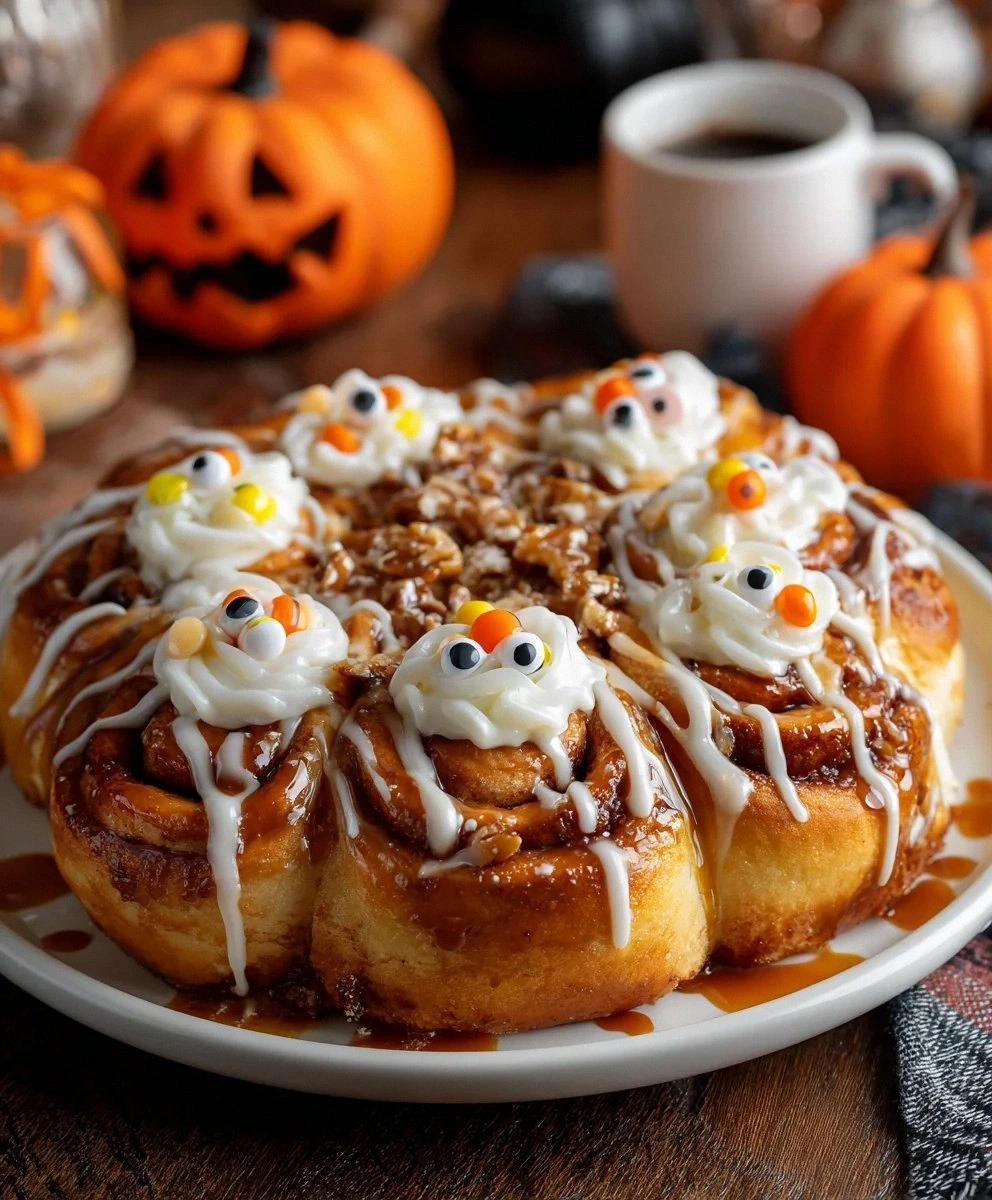
I still remember the Halloween when my kitchen looked like a crime scene — orange frosting splattered across the cabinets, candy eyes rolling underfoot, and the smoke alarm blaring because I got distracted trying to pipe spider webs on cinnamon rolls that were definitely more "trick" than "treat." My friends were due to arrive in an hour for our annual spooky brunch, and there I stood, apron askew, holding a tray of what looked like sad, deflated pumpkins. Fast forward through a frantic grocery store run, a desperate phone call to my grandmother, and a whole lot of improvisation, and I somehow stumbled upon the recipe that changed everything. These Halloween cinnamon rolls aren't just another seasonal gimmick — they're the perfect marriage of pillowy-soft dough, gooey cinnamon-sugar swirls, and frosting that glows like a jack-o'-lantern without tasting like food coloring. The secret? We'll get to that in a moment, but first, let me set the scene for what might become your new favorite October tradition.
Picture this: It's a crisp Saturday morning in late October, the kind where golden light streams through your kitchen window and the air smells like possibility and decomposing leaves. You're still in your pajamas because it's the weekend and you've earned the right to be a little lazy, but there's something magical brewing in your oven. The aroma that wafts through your house doesn't just smell like cinnamon and sugar — it smells like childhood memories of trick-or-treating, like the excitement of dumping out your candy haul on the living room carpet, like the moment you realized your mom had been sneaking your least favorite candies when you weren't looking. These cinnamon rolls capture all of that nostalgia and wrap it up in a sticky-sweet package that's somehow even better than you remember. The dough puffs up like little ghosts, the filling creates these incredible caramelized edges that crunch slightly when you bite into them, and the cream cheese frosting — oh, the frosting — it's tinted the most perfect shade of Halloween orange without any artificial aftertaste.
But here's what really sets these apart from every other Halloween recipe cluttering your Pinterest feed right now: they're actually foolproof. I'm talking about the kind of recipe that makes you look like a culinary genius even if your usual baking repertoire consists of slice-and-bake cookies and toast. We're using refrigerated dough as our base, but we're treating it with such respect and adding so many layers of flavor that nobody — and I mean nobody — will be able to tell you didn't slave over these for hours. The heavy cream pour-over technique that I'm about to share with you is pure sorcery, creating rolls so moist and tender that they practically melt on your tongue. And the decoration? We're going full spooky-cute without venturing into that territory where things look so perfect you're afraid to eat them. These rolls have personality — some might have googly eyes that are slightly askew, others might have sprinkles that look like they were applied by an enthusiastic toddler, and that's exactly what makes them perfect.
So whether you're hosting a Halloween brunch, need something spectacular for the office potluck, or just want to justify eating cream cheese frosting for breakfast (no judgment here), these cinnamon rolls are about to become your new October obsession. Let me walk you through every single step — by the end, you'll wonder how you ever made it any other way.
What Makes This Version Stand Out
Before we dive into the nitty-gritty of creating these spooky-sweet masterpieces, let me tell you exactly why this recipe deserves a permanent spot in your Halloween rotation. I've tested dozens of variations over the years — from completely homemade dough that took four hours to rise to shortcuts that tasted like cardboard with cinnamon on top — and this version hits every single mark. It's the recipe I bring to every October gathering, the one my neighbors request by name, the one that has people texting me in November asking if I'll make "those Halloween rolls" again even though it's technically the wrong season.
- Time-Smart: Using refrigerated cinnamon rolls as our foundation means you can go from zero to spooky in under an hour, but we're doctoring them up so brilliantly that they'll taste like they came from a boutique bakery. The heavy cream bath is our secret weapon — it transforms ordinary dough into something so luxuriously rich that you'll question everything you thought you knew about store-bought shortcuts.
- Flavor Explosion: Most Halloween treats are all show and no substance, but these rolls deliver a complex flavor profile that would make a French pastry chef weep. The brown sugar and cinnamon create this deep, almost molasses-like richness, while the cream cheese frosting adds tanginess that cuts through the sweetness like a knife through butter.
- Visual Drama: These aren't just orange-tinted cinnamon rolls — they're personality-packed treats that look like they're about to come alive and dance off the plate. The candy eyes seem to follow you around the room, and the Halloween sprinkles catch the light like tiny edible disco balls.
- Kid-Friendly Assembly: This is the part where I confess that half the fun comes from letting children (or childlike adults) go wild with the decorations. There's no right or wrong way to place those candy eyes, and the more chaotic the sprinkle distribution, the more charming the final result.
- Make-Ahead Magic: You can prep these up to the point of the cream pour, cover them, and refrigerate overnight. In the morning, just let them sit at room temperature while your oven preheats, then bake as directed. The flavors actually meld together even more beautifully with the overnight rest.
- Instagram Gold: Let's be honest — we eat with our eyes first, and these rolls are so photogenic that you'll find yourself staging elaborate photo shoots with tiny pumpkins and fake spider webs. The orange frosting photographs as this perfect peachy-coral shade that looks incredible against the golden-brown rolls.
Alright, let's break down exactly what goes into this masterpiece...
Inside the Ingredient List
Every great recipe tells a story through its ingredients, and this one reads like a Halloween fairy tale with a very happy ending. Each component has been carefully selected not just for flavor, but for how it contributes to the overall experience — from the moment you start unrolling that refrigerated dough to the final flourish of candy eyes. I've made every substitution mistake possible so you don't have to, and I'm here to tell you exactly why each ingredient matters and what happens if you try to cut corners. Trust me on this one — I once tried to use milk instead of heavy cream because I ran out, and the results were so sad and dry that even my garbage disposal seemed disappointed.
The Foundation Players
Refrigerated Grands cinnamon rolls are the unsung heroes of this recipe, and before you turn up your nose at the idea of not making dough from scratch, let me change your mind. These aren't just any refrigerated rolls — they're specifically designed to create those glorious layers that pull apart like edible cotton candy. The dough has just enough structure to hold our additions without becoming tough, and it rises like a dream when we give it the heavy cream treatment. Plus, they come with their own icing that we'll doctor up into something spectacular. If you absolutely must use another brand, make sure you're getting the "grands" style — the regular ones will work, but they won't give you those pillowy, cloud-like results that make people close their eyes when they take their first bite.
Heavy whipping cream is the ingredient that will make you question everything you thought you knew about baking shortcuts. When you pour this liquid gold over your assembled rolls before baking, something magical happens. The fat in the cream seeps into every layer of dough, creating this impossibly tender texture that's reminiscent of brioche but without the 8-hour commitment. It also helps the brown sugar and butter create this incredible caramel sauce that pools at the bottom of your pan — the baker's equivalent of liquid gold. Don't even think about substituting with half-and-half or milk; I've tried, and you end up with dry, sad rolls that taste like you forgot an ingredient.
The Flavor Amplifiers
Butter plays two crucial roles here, and each application requires a different temperature for maximum impact. The melted butter that we brush over the dough before adding our brown sugar mixture acts as the flavor carrier, helping those warm spices penetrate every swirl and fold. It also creates steam as it bakes, contributing to that gorgeous rise and ensuring the bottoms don't dry out. The softened butter that gets beaten into our cream cheese frosting is what gives it that luxurious, spreadable texture that doesn't tear the delicate rolls when you're applying it. Use the good stuff here — European-style butter with higher fat content will give you frosting so silky smooth it should come with a warning label.
Brown sugar is where we start building those deep, complex flavors that separate these from your average cinnamon roll. The molasses in the brown sugar caramelizes as it bakes, creating these little pockets of toffee-like crunch that provide textural contrast to all that softness. Dark brown sugar will give you an even more intense flavor, but I prefer light brown here because it lets the cinnamon shine through without making the rolls taste like molasses cookies. Make sure it's fresh and soft — hardened brown sugar won't distribute evenly and you'll end up with some bites that are cloyingly sweet while others taste bland.
The Spice and the Surprise
Cinnamon might seem like a boring, obvious choice, but hear me out — not all cinnamon is created equal, and this is where you can really elevate your rolls from good to unforgettable. Ceylon cinnamon (sometimes called "true cinnamon") has a more delicate, citrusy flavor that won't overpower the other ingredients. Cassia cinnamon, which is what most supermarkets carry, has that classic bold spiciness we associate with cinnamon rolls. I actually like to use a blend of both — the Ceylon for complexity and the Cassia for that nostalgic hit of flavor that transports you back to every perfect autumn moment you've ever had. Freshness matters here, too — if your cinnamon has been sitting in your spice cabinet since last Halloween, it's time for a new jar.
Orange food coloring is where we start getting into the fun, spooky territory, but I approach this with the same respect I'd give to any other ingredient. The goal is to create a frosting that's distinctly Halloween-orange without tasting like a chemistry experiment. Gel food coloring gives you the most vibrant results with the smallest amount, which means you won't dilute your frosting or give it that bitter artificial taste. Start with the tiniest amount on the tip of a toothpick — you can always add more, but you can't take it away once it's mixed in. If you're feeling particularly Martha Stewart-ish, you could use natural coloring from carrot juice or pumpkin puree, but honestly, life is too short and Halloween comes but once a year.
The Finishing Touches
Candy eyes are where these rolls really come alive — literally. These little sugar discs with their edible ink pupils somehow transform ordinary cinnamon rolls into characters with personality. The key is applying them at just the right moment: too soon and they'll absorb moisture from the frosting and bleed, too late and they won't stick properly. I like to press them in gently with tweezers for precision, but there's something charming about the slightly crooked ones that clearly got placed by small, enthusiastic hands. Don't limit yourself to just two eyes per roll — some of my favorites have three eyes arranged in a triangle, or a single giant eye right in the center like a cyclops cinnamon roll.
Halloween sprinkles are the confetti at this party, and while they're technically optional, I can't imagine skipping them. The good ones (and yes, there are definitely good and bad sprinkles) add not just color but texture — little crunchy sugar bits that provide contrast to all that softness. Look for mixes that include different shapes and sizes: tiny bats, miniature pumpkins, maybe even little candy bones. The sprinkle application is where you can really let your creativity run wild. Some people like a light dusting that looks like Halloween confetti, others go for the full Jackson Pollock treatment. There's no wrong answer here, though I will say that if you completely cover the frosting, you might want to have a backup plan for people who don't love the crunch of sprinkles in every bite.
Everything's prepped? Good. Let's get into the real action...
The Method — Step by Step
Now we're getting to the good part — the moment where everything comes together and your kitchen starts smelling like autumn exploded in the best possible way. I've broken this down into foolproof steps, and I want you to read through the entire method before you start. This isn't because it's complicated (it's not), but because there are a few moments where timing matters, and I want you to feel confident rather than rushed. Think of this as your roadmap to cinnamon roll glory, complete with all the little detours and scenic routes I've discovered through years of trial and error. Some of my best discoveries came from mistakes — like the time I accidentally poured the cream too early and ended up with rolls that were so tender they practically dissolved on the tongue like cotton candy.
- Preheat your oven to 350°F (175°C), but don't just crank it up and walk away — give it a good 20 minutes to come to temperature. A properly heated oven is crucial here because we're working with refrigerated dough that needs to rise and bake evenly. While your oven is heating, grab a 9x13-inch baking dish and give it a good buttering. Not just a quick swipe — really work that butter into every corner and up the sides about an inch. This isn't just to prevent sticking (though it does that beautifully); the butter will mingle with the brown sugar and cream as it bakes, creating this incredible caramel sauce that you'll want to drink with a straw. If you're feeling fancy, you could use that butter wrapper to grease the pan — waste not, want not, and all that jazz.
- Open your refrigerated cinnamon rolls like you're defusing a bomb — slowly and with great respect for the pressure that's built up inside that canister. The first time I made these, I pulled the tab too hard and sent dough spiraling across my kitchen like some kind of pastry frisbee. Once you've successfully liberated your dough, separate the rolls and place them in your buttered dish with about an inch of space between each one. They look lonely now, but trust me — they're about to become best friends as they rise and expand. Press down gently on each roll, just enough to slightly flatten the tops. This creates a little well for our brown sugar mixture and ensures they bake up flat enough to hold our frosting without rolling off like sugary tumbleweeds.
- Now for the moment that separates good cinnamon rolls from legendary ones — the brown sugar bath. In a small bowl, mix together your brown sugar and cinnamon with a fork, making sure there are no clumps. The ratio here is important: you want enough sugar to create that gorgeous caramel, but not so much that it overwhelms the cinnamon. Sprinkle this mixture evenly over your rolls, but here's the key — don't just dump it on. Use your fingers to distribute it, letting some fall between the rolls and concentrating a bit more in those wells we created. This ensures every bite has that perfect balance of sweet and spicy, and some rolls get those incredible caramelized edges that shatter like thin ice when you bite into them.
- The heavy cream pour is where the real magic happens, and this is the step that makes people think you've got some kind of culinary superpower. Warm your cream slightly — just to take the chill off, about 30 seconds in the microwave should do it. You're not trying to heat it, just bringing it up to room temperature so it doesn't shock the dough. Now, pour it slowly around the edges of the pan first, letting it seep underneath the rolls, then drizzle a bit over the top of each one. It should come up about halfway up the sides of the rolls — not swimming, but definitely wading. As it bakes, this cream will be absorbed into the dough, creating this impossibly tender texture while also mixing with the brown sugar to create a sauce that you'll want to put on everything from pancakes to ice cream to your morning coffee (don't judge until you've tried it).
- Slide your pan into the preheated oven and set your timer for 25 minutes, but here's what nobody tells you — start checking them at 20 minutes. Every oven is different, and these can go from perfectly golden to tragically overbaked in the blink of an eye. You're looking for rolls that have puffed up dramatically, with tops that are golden-brown and centers that spring back lightly when touched. The cream around the edges should be bubbling and starting to thicken, and your kitchen should smell like you've died and gone to autumn heaven. If the tops are browning too quickly but the centers still look doughy, tent the whole pan with foil for the last few minutes of baking. This is the moment of truth, friends — don't walk away from your oven.
- While your rolls are baking and making your house smell like you should be charging admission, it's time to work on the frosting — and this isn't just any frosting. This is cream cheese frosting elevated to Halloween royalty. Start with room temperature cream cheese (this is non-negotiable — cold cream cheese will give you lumpy frosting that looks like cottage cheese mixed with sadness). Beat it with softened butter until it's lighter than air and smoother than a politician's promises. Add your powdered sugar gradually, about a quarter cup at a time, beating well after each addition. This prevents the sugar cloud that will otherwise coat your entire kitchen like sweet, sticky snow. The pre-made icing that came with your rolls? We're using that too — it adds this incredible flavor depth and helps stretch our frosting so we can be generous with our application.
- Now comes the fun part — coloring your frosting that perfect Halloween orange. Start with the tiniest amount of gel coloring on a toothpick, stir it in thoroughly, and then add more if needed. You're going for the color of a perfectly ripe persimmon, not a traffic cone. If you accidentally go too orange (it happens), you can tone it down with a bit more cream cheese or a tiny touch of brown food coloring. The consistency should be spreadable but not runny — think Greek yogurt rather than heavy cream. If it's too thick, add milk a teaspoon at a time. Too thin? More powdered sugar. This frosting should hold its shape when you spread it, but smooth out slightly over the warm rolls, creating those gorgeous drips that make people reach for their phones before they reach for a fork.
- Once your rolls emerge from the oven looking like golden clouds of autumn perfection, let them rest for exactly five minutes. Not ten, not three — five. This is when the magic continues happening inside the rolls. The cream that's been bubbling away will start to thicken as it cools, the brown sugar will set into this gorgeous caramel, and the rolls will firm up just enough to hold our frosting without collapsing. But they're still warm enough that when you spread on that orange cream cheese frosting, it will melt slightly and seep into every swirl and crevice. Use an offset spatula if you're feeling fancy, or the back of a spoon if you're like me and can never find your offset spatula when you need it. Don't frost the rolls in the pan — transfer them to a serving platter first so you can really go to town with the decoration.
- The final flourish is where these rolls really come alive — literally. While your frosting is still soft (but not so soft that everything slides off like sleds on an icy hill), it's time to add the candy eyes. This is where you can really let your creativity shine. Some rolls get the classic two-eye arrangement, but I like to mix it up. Try three eyes in a triangle formation, or a single giant eye right in the center for a cyclops effect. Press them in gently but firmly — you want them to stick, but you don't want to deflate your beautiful rolls. The Halloween sprinkles come last, and this is where more is definitely more. Don't be shy here — let them rain down like confetti at the world's best party. Some will stick, some will bounce off, and that's perfectly fine. The ones that don't stick become little treasures for people to discover on their plates.
That's it — you did it. But hold on, I've got a few more tricks that'll take this to another level...
Insider Tricks for Flawless Results
After making these rolls more times than I care to admit (there was one October when I made them every weekend for different events — my mail carrier started asking if I was opening a bakery), I've discovered some insider secrets that separate the merely good from the absolutely transcendent. These aren't the obvious tips you'll find in every recipe — these are the hard-won wisdom of someone who has eaten more cinnamon rolls in a single month than most people eat in a year. Some of these tricks came from happy accidents, others from desperate attempts to fix disasters, and a few from that magical moment when you realize you've been overthinking something simple all along.
The Temperature Rule Nobody Follows
Here's the thing about temperature that nobody talks about: your cream cheese frosting needs to be at exactly 68°F when you apply it to the rolls. Too cold and it won't spread smoothly, creating tears in your beautiful rolls and making you want to throw your spatula across the kitchen. Too warm and it will slide right off like a sugar avalanche, taking your candy eyes with it on a terrible journey to the bottom of your serving platter. I keep a kitchen thermometer specifically for this purpose now, but before I was that person, I developed a foolproof method: if you can press your finger into the frosting and leave an impression that slowly fills back in, you're golden. If your finger comes away covered in frosting that's more liquid than solid, pop the whole bowl in the fridge for five minutes. If the frosting feels like you're pressing into cold butter, let it sit at room temperature for a bit longer. This one simple check will save you from frosting heartbreak.
Why Your Nose Knows Best
Forget timers — your nose is the best tool you have for knowing when these rolls are perfectly baked. About 20 minutes into baking, you'll start noticing the most incredible aroma wafting through your house. It starts as a gentle suggestion of cinnamon and butter, then builds into this crescendo of caramelized sugar and warm spices that makes it physically impossible to stay out of the kitchen. When you can smell the brown sugar starting to take on that deep, almost burnt-caramel note, you're about two minutes away from perfection. This is when you want to start checking them visually. The combination of aroma and visual cues is far more reliable than any timer, because ovens vary so much and the difference between perfectly baked and overbaked is a matter of minutes. I've learned to trust this method so completely that I rarely set a timer anymore — I just follow my nose to cinnamon roll nirvana.
The 5-Minute Rest That Changes Everything
I know you're going to want to dig in immediately — the smell is intoxicating, the frosting is calling your name, and those candy eyes are practically winking at you. But here's where patience pays off in spades. Letting the rolls rest for exactly five minutes after they come out of the oven allows the cream and brown sugar mixture to thicken into this gorgeous sauce that coats the bottom of each roll like liquid caramel. It's the difference between rolls that are merely delicious and rolls that are so good they inspire spontaneous poetry. During this rest, the internal temperature continues to rise slightly, finishing off the centers without overbrowning the tops. The frosting application is also much cleaner — warm enough to spread smoothly but not so hot that everything melts into a puddle. Set a timer if you must, but don't you dare skip this step. I've seen grown adults cry over what happens when you frost these rolls too early, and it's not pretty.
The Make-Ahead Magic Method
Here's a little secret for those of you who like to entertain but don't want to be stuck in the kitchen while your guests are having all the fun: you can prep these rolls up to 24 hours in advance and they actually get better with the overnight rest. Assemble everything up to the point of the cream pour, then cover tightly with plastic wrap and refrigerate. The cold environment slows down the yeast activity, allowing the flavors to meld and develop in ways that same-day rolls just can't match. In the morning, remove them from the refrigerator while your oven preheats, then pour over the cream and bake as directed. They'll rise even higher and have a more complex flavor profile that will have people asking for your secret. The only adjustment you need to make is adding about 5-7 extra minutes to the baking time since you're starting with cold dough.
The Frosting Consistency Secret
The perfect frosting consistency is like the Holy Grail of cinnamon roll making — everyone's searching for it, but few actually achieve it. Here's what I've learned: you want your frosting to be thick enough to hold those candy eyes in place, but thin enough that it will spread smoothly without tearing your delicate rolls. The secret ingredient is time — beat your cream cheese and butter together for a full three minutes before adding any sugar. This incorporates air and creates a structure that will hold up to additions without becoming too thin. When you add the powdered sugar, do it in thirds, beating well after each addition. Then, and this is crucial, let the frosting rest for five minutes before applying it. This allows the sugar to fully hydrate and gives you a much smoother, more stable final product. If it's too thick after resting, add milk a teaspoon at a time. Too thin? More powdered sugar, but let it rest again before adding more — sometimes it just needs a moment to come together.
Creative Twists and Variations
This recipe is a playground, and once you've mastered the basic version, the variations are limited only by your imagination (and possibly your pantry). I've made these rolls for everything from Halloween brunches to Christmas morning, and I've discovered that a few simple swaps can completely transform them into something new and exciting. The beauty of starting with a solid base recipe is that you can take it in any direction without fear of complete failure. Some of my favorite variations have come from desperate attempts to use up ingredients I had on hand, or from trying to accommodate various dietary restrictions and preferences. The rolls I'm about to describe aren't just variations — they're entirely new experiences that happen to share the same foolproof technique.
The Pumpkin Spice Paradise
Transform these into the ultimate autumn treat by adding pumpkin to the mix — but not where you think. Instead of adding it to the dough (which can make things dense and heavy), whisk two tablespoons of pumpkin puree into your heavy cream before pouring it over the rolls. The pumpkin flavor is subtle but present, and it adds this gorgeous golden color to the caramel sauce that forms at the bottom of the pan. For the frosting, replace two tablespoons of cream cheese with pumpkin puree and add a pinch each of nutmeg and cloves. The result is a roll that tastes like pumpkin spice but doesn't have that overwhelming sweetness that makes you feel like you're eating a candle. Top with candied pecans instead of candy eyes for a more sophisticated take that works beautifully for Thanksgiving brunch.
The Chocolate Monster Mash
For the chocolate lovers in your life (and really, who isn't a chocolate lover?), this variation is pure decadence. Replace half the brown sugar with Dutch-processed cocoa powder, and add a teaspoon of espresso powder to deepen the chocolate flavor without making them taste like coffee. The heavy cream pour stays the same, but the result is these incredibly rich, fudgy rolls that taste like someone crossed a cinnamon roll with a brownie. For the frosting, use chocolate cream cheese as your base — just melt two ounces of good dark chocolate and let it cool slightly before beating it into your cream cheese. The candy eyes pop beautifully against the dark chocolate background, looking like little ghosts peeking out from chocolate clouds. These are particularly spectacular for Halloween parties where you want to serve something that feels indulgent rather than just sweet.
The Salted Caramel Specter
This variation came about when I accidentally grabbed salted butter instead of unsalted, and it was one of those happy accidents that changed everything. Use salted butter in both the pan preparation and the frosting, and add an extra pinch of flaky sea salt to the brown sugar mixture. The salt doesn't just enhance the sweetness — it creates this incredible complexity that makes it impossible to eat just one. For an extra touch, drizzle warm caramel sauce over the frosted rolls just before serving, letting it pool in the crevices between rolls. The combination of salty and sweet, warm and cool, soft and slightly chewy is absolutely addictive. These have become my go-to for brunches where I want to impress people without looking like I'm trying too hard.
The Apple Cider Spectacular
Reduce apple cider down to a syrup (simmer two cups until you have about half a cup left) and use this in place of some of the heavy cream for a roll that tastes like apple picking and hayrides and all those perfect October moments. The reduced cider adds this incredible concentrated apple flavor without adding extra liquid that would make the rolls soggy. Mix some of the cider syrup into your frosting as well, and top with tiny dried apple chips for a textural element that takes these over the top. The candy eyes work surprisingly well here — they look like little faces peeking out from an apple orchard. These are particularly magical when served warm with a glass of cold apple cider on the side.
The S'mores Spooktacular
Replace half the brown sugar with crushed graham crackers (pulse them in a food processor until they're like coarse sand), and add mini chocolate chips to the filling. The graham crackers add this incredible toasty flavor and create little pockets of crunch that contrast beautifully with the soft dough. For the frosting, mix in some marshmallow fluff — about a third cup beaten in at the very end. Use a kitchen torch to toast the frosting slightly before adding your candy eyes and sprinkles. The result is a roll that tastes exactly like the best part of camping, minus the mosquitoes and questionable bathroom facilities. These are especially fun for kids' Halloween parties because they get to watch you torch the frosting, which never fails to elicit gasps of amazement.
The Chai Tea Terror
For a more sophisticated flavor profile that works beautifully for adult Halloween gatherings, infuse your heavy cream with chai tea before pouring it over the rolls. Heat the cream until it's just steaming, add two chai tea bags, and let it steep for 15 minutes. Remove the tea bags and let the cream cool to room temperature before using. The chai adds this incredible warmth and complexity — notes of cardamom, ginger, and black tea that play beautifully with the cinnamon. For the frosting, add a quarter teaspoon of ground cardamom and a pinch of black pepper. The candy eyes look particularly striking against the pale, spiced frosting, like little ghosts floating in a chai latte. These have become my signature contribution to book club meetings in October, and I'm not exaggerating when I say they've converted non-cinnamon-roll people into fanatics.
Storing and Bringing It Back to Life
Here's the thing about these Halloween cinnamon rolls — they're best fresh out of the oven when the frosting is still slightly warm and the caramel sauce is pooling invitingly at the bottom of the pan. But unless you're feeding a small army (or my family, who consider cinnamon rolls a major food group), you'll likely have leftovers. The good news is that these store and reheat beautifully, maintaining their incredible texture and flavor with just a few simple tricks. I've perfected the art of leftover cinnamon roll resurrection through years of making far too many batches "just in case" and then eating them for breakfast, lunch, and dinner until they're gone. These aren't your sad, dried-out leftovers — these are rolls that might actually taste better the second day after the flavors have had time to meld and deepen.
Fridge Storage
Once your rolls have cooled completely (and by completely, I mean no trace of warmth — this usually takes about two hours), transfer them to an airtight container. I like to use a glass container with a tight-fitting lid because it doesn't absorb odors and lets me see exactly what deliciousness awaits me. If you're stacking them, place a piece of parchment paper between layers to prevent the frosting from sticking and creating a mess that will make you weep when you try to separate them later. They'll keep beautifully in the refrigerator for up to five days, though I challenge you to make them last that long. The key is letting them come to room temperature before reheating — about 30 minutes on the counter while your oven preheats. This prevents that terrible temperature shock that can make the frosting seize up and the rolls become tough and sad.
Freezer Friendly
These rolls freeze like a dream, which makes them perfect for meal prep or for those moments when you need an impressive breakfast but don't want to actually cook. Freeze them before adding the candy eyes and sprinkles — those don't survive the freezing process well and will just make you sad when they bleed weird colors into your frosting. Wrap each roll individually in plastic wrap, then place them all in a freezer bag with as much air removed as possible. They'll keep for up to three months, though I guarantee they won't last that long. When you're ready to eat them, let them thaw overnight in the refrigerator, then bring to room temperature before reheating. The frosting might look a little separated after thawing, but a quick 10-second zap in the microwave followed by a gentle stir will bring it right back to life. Add fresh candy eyes and sprinkles after reheating for that just-made appearance.
Best Reheating Method
Microwaves are the enemy of good cinnamon rolls — they'll turn your beautiful, tender creations into tough, rubbery discs that taste like sweet cardboard. Instead, embrace your oven for the reheating process. Preheat to 300°F (150°C), place your rolls on a baking sheet, and add a tiny splash of water to the bottom of the pan — just a teaspoon or two. Cover the whole thing with foil and heat for 10-12 minutes if refrigerated, 15-18 minutes if frozen. The water creates steam that rehydrates the rolls and brings them back to their original glory, while the low temperature ensures they heat through without drying out or burning. If you're in a hurry, you can microwave individual rolls for 15-20 seconds, but place a small microwave-safe cup of water in there with them to create steam. It's not as good as the oven method, but it's infinitely better than dry, sad microwave rolls.