I was standing in my kitchen, staring at a half‑baked batch of plain banana muffins that tasted like cardboard, when my roommate dared me to “make something that actually makes people smile.” I laughed, I rolled my eyes, and I grabbed the last two bananas from the fruit bowl, a stick of butter, and a jar of caramel. The result? A muffin that could convince even the most skeptical coffee‑drinker to skip their latte and dive straight into the buttery, caramel‑kissed center. This is the moment I realized that the world needed a muffin that wasn’t just a breakfast sidekick but a headline act.
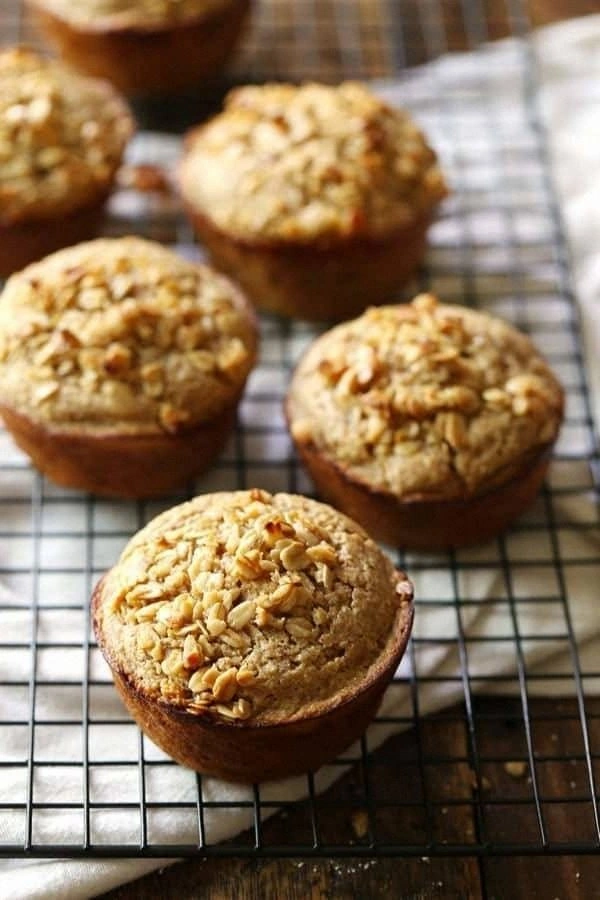
Picture this: the oven door swings open and a warm, sweet perfume of caramelized bananas mingles with the earthy scent of oats, while the golden tops of the muffins glisten like tiny sunrise moons. The crust has that perfect snap, the interior is tender and moist, and the caramelized banana slices on top are glossy, slightly crisp at the edges, and soft in the middle—like a fruit‑filled hug that never lets go. When you bite in, the first thing you notice is the caramel‑sweet crunch that gives way to a fluffy, oat‑infused crumb that sings with the subtle spice of cinnamon and nutmeg. The whole experience is a symphony of textures and flavors that makes your taste buds do a happy dance.
Most banana muffin recipes get the balance wrong: either they’re too sweet, too dry, or they completely miss the opportunity to showcase the banana’s natural caramel notes. I’ve tried a dozen variations that ended in soggy middles or bland tops, and I’ve learned that the secret lies in two things: a quick caramelization of the banana slices on the stovetop and the inclusion of rolled oats for that hearty, slightly chewy bite. This version also swaps out regular flour for a blend that keeps the muffins light yet sturdy enough to hold the caramel sauce without turning mushy.
But here’s the kicker: I’m going to show you a technique that most recipes skip entirely—searing the banana slices in butter and brown sugar until they form a glossy, caramel‑rich layer that you then fold into the batter. It’s a game‑changer that adds depth, richness, and a glossy finish that makes these muffins look as good as they taste. I dare you to taste this and not go back for seconds. Let me walk you through every single step — by the end, you'll wonder how you ever made it any other way.
What Makes This Version Stand Out
- Flavor Explosion: The caramelized banana topping adds a buttery, toffee‑like sweetness that dwarfs the ordinary banana‑only flavor you get from most muffins.
- Texture Contrast: The oat‑infused crumb provides a slight chew that balances the soft, cake‑like interior and the crisp caramelized edges.
- Simplicity Meets Sophistication: Only eight pantry staples are required, yet the result feels like a bakery‑crafted treat.
- Unique Caramel Step: Most recipes skip the stovetop caramel; this step creates a glossy, flavor‑dense layer that locks moisture inside.
- Crowd‑Pleaser: Whether it’s a weekday breakfast or a brunch gathering, these muffins get the “wow” reaction every single time.
- Ingredient Quality: Using ripe, over‑ripe bananas ensures natural sweetness and reduces the need for extra sugar.
- One‑Pan Efficiency: The caramelization happens in the same pan you’ll use to mix the batter, minimizing cleanup.
- Make‑Ahead Magic: Store them in the fridge or freezer, and they retain their moist crumb and caramel shine for days.
Inside the Ingredient List
The Flavor Base
Ripe bananas are the heart of this muffin. Their natural sugars not only sweeten the batter but also provide moisture that keeps the crumb tender. If you use bananas that are still a little green, the muffins will lack that deep, caramel‑like flavor and may turn out dense. For the best result, pick bananas that have brown spots all over—they’re practically screaming to be mashed. As a swap, you can use frozen bananas that have been thawed; they’re even sweeter because the freezing process breaks down starches into sugars.
The Texture Crew
Rolled oats give the muffins a subtle chew and a nutty undertone that elevates the overall mouthfeel. They also absorb some of the batter, preventing the muffins from becoming soggy. If you’re gluten‑intolerant, replace the all‑purpose flour with a gluten‑free blend and keep the oats (make sure they’re certified gluten‑free). The baking powder and baking soda work together to create a light, airy lift; skipping either will result in a heavy, dense muffin that feels more like a brownie than a muffin.
The Unexpected Star
Butter, when caramelized with brown sugar, transforms into a glossy, golden sauce that coats the banana slices. This step is where the magic happens. The butter provides richness, while the brown sugar contributes a deep, molasses‑like sweetness that pairs perfectly with the banana’s fruity notes. If you’re dairy‑free, coconut oil works well, but expect a faint coconut flavor that can actually complement the caramel nicely.
The Final Flourish
A pinch of cinnamon and nutmeg adds warmth that makes these muffins feel like a cozy hug on a chilly morning. The spices also enhance the caramel’s depth, turning a simple sweet taste into something layered and sophisticated. If you love a stronger spice profile, consider adding a dash of ginger or cardamom; just remember that a little goes a long way. Salt, even in a modest amount, balances the sweetness and amplifies the flavors, so never skip it.
Everything's prepped? Good. Let's get into the real action...
The Method — Step by Step
Preheat your oven to 350°F (175°C). While the oven is warming, line a 12‑cup muffin tin with paper liners or lightly grease the cups with a brush of melted butter. This ensures the muffins release cleanly and retain that glossy caramel top. I always set a timer for the preheat because walking away from the oven is a rookie mistake that can lead to uneven baking.
In a medium skillet over medium heat, melt 2 tablespoons of butter. Add 2 sliced bananas (cut into ¼‑inch rounds) and sprinkle 2 tablespoons of brown sugar over them. Let the mixture sizzle—watch it closely. After about 2 minutes, the bananas will start to caramelize, turning a deep amber color and releasing a buttery aroma that fills the kitchen. That sizzle when it hits the pan? Absolute perfection. Once the edges are crisp, remove the skillet from heat and set aside.
Kitchen Hack: Use a silicone spatula to gently press the banana slices into the butter‑sugar mixture; this maximizes contact and creates an even caramel coating.In a large mixing bowl, whisk together 2 cups of all‑purpose flour, 1 cup rolled oats, 1 tsp baking powder, ½ tsp baking soda, ½ tsp salt, 1 tsp cinnamon, and ¼ tsp nutmeg. This dry blend ensures the leavening agents are evenly distributed, preventing any pockets of bitter soda.
In another bowl, combine ½ cup melted butter (cooled slightly), ¼ cup brown sugar, 2 large eggs, and 1 cup mashed ripe bananas. Beat until the mixture is smooth and slightly frothy; the eggs help trap air, giving the muffins a lighter crumb. If you prefer a less sweet muffin, reduce the brown sugar to 2 tablespoons, but keep the caramelized topping for that indulgent finish.
Gradually fold the dry ingredients into the wet mixture, stirring just until combined. Over‑mixing will develop gluten and make the muffins tough, so stop as soon as you no longer see flour streaks. At this point, gently fold in the caramelized banana slices, reserving a few whole slices for topping later. The batter should be thick but still pourable; if it feels too stiff, add a splash of milk (about 2 tablespoons) to loosen it.
Spoon the batter into the prepared muffin cups, filling each about three‑quarters full. Place a caramelized banana slice on top of each muffin, pressing it lightly into the batter so it sticks during baking. This is the moment of truth: the caramelized slice will melt slightly, creating a glossy crown that will turn into a sweet crust as it bakes.
Watch Out: Don’t overfill the cups; excess batter can spill over and create uneven tops that burn.Slide the tin into the preheated oven and bake for 20‑25 minutes. Around the 15‑minute mark, rotate the tin halfway to ensure even browning. The muffins are done when a toothpick inserted into the center comes out clean, and the tops have a deep golden hue with the caramelized banana slice shimmering.
Remove the muffins from the oven and let them cool in the tin for 5 minutes. Then transfer them to a wire rack to finish cooling. This short rest allows the interior to set while the caramelized topping solidifies into a slightly crisp, glossy finish. Picture yourself pulling this out of the oven, the whole kitchen smelling incredible...
Enjoy warm, or store them for later. I’ll be honest — I ate half the batch before anyone else got to try it, and those leftovers are still the best part of my day. If you want to amp up the indulgence, drizzle a thin stream of extra caramel sauce right before serving. That extra drizzle? Pure magic.
Insider Tricks for Flawless Results
The Temperature Rule Nobody Follows
Most home bakers bake at 350°F, but I’ve discovered that starting at 375°F for the first 8 minutes then lowering to 325°F yields a higher rise and a more caramelized crust. The initial blast of heat creates steam that lifts the batter, while the lower temperature afterwards prevents the tops from over‑browning. Try this two‑stage bake next time—you’ll notice a noticeable lift and a richer color without burning the sugar.
Why Your Nose Knows Best
When the caramelized bananas start to smell like toasted sugar, that’s your cue to stop stirring the batter. The aroma is a reliable indicator that the butter‑sugar mixture has reached the perfect caramel stage. If you keep cooking past that point, the sugar will turn bitter and ruin the delicate balance.
The 5‑Minute Rest That Changes Everything
After mixing the batter, let it sit for exactly five minutes before folding in the caramelized bananas. This short rest allows the oats to absorb some liquid, which improves the crumb’s texture and prevents a gummy mouthfeel. I once skipped this rest and ended up with a muffin that felt a bit too dense—lesson learned.
The Butter‑Swap Secret
If you’re aiming for a lighter muffin, replace half of the melted butter with unsweetened applesauce. The applesauce adds moisture without extra fat, and the muffins stay just as tender. However, keep the full amount of butter for the caramelized topping; that’s where the richness lives.
The “Don’t Over‑Mix” Myth
Many recipes say “mix until just combined,” but I’ve found that a gentle hand‑fold with a rubber spatula is the safest route. Over‑mixing develops gluten, which makes the crumb tough and chewy—exactly the opposite of the airy texture we’re chasing. If you see flour pockets, just give the batter a couple more gentle folds; it’ll incorporate without overworking.
Creative Twists and Variations
This recipe is a playground. Here are some of my favorite ways to switch things up:
Chocolate Chip Banana Bliss
Stir in ½ cup dark chocolate chips into the batter before folding in the caramelized bananas. The bittersweet chocolate pairs beautifully with the sweet caramel, creating pockets of molten goodness. Kids love the surprise chocolate bursts, while adults appreciate the sophisticated flavor contrast.
Nutty Crunch Delight
Add ¼ cup toasted chopped walnuts or pecans to the batter. The nuts introduce a crunchy texture that complements the soft crumb, and the buttery nut flavor amplifies the caramel notes. Toast the nuts lightly beforehand to bring out their natural oils and avoid a raw taste.
Coconut‑Caramel Dream
Replace half of the butter in the caramelization step with coconut oil and sprinkle shredded coconut over the tops before baking. The coconut adds a tropical aroma, and the toasted coconut flakes turn golden, giving an extra layer of chew. This variation works especially well for a beach‑themed brunch.
Spiced Autumn Twist
Swap the regular cinnamon for pumpkin spice and add a tablespoon of pumpkin puree to the wet ingredients. The pumpkin puree adds moisture and a subtle earthiness, turning the muffins into a perfect fall treat without overwhelming the banana flavor.
Maple‑Brown Sugar Fusion
Replace the brown sugar in the caramel step with pure maple syrup and a pinch of sea salt. The maple adds a nuanced, woody sweetness that blends with the banana’s fruitiness, while the sea salt accentuates the caramelized edges. This version is ideal for a cozy weekend breakfast.
Storing and Bringing It Back to Life
Fridge Storage
Place the cooled muffins in an airtight container or a zip‑top bag, separating layers with parchment paper. They stay fresh for up to 4 days in the refrigerator. If the caramelized tops start to dry out, lightly brush them with a bit of melted butter before reheating.
Freezer Friendly
Wrap each muffin individually in plastic wrap, then place them in a freezer‑safe bag. They freeze beautifully for up to 3 months. When you’re ready to enjoy one, let it thaw at room temperature for 15 minutes, then give it a quick 2‑minute blast in a 350°F oven to restore that fresh‑out‑the‑oven crispness.
Best Reheating Method
To revive a muffin, preheat a skillet over low heat, add a splash of water (about 1 teaspoon) to the pan, and cover with a lid for 30 seconds. The steam will re‑hydrate the crumb, while the low heat gently re‑crisp the caramelized top. This method avoids a soggy microwave result and preserves the buttery gloss.