Picture this: I’m standing in a kitchen that smells like burnt toast and ambition, juggling a bag of flour that refuses to cooperate and a jar of peanut butter that’s more stubborn than a toddler. I’m the kind of cook who thinks a disaster is just a missed opportunity in disguise. That night, a friend dared me to make the most unforgettable mini peanut butter & jelly waffle sandwich ever. I laughed, grabbed the ingredients, and let the kitchen chaos turn into a symphony of crunch and gooeyness. The result? A bite-sized marvel that feels like a hug wrapped in waffle‑bread, with a peanut butter core that oozes into every crumb.
From the moment I cracked the first egg, the air was thick with the promise of sweetness and salt. The batter’s golden sheen reflected the kitchen lights like a miniature sunrise. When the first waffle hit the hot griddle, it sang a crisp, buttery note that made my ears pop. The smell of toasted sugar mingled with peanut butter’s nutty aroma, creating a heady perfume that made the whole house smell like childhood afternoons. Each bite was a layered experience: the waffle’s airy interior, the crunchy edges, and that unmistakable burst of jelly that kissed the palate. I swear, even my dog paused to sniff the air, as if he could taste the triumph.
What sets this version apart is not just the combination of flavors but the meticulous attention to texture and timing. The waffles are thin enough to hold the filling without drowning, yet sturdy enough to stay together when you bite. The peanut butter is swirled into the batter, creating a hidden reservoir that melts in the mouth. The jelly isn’t spread on the outside; it’s folded into the batter, ensuring every bite has that sweet, fruity splash. The result is a sandwich that feels both nostalgic and daring, a playful nod to childhood favorites with an adult twist. I dare you to taste this and not go back for seconds.
The secret lies in a few unconventional tweaks: a splash of vanilla for depth, a pinch of sea salt to balance sweetness, and the decision to use a waffle iron with a small, even surface that guarantees uniformity. If you’re ready to ditch the ordinary and step into a world where every bite is a revelation, let me walk you through every single step. By the end, you’ll wonder how you ever made it any other way.
What Makes This Version Stand Out
- Flavor Fusion: The batter itself becomes a canvas for peanut butter and jelly, so each bite is a harmonious blend rather than a layered sandwich. The result is a single, cohesive flavor profile that lingers on the tongue.
- Texture Triumph: Thin, crisp edges give way to a soft, airy center that crumbles with a satisfying snap, creating a multi‑sensory experience that’s hard to forget.
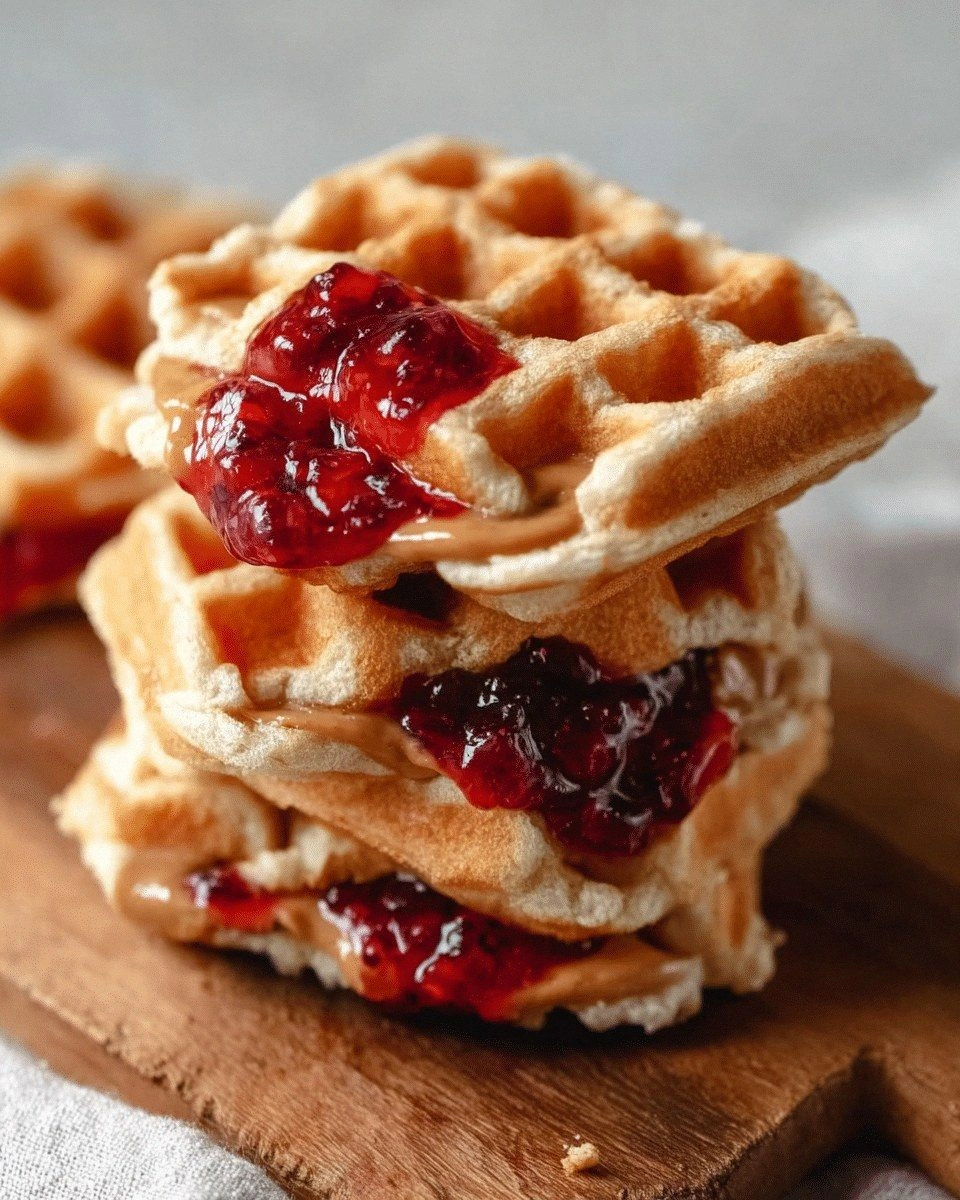
- Visual Appeal: The golden waffle exterior with a subtle swirl of peanut butter inside looks like a work of art, making it perfect for Instagram or a family brunch.
- Simplicity: With only nine ingredients and no complicated steps, this recipe is a breeze for beginners and a joy for seasoned cooks.
- Crowd‑Pleaser: Whether it’s a kids’ party, a breakfast gathering, or a late‑night snack, these mini waffles are guaranteed to be a hit.
- Make‑Ahead Friendly: Prepare the batter ahead of time, refrigerate, and pop them straight from the fridge for a quick, fresh treat whenever cravings strike.
- Ingredient Quality: Using high‑quality peanut butter and a natural jelly elevates the entire experience, turning a simple snack into a gourmet delight.
- Time Efficiency: From prep to plate, the entire process takes less than an hour, making it ideal for busy mornings or spontaneous cravings.
Alright, let’s break down exactly what goes into this masterpiece…
Inside the Ingredient List
The Flavor Base
All-purpose flour is the backbone of the waffle batter. It gives structure and a neutral canvas that lets the peanut butter and jelly shine. If you’re craving a lighter bite, swap half the flour for oat flour; the texture will become slightly denser but the flavor stays intact. When you skip flour entirely, the waffles turn into a batter‑like mush that won’t hold the filling, so keep it.
The Sweetness Brigade
Granulated sugar is the sweetener that caramelizes on the waffle’s surface, producing that coveted golden crust. A pinch of sea salt is added to enhance the sweetness and bring out the nutty undertones of the peanut butter. If you prefer a richer flavor, replace half the sugar with brown sugar; the molasses note pairs beautifully with the jelly.
The Protein Power
Eggs are the glue that binds everything together, providing structure and a silky mouthfeel. They also help the batter rise slightly, creating airy pockets that hold the peanut butter and jelly. For a vegan version, use flaxseed eggs or a commercial egg replacer; the texture will be a bit denser but still enjoyable.
The Moisture Masters
Milk (or a dairy‑free alternative) adds moisture, allowing the batter to flow smoothly across the griddle. Melted butter brings richness and a subtle buttery flavor that complements the peanut butter. If you’re short on time, substitute half the butter with coconut oil for a tropical twist.
The Flavor Stars
Peanut butter is the star of the show, providing a creamy, nutty core that melts in your mouth. Use a natural peanut butter with no added sugars for a cleaner taste. The jelly—your choice of strawberry, grape, or raspberry—adds fruity sweetness that cuts through the richness. Swirl the peanut butter into the batter before adding the jelly; this ensures a uniform distribution and a surprise burst in every bite.
Everything's prepped? Good. Let's get into the real action…
The Method — Step by Step
- In a large bowl, whisk together 2 cups flour, 2 teaspoons baking powder, 1 teaspoon baking soda, and 1/2 teaspoon salt. Sift the dry mix to ensure an airy batter. This step is crucial; any lumps will translate to uneven waffles.
- In a separate bowl, cream 1 cup sugar with 1/2 cup melted butter until light and fluffy. The butter should be at room temperature to avoid clumping. This creates the buttery base that will caramelize on the waffle surface.
- Add 2 eggs, one at a time, beating well after each addition. The first egg should be whisked until frothy; the second ensures the batter is glossy and cohesive.
- Pour in 1 cup milk slowly while whisking to avoid lumps. The batter should be smooth, slightly runny—like a thick pancake batter. If it’s too thick, add a splash of milk.
- Fold in 1 cup peanut butter until fully incorporated. The peanut butter should be evenly distributed; this prevents pockets of thick, oily batter.
- Fold in 1 cup jelly gently. The jelly should be soft enough to mix without breaking the batter’s structure. If the jelly is too firm, let it sit at room temperature for 5 minutes.
- Preheat your waffle iron to medium‑high heat. Lightly spray the plates with non‑stick spray or brush with oil. This ensures a crisp exterior and prevents sticking.
- Pour a small ladle of batter onto the center of the waffle iron. Close the lid and cook for 2–3 minutes or until the waffle is golden and the edges are crisp. The batter should spread evenly across the surface; if it pools, adjust the heat.
- Once cooked, remove the waffle and let it sit for 30 seconds before slicing into 1‑inch squares. The heat will continue to cook the interior slightly, ensuring a perfect bite every time.
- Repeat with the remaining batter, stacking the finished waffles on a cooling rack. This prevents them from becoming soggy from steam.
That's it — you did it. But hold on, I've got a few more tricks that'll take this to another level…
Insider Tricks for Flawless Results
The Temperature Rule Nobody Follows
Waffles need a steady, medium‑high heat to develop a crisp crust without burning. I’ve found that preheating the waffle iron for at least 5 minutes and then adjusting the temperature to a medium setting yields the best balance. If you’re using a non‑stick iron, a slight reduction in heat prevents the batter from sticking to the plates.
Why Your Nose Knows Best
The scent of caramelizing sugar is a reliable indicator that the waffles are cooking properly. When the aroma is sweet and nutty, the exterior is golden. If the smell is too sharp or metallic, lower the heat immediately.
The 5‑Minute Rest That Changes Everything
Letting the waffles rest for 5 minutes after cooking allows steam to escape, preventing sogginess. This short pause also lets the interior set, giving you a clean bite that’s not gummy.
The Secret to a Crispy Edge
Spritzing the waffle iron with a tiny amount of oil before each batch creates a barrier that prevents the batter from sticking and promotes a crisp edge. A tablespoon of coconut oil works wonders, especially when you want a subtle tropical flavor.
The Perfect Finish
A quick dusting of powdered sugar or a drizzle of honey after cooling adds a finishing touch that elevates the dish from snack to dessert. The sweet glaze also helps the waffle’s surface stay crisp longer.
Creative Twists and Variations
This recipe is a playground. Here are some of my favorite ways to switch things up:
Cinnamon Swirl Surprise
Add 1 teaspoon ground cinnamon to the batter and swirl a spoonful of maple syrup into the filling. The warm spice pairs beautifully with the peanut butter, creating a comforting, fall‑inspired bite.
Chocolate‑Covered Delight
Dip the finished waffles in melted dark chocolate and let them set on parchment. The chocolate coating adds a decadent layer that balances the sweet jelly and nutty peanut butter.
Berry‑Burst Variation
Swap the traditional jelly for a mix of fresh blueberries and raspberries. The fresh berries provide a tart contrast that cuts through the richness, making it a refreshing option for summer afternoons.
Savory Twist
Replace the peanut butter with almond butter and add a pinch of smoked paprika to the batter. Finish with a drizzle of honey and a sprinkle of sea salt for a savory snack that’s surprisingly sweet.
Nutty Layered Edition
Layer the batter with chopped walnuts before pouring it into the waffle iron. The crunchy nuts add texture and a subtle earthy flavor that complements the peanut butter’s smoothness.
Storing and Bringing It Back to Life
Fridge Storage
Store the cooled waffles in an airtight container for up to 3 days. Keep them on a rack or line them with parchment to prevent sticking. When ready to eat, pop them in a toaster or oven at 350°F for 3 minutes to restore crispness.
Freezer Friendly
Place the waffles on a parchment‑lined tray and freeze for up to 2 months. Once frozen, transfer them to a zip‑lock bag. Reheat in a toaster or oven at 375°F for 5 minutes. The waffles will retain their texture and flavor.
Best Reheating Method
The key to reheating is gentle heat. Avoid microwaving, which can make them soggy. Instead, use a toaster or a quick oven bake. Add a splash of water to the bottom of the pan to create steam; this helps the waffles stay moist inside while the exterior crisps up.