Okay, picture this: it’s a Sunday afternoon, the kind where the sky is a lazy, buttery blue and the only thing louder than the cicadas outside is the chorus of my kids demanding “what’s for dinner?” I stared into the pantry, half‑expecting to pull out a frozen pizza, when a memory of a disastrous pot roast from three years ago flashed across my mind—dry meat, soggy carrots, and a broth that tasted like watered‑down broth. I swore I’d never attempt it again, but then I heard a friend whisper, “You’ve got an Instant Pot, right? That thing can fix anything.” I laughed, rolled my eyes, and dared myself to turn that skepticism into a masterpiece. I’m going to be honest—by the time I finished the first bite, I’d already eaten half the batch before anyone else could even peek.
I dove into the kitchen with a mix of curiosity and caution, the way you’d approach a mystery novel that promises a twist on the last page. The moment the beef hit the hot oil, a sizzle erupted that sounded like applause, and the aroma—rich, beefy, with a hint of caramelized onion—filled the entire house, making the walls practically melt. I could hear the gentle hiss of the Instant Pot building pressure, a low, steady rumble that felt like a secret promise to deliver something spectacular. My hands were warm from the pot, the weight of the roast grounding, while the kitchen air grew thick with anticipation, like the moment before a fireworks show.
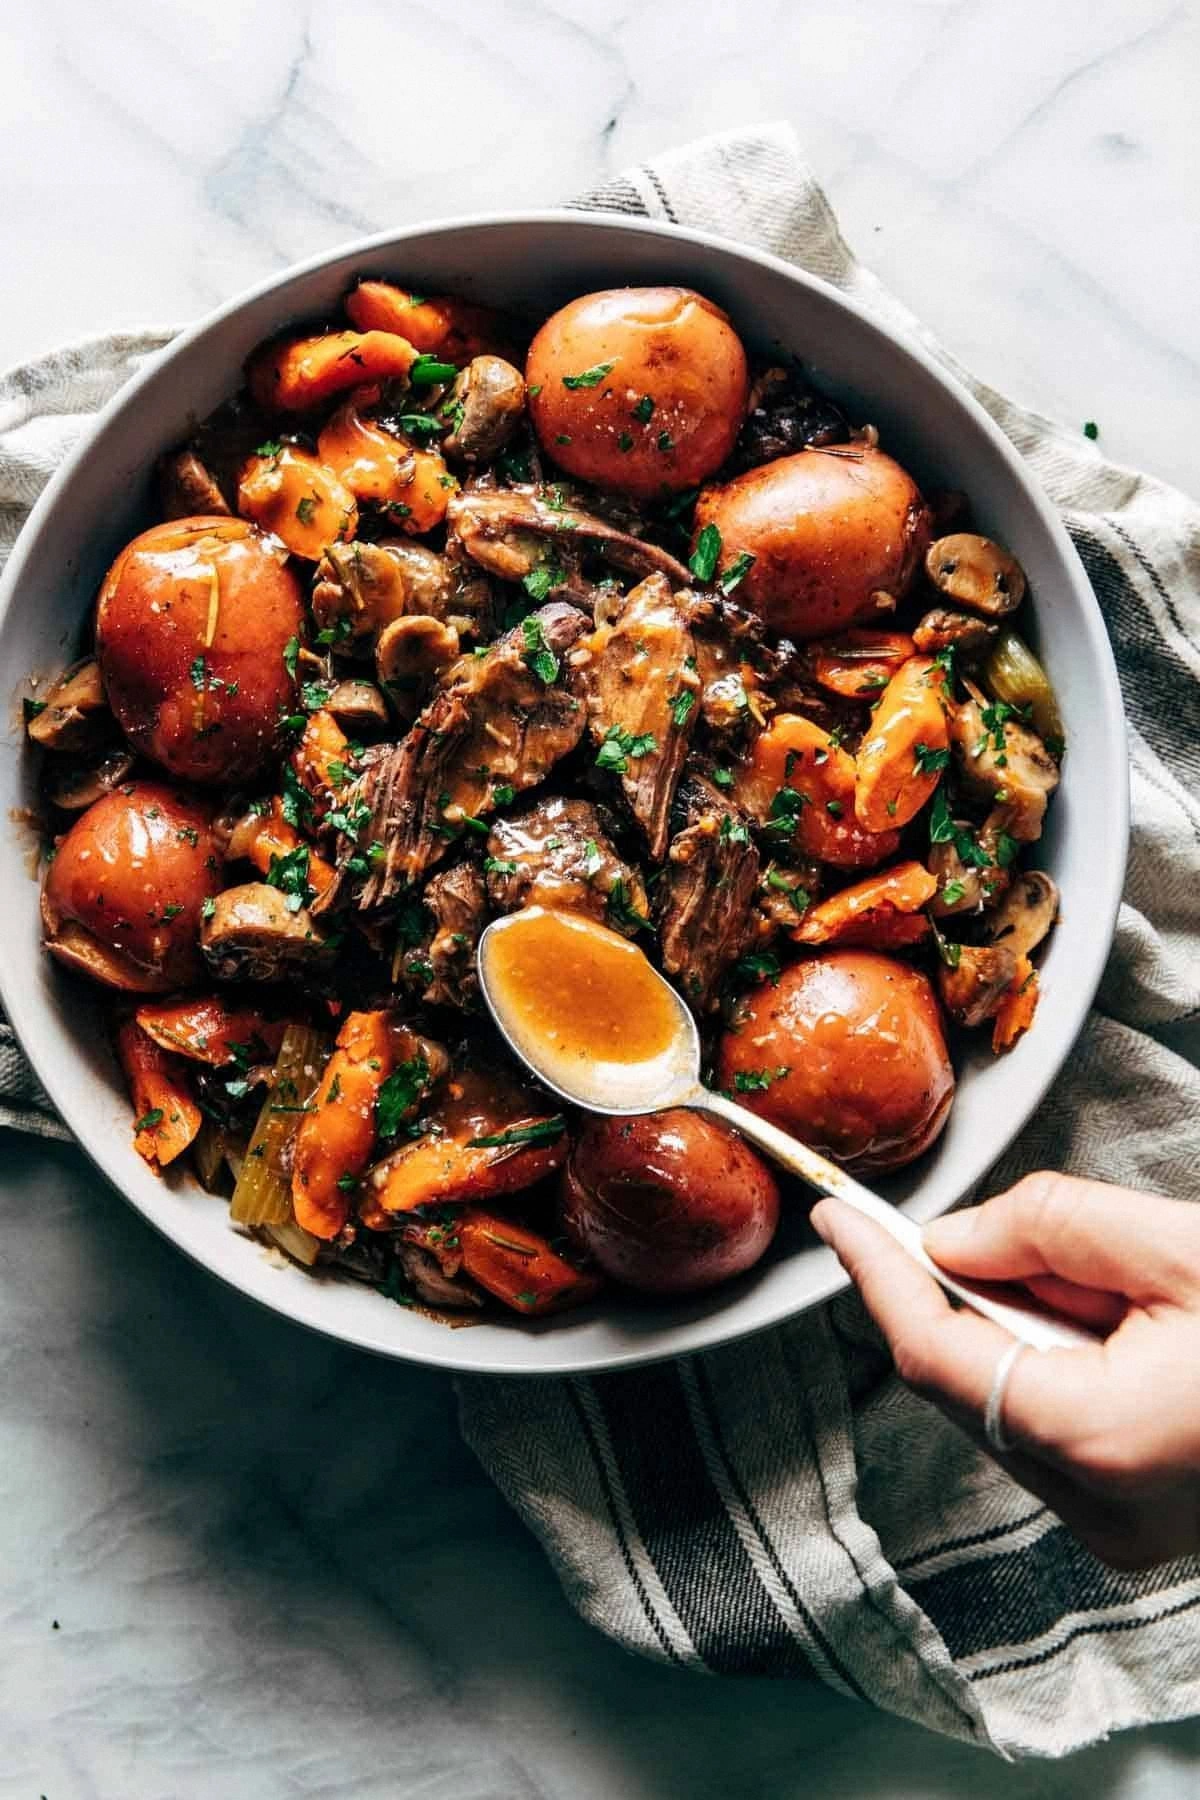
Now, why does this version stand out from every other pot roast you’ve ever Googled? First, the sear. I’m not just talking about a quick browning; I’m talking about a crust that cradles the meat like a protective armor, locking in juices that later explode into the sauce. Second, the broth: a symphony of beef stock, a splash of robust red wine, and a dollop of tomato paste that gives it depth without turning it into a sloppy mess. Third, the veggies—carrots and potatoes—don’t turn to mush; they stay firm, each bite offering a sweet‑earthy contrast to the melt‑in‑your‑mouth beef. And finally, the whole thing comes together in under an hour, thanks to the Instant Pot’s pressure‑cooking wizardry.
I’m about to reveal a technique that most recipes completely ignore: a quick deglaze with red wine and a splash of Worcestershire sauce that lifts every caramelized bit from the bottom of the pot, turning them into a velvety, glossy sauce that coats the roast like a silk scarf. Trust me, this is the game‑changer that separates a “good” pot roast from a “hands down the best version you’ll ever make at home.” Let me walk you through every single step — by the end, you'll wonder how you ever made it any other way.
What Makes This Version Stand Out
- Taste: The blend of beef broth, red wine, and tomato paste creates a deep, umami‑rich sauce that clings to each morsel, delivering a flavor punch that lingers on the palate.
- Texture: A seared crust locks in moisture, while the pressure cooking makes the interior fork‑tender without ever turning the veggies into mush.
- Simplicity: Only ten ingredients, one pot, and a 45‑minute cook time make it perfect for busy weeknights or lazy weekends.
- Uniqueness: The deglazing step with wine and Worcestershire sauce adds a layer of complexity that most “set‑and‑forget” recipes skip.
- Crowd Reaction: Expect empty plates, second‑helpings, and a chorus of “What’s the secret?” from friends and family.
- Ingredient Quality: Using a well‑marbled chuck roast ensures the meat stays juicy, while fresh herbs brighten the broth.
- Cooking Method: Pressure cooking delivers that melt‑in‑your‑mouth tenderness in a fraction of the time traditional braising requires.
- Make‑Ahead Potential: This dish actually tastes better the next day once the flavors have fully married.
Inside the Ingredient List
The Flavor Base
The backbone of any great pot roast is a robust, aromatic base. I start with a generous drizzle of olive oil, which not only prevents sticking but also carries the flavors of the onion and garlic into the broth. The onion, quartered and left with its skins on, imparts a subtle sweetness that mellows the acidity of the wine later on. Garlic, minced finely, adds that unmistakable punch that makes you think, “I dare you to taste this and not go back for seconds.” If you skip the garlic, you’ll miss out on that lingering warmth that makes the sauce feel like a hug in a bowl.
The Texture Crew
Carrots and potatoes are the classic sidekicks, but they’re not just filler. The carrots, cut into thick chunks, retain a slight bite that contrasts beautifully with the melt‑in‑your‑mouth beef. The potatoes, preferably Yukon Gold, hold their shape and absorb the broth, turning each bite into a buttery, savory delight. If you’re allergic to potatoes, try parsnips or turnips; they’ll give a slightly sweeter note without compromising the texture.
The Unexpected Star
Red wine is the secret weapon I swear by. A half‑cup of a dry Cabernet or Merlot brings acidity that balances the richness of the beef, while also pulling out the caramelized bits from the bottom of the pot. For those who don’t drink alcohol, substitute with an equal amount of beef broth plus a splash of balsamic vinegar for that same depth. Worcestershire sauce, often overlooked, adds a umami boost that makes the sauce feel almost velvety.
The Final Flourish
Dried thyme and a single bay leaf are the quiet heroes that infuse the broth with an herbaceous perfume. They’re subtle enough not to overpower but essential for that “something extra” flavor that makes every spoonful feel layered. Remember to remove the bay leaf before serving; it’s a tiny detail, but it prevents that occasional “I bit into a leaf” mishap. Finally, a generous seasoning of salt and freshly cracked black pepper brings everything together, ensuring no flavor is left in the shadows.
Everything's prepped? Good. Let's get into the real action…
The Method — Step by Step
-
Season the chuck roast liberally with kosher salt and freshly cracked black pepper on all sides. The salt draws out moisture, creating a beautiful crust later, while the pepper adds a subtle heat that awakens the palate. Let it sit for five minutes while you heat the Instant Pot on the “Sauté” setting. This short rest is the first secret to a juicy roast.
Once the pot is hot, add a tablespoon of olive oil, swirling to coat the bottom. The oil should shimmer, not smoke—if it starts to smoke, turn the heat down a notch.
-
Place the seasoned roast in the pot and sear for about 4–5 minutes per side, or until each side is a deep, caramelized brown. You’ll hear a satisfying sizzle that sounds like applause from the culinary gods. While the meat browns, the Maillard reaction creates those complex flavor compounds that will later coat the sauce like velvet.
When the roast is beautifully seared, remove it and set aside on a plate. This step is crucial—if you try to keep everything in the pot, you’ll end up with steam instead of a rich, browned base.
Kitchen Hack: After searing, deglaze the pot with a splash of cold water before adding the wine; this prevents the fond from scorching and releases even more flavor. -
Add the quartered onion and minced garlic to the pot. Sauté for 2–3 minutes, stirring frequently, until the onion becomes translucent and the garlic releases its fragrant aroma. This is the moment where the kitchen smells like a cozy inn on a rainy day.
Stir in the tomato paste, allowing it to caramelize slightly. The paste deepens the color of the broth and adds a subtle sweetness that balances the acidity of the wine.
-
Now comes the star move: pour in the half‑cup of red wine, scraping the bottom of the pot with a wooden spoon to release all the browned bits. You’ll hear a gentle fizz as the wine meets the hot surface—listen for that sound, it’s the soundtrack of flavor building.
Let the wine reduce by about half, which should take 2–3 minutes. This concentration step intensifies the sauce and evaporates the harsh alcohol bite, leaving behind a mellow, fruity undertone.
Watch Out: If you add the wine too quickly, it may steam vigorously and splatter; pour slowly and keep the lid slightly ajar. -
Return the seared roast to the pot, nestling it among the onions and garlic. Pour in the beef broth, ensuring the liquid comes up at least halfway up the side of the meat. This level of liquid is essential for proper pressure cooking and prevents the pot from triggering a “low liquid” error.
Add the Worcestershire sauce, dried thyme, and bay leaf. Give everything a gentle stir, but avoid breaking up the roast.
-
Arrange the carrot and potato chunks around the roast, making sure they’re partially submerged. The vegetables will absorb the broth, becoming tender without turning mushy.
Seal the Instant Pot lid, making sure the vent is set to “Sealing.” Set the cooker to “Manual” or “Pressure Cook” on high pressure for 45 minutes. This is the part where patience pays off—while the pot builds pressure, the flavors meld together in a way that no stovetop simmer can match.
Kitchen Hack: After the cooking cycle, let the pot sit for a natural release of 10 minutes before doing a quick release; this extra time helps the meat retain its juices. -
When the timer dings, perform a natural release for 10 minutes, then carefully turn the vent to “Venting” for a quick release of any remaining pressure. Once the pin drops, open the lid and you’ll be greeted by a cloud of aromatic steam that smells like a holiday feast.
Transfer the roast to a cutting board and let it rest for five minutes. This short rest allows the juices to redistribute, ensuring every slice is juicy.
-
Shred the meat with two forks, or slice it against the grain for a more elegant presentation. If you prefer a thicker sauce, turn the Instant Pot back to “Sauté” and let the broth reduce for 5–7 minutes, stirring occasionally. A splash of water or additional broth can be added if the sauce gets too thick—remember, you’re aiming for a glossy, coat‑like consistency.
Serve the roast alongside the carrots and potatoes, ladling generous spoonfuls of the reduced sauce over everything. That moment when the first bite hits your tongue? Pure, comforting bliss. This is the part where I’ll be honest—I ate the entire plate before anyone else could even ask for seconds.
Watch Out: If you plan to thicken the sauce, whisk a teaspoon of cornstarch with cold water first; adding it directly can cause clumps.
That's it — you did it. But hold on, I've got a few more tricks that'll take this to another level...
Insider Tricks for Flawless Results
The Temperature Rule Nobody Follows
Most home cooks think “room temperature meat” is a myth, but starting with a roast that’s been out of the fridge for 30 minutes makes a huge difference. The interior warms up just enough to cook evenly, preventing a cold center that can turn rubbery. If you forget this step, the outer layers will overcook while the middle stays tough. Trust me, the extra five minutes of planning pays off in a melt‑in‑your‑mouth texture.
Why Your Nose Knows Best
During the sauté phase, listen to the sound of the onions and garlic. When they start to sizzle softly and turn translucent, you’ve hit the sweet spot. If they start to crackle loudly, they’re burning, and you’ll end up with a bitter edge. The scent is your compass—follow it, and you’ll never miss the flavor peak.
The 5‑Minute Rest That Changes Everything
After pressure cooking, many people rush to shred the meat immediately. Resist that urge. Let the roast rest, loosely covered with foil, for five minutes. This pause allows the muscle fibers to relax and re‑absorb the juices that were forced to the surface during cooking. Skipping this step results in a drier bite, especially noticeable with leaner cuts.
Deglaze Like a Pro
When you add the wine, use a wooden spoon to scrape every caramelized bit from the bottom. Those bits are flavor gold; ignoring them is like leaving money on the table. A quick swirl and a few minutes of reduction will transform the broth from “good” to “show‑stopper.” I once tried skipping this step and the sauce tasted flat—lesson learned.
Season in Layers
Don’t dump all the salt at once. Season the meat before searing, then add a pinch of salt to the broth, and finish with a final dash after the sauce has reduced. Layered seasoning builds complexity and prevents the dreaded “over‑salted” disaster. My friend once added a tablespoon of salt at the end and the roast was inedible—never repeat that mistake.
Creative Twists and Variations
This recipe is a playground. Here are some of my favorite ways to switch things up:
Mexican‑Style Chipotle Roast
Swap the thyme for smoked paprika and add a chipotle pepper in adobo sauce. The broth becomes smoky, slightly spicy, and perfect for shredding into tacos or burritos. Serve with cilantro, lime wedges, and warm corn tortillas for a fiesta on a plate.
Asian‑Inspired Soy‑Ginger Roast
Replace the red wine with a mixture of soy sauce and mirin, and add a tablespoon of grated ginger. Finish with a splash of sesame oil after cooking. The result is a savory‑sweet roast that pairs beautifully with steamed rice and bok choy.
Herb‑Infused Mushroom Medley
Add a cup of sliced cremini mushrooms and a handful of fresh rosemary during the pressure‑cook phase. The mushrooms soak up the broth, adding an earthy depth that complements the beef perfectly. This version is ideal for a cozy fall dinner.
Spicy Italian Arrabbiata Roast
Stir in a generous spoonful of crushed red pepper flakes and a splash of balsamic vinegar before sealing the pot. The sauce takes on a tangy heat that brightens the rich beef, making it a great match for crusty Italian bread.
Slow‑Cooked Barbecue Roast
Swap the broth for your favorite barbecue sauce and add a half cup of apple cider vinegar. After pressure cooking, shred the meat and toss it in extra sauce. Serve on buns with coleslaw for a BBQ sandwich that’ll have everyone asking for the recipe.
Storing and Bringing It Back to Life
Fridge Storage
Cool the roast to room temperature (no more than two hours), then transfer to an airtight container. It keeps beautifully for up to four days. When reheating, add a splash of water or broth and gently warm on the “Sauté” setting, stirring occasionally to revive the sauce’s silkiness.
Freezer Friendly
Portion the cooked roast and vegetables into freezer‑safe bags, removing as much air as possible. Freeze for up to three months. To reheat, thaw overnight in the fridge, then simmer in a pot with a bit of broth until heated through, or use the Instant Pot’s “Steam” setting for a quick revival.
Best Reheating Method
For the ultimate texture, reheat in the Instant Pot using the “Sauté” mode with a drizzle of water or broth. This method prevents the meat from drying out and restores the sauce’s glossy sheen. If you’re in a hurry, the microwave works, but expect a slight loss of that comforting mouthfeel.