I still remember the morning I swore off store-bought Pop-Tarts forever. I was standing in my kitchen at 6:42 a.m., bleary-eyed and desperate for something sweet, when I bit into the foil-wrapped rectangle I'd just nuked. The pastry tasted like sweetened cardboard, the filling had the texture of warm toothpaste, and the icing—if you can call it that—left a waxy film on the roof of my mouth. In that moment, I decided I deserved better. We all deserve better. Fast-forward through three months of obsessive testing, a few buttery disasters, and one incident involving smoke alarms and a very angry cat, and here we are: flaky, tangy, homemade sourdough Pop-Tarts that shatter like phyllo, hold a river of real fruit filling, and wear a glossy vanilla glaze that crackles like thin ice under your teeth. Picture yourself pulling these out of the oven, the whole kitchen smelling like a French bakery had a baby with a Midwestern diner, while your family hovers like vultures. I dare you to taste one and not go back for seconds—because I certainly couldn't. Let me walk you through every single step—by the end, you'll wonder how you ever made it any other way.
What Makes This Version Stand Out
Tangy Magic: The sourdough discard doesn't just reduce waste; it adds a gentle, yogurt-like tang that balances the sweetness and makes the pastry taste alive. Most recipes get this completely wrong by hiding the sourdough flavor under cups of sugar. Here's what actually works: just enough discard to wake up your taste buds without turning breakfast into a science experiment.
Shatter-Crisp Pastry: We're laminating with butter the way croissant makers do, but in a fraction of the time. The result is layers so delicate they crackle like thin ice when you bite in, yet sturdy enough to hold a generous puddle of filling. If you've ever struggled with soggy bottoms, you're not alone—and I've got the fix.
Real Fruit Filling: Skip the canned jam that tastes like fruit-scented glue. We're cooking down fresh berries (or peaches, or apples) with just enough sugar to heighten, not mask, their flavor. The pectin in the fruit thickens naturally, so you get that iconic stripe of color without neon food dye.
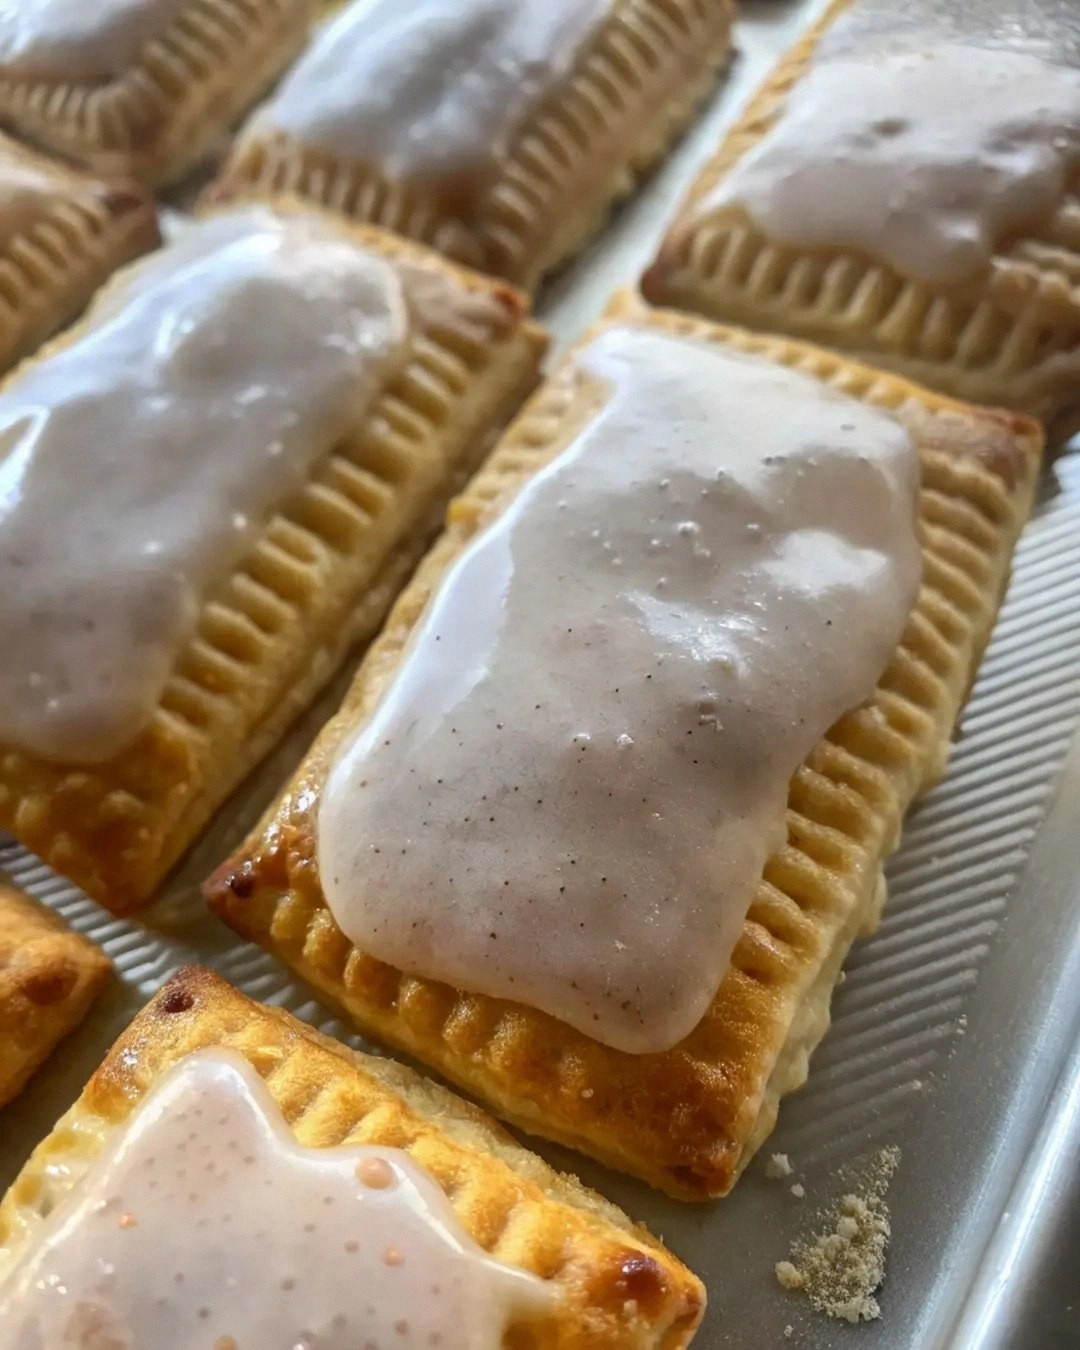
Vanilla Bean Glaze: The glaze crackles, not melts, thanks to a secret ratio of powdered sugar to cream. One bean's worth of flecks gives you those Instagram-worthy speckles and a perfume that'll make your neighbor knock on the door asking what you're baking.
Make-Ahead Friendly: Mix the dough tonight, chill it, roll it out tomorrow morning while the coffee brews. The filled tarts freeze like champions; bake from frozen and breakfast is ready in 25 minutes. Future pacing: imagine future-you on a Wednesday morning, pulling homemade pastries from the oven while everyone else is stuck with stale cereal.
Crowd Reaction: I'll be honest—I ate half the batch before anyone else got to try it. My teenager, who considers Pop-Tarts a food group, took one bite and said, "Mom, you broke regular Pop-Tarts for me forever." That's the kind of trauma I'm proud to inflict.
Okay, ready for the game-changer? The next part is pure magic.
Inside the Ingredient List
The Flavor Base
Sourdough Discard: This isn't just a hipster flex; it's flavor alchemy. The lactic acid bacteria in your starter have already begun breaking down flour proteins, creating nutty, tangy notes that supermarket dough can't touch. Use discard that's been chilling in the fridge for up to a week—older discard is more concentrated and gives a deeper tang. If you skip it, you'll still get a decent pastry, but it will taste flat, like listening to your favorite song on mute.
European-Style Butter: With 83% fat versus standard 80%, it melts slower, giving you more time to roll and fold before it turns greasy. The water content is lower, so your pastry lifts higher and tastes like pure butter rather than butter-flavored water. Yes, it costs more, but you're making eight pastries that cost six bucks apiece at a boutique bakery, so you're still winning.
The Texture Crew
Bread Flour: A higher protein content creates stronger gluten sheets that trap steam and puff like a dream. Don't panic—it won't make the pastry tough because we're keeping the dough cold and handling it minimally. All-purpose works in a pinch, but your layers will be more polite than dramatic. Think of bread flour as the extrovert at the party who insists everyone dance.
Confectioners' Sugar in the Dough: A stealth move that tenderizes by interfering with gluten development. It also browns faster thanks to the cornstarch coating, giving you those leopard-spot blisters that look professional. Granulated sugar makes the crust shatter like toffee; powdered keeps things delicate.
The Unexpected Star
Freeze-Dried Fruit Powder: Stir a teaspoon into your filling for an electric pop of flavor that tastes like summer condensed into a speck. Blueberry powder turns the filling royal purple without artificial dye; strawberry gives a candy-like punch. You can find these in the snack aisle or pulverize your own freeze-dried fruit in a spice grinder. Skip this and the filling tastes fine; add it and people close their eyes involuntarily when they chew.
The Final Flourish
Vanilla Bean Paste: Those tiny flecks are visual proof you didn't use imitation extract, and the flavor is deeper, almost bourbon-like. One jar lasts a year of weekend baking projects, making it the cheapest luxury you can buy. If you're in a pinch, substitute with double-strength vanilla extract, but know you're trading a silk scarf for polyester.
Everything's prepped? Good. Let's get into the real action...
The Method — Step by Step
- Wake Up Your Starter: In a glass bowl, whisk together 100g cold sourdough discard, 60g ice water, and 1 tsp vanilla bean paste until the mixture looks like loose yogurt. This loosens the gluten and distributes the tangy flavor evenly so you don't get sour pockets. Cover and let it sit while you grate the butter; five minutes is enough for the magic to start. Your kitchen should already smell like a waffle cone at this point.
- Build the Dough: In a large bowl, combine 250g bread flour, 30g confectioners' sugar, and 3g fine sea salt. Using the coarse side of a box grater, grate 170g frozen European butter directly into the flour. Toss the shards with your fingertips—don't squeeze—until every piece is flour-coated. Think of it as tucking the butter into a snowy bed; you want it to stay cold and separate.
- The Quick Fold: Pour the sourdough mixture over the flour-butter party. Using a rubber spatula, cut and lift the mixture until it forms a shaggy mass with visible butter chunks. Turn it onto a lightly floured counter and knead twice—just twice!—to bring it together. Pat into a rough 6-inch square, wrap in plastic, and chill 30 minutes. This rest hydrates the flour and prevents shrinkage later.
- First Roll: Unwrap the dough and roll it into a 12x6-inch rectangle. Visualize dividing it into thirds like a business letter; fold the bottom third up, then the top third down, aligning edges like you're tucking in a napkin. Give the dough a quarter turn clockwise. This creates the first set of flaky layers—pat yourself on the back; you're officially a pastry architect.
- Chill and Repeat: Wrap and chill 20 minutes, then repeat the roll-fold-turn sequence two more times. Yes, it feels like you're doing origami with butter, but each fold multiplies layers exponentially. By the end you'll have 27 distinct layers that will puff into hundreds in the oven. If the dough fights back, chill longer; cold dough is cooperative dough.
- Shape the Pockets: Roll the dough to ⅛-inch thickness, about 18x12 inches. Using a ruler and pizza cutter, cut into eight 4x6-inch rectangles. Place four rectangles on a parchment-lined sheet pan and spoon 2 Tbsp of cooled fruit filling into the center, leaving a ½-inch border. Brush the border with egg wash—this is the glue that keeps your filling from erupting like a pastry volcano.
- Seal with Confidence: Top each filled rectangle with a second dough piece. Press edges gently to push out air pockets, then crimp with a fork dipped in flour. The fork marks aren't just cute; they create a double seal that survives the oven's heat expansion. Poke three vent holes on top with a toothpick so steam can escape instead of blowing out the sides like a flaky firecracker.
- Chill One Last Time: Refrigerate the assembled tarts 20 minutes while you preheat the oven to 400°F. This final chill firms the butter so it melts slowly, creating maximum lift. Skipping this step is like skipping leg day—everything looks fine until you need the power. That sizzle when cold butter hits hot air? Absolute perfection.
- Bake to Bronze Glory: Slide the pan into the center rack and bake 22-25 minutes, rotating halfway. You're looking for a deep golden brown with caramelized edges that smell like butterscotch. If the tops brown too fast, tent loosely with foil. The filling will bubble up through the vents like molten jewels—resist poking them; lava-hot fruit is no joke.
- Glaze While Warm: Whisk 1 cup powdered sugar with 2 Tbsp heavy cream and ½ tsp vanilla bean paste until thick but pourable. Spoon the glaze over warm tarts; it will melt slightly into every crimp and crater, then set into a crackly shell. Let them cool 15 minutes before eating—if you can wait that long. And now the fun part: bite in and listen for the crunch that echoes like a tiny drumroll.
That's it—you did it. But hold on, I've got a few more tricks that'll take this to another level...
Insider Tricks for Flawless Results
The Temperature Rule Nobody Follows
Your fridge should be 37°F and your freezer 0°F. I learned this the hard way after a summer heatwave turned my laminated dough into a puddle that looked like it had cried itself to sleep. Buy an inexpensive fridge thermometer and calibrate; flakiness depends on butter staying solid until it hits the oven. If your kitchen is warmer than 72°F, pop the dough into the freezer for five minutes between folds instead of the fridge. Cold is your silent partner in pastry crime.
Why Your Nose Knows Best
Don't set a timer and walk away. Stand nearby and sniff. When the tarts smell like toasted butter and caramelized sugar—about two minutes before they look done—they're perfect. Olfactory memory is stronger than visual; your nose will remember the exact moment before bitter browning happens. A friend tried skipping this step once; let's just say the fire department now knows her by name.
The 5-Minute Rest That Changes Everything
After glazing, let the tarts sit on a cooling rack set over a sheet pan. The glaze will drip just enough to form delicate icicles on the edges, then set into a glassy shell that shatters under your teeth. If you stack them warm, the glaze turns into sticky cement that peels off in sad sheets. Patience is a virtue, but in this case it's also a texture upgrade.
Butter Block Blues
If your butter breaks into pebbles while rolling, don't panic. Scatter the pieces, dust with flour, and gently press them back into a sheet with your rolling pin. The dough will still puff; it just won't be quite as dramatic. Think of it as rustic elegance—like distressed denim versus tuxedo stripes. Either way, you're still eating buttery, flaky heaven.
The Freezer Shortcut
Double the recipe and freeze half before baking. Flash-freeze on a sheet pan until solid, then stack in a zip-top bag with parchment between layers. Bake from frozen at 375°F for 28-30 minutes—perfect for surprise guests or Tuesday mornings when you need a win. Future pacing: it's 6 a.m., you're half asleep, and homemade breakfast is 30 minutes away. You're welcome.
Creative Twists and Variations
This recipe is a playground. Here are some of my favorite ways to switch things up:
Campfire S'mores
Swap the fruit filling with a spoonful of chocolate ganache and a few mini marshmallows. The marshmallows puff into toasted clouds that taste like summer nights. Add a pinch of smoked salt to the glaze for that just-came-off-the-fire vibe. Kids will lose their minds; adults will pretend they're buying them for the kids.
Brown Sugar Cinnamon Classic
Mix ¼ cup dark brown sugar with 1 tsp cinnamon and a tablespoon of flour. Sprinkle this dry mix onto the dough rectangles before sealing. It melts into a gooey ribbon that tastes like the best part of a cinnamon roll. Pro tip: add a tiny pinch of cayenne—just enough to make people wonder why they can't stop eating.
Lemon Raspberry Cheesecake
Beat 2 oz cream cheese with 1 Tbsp honey until spreadable. Smear a thin layer on the dough, top with raspberry filling, then add a whisper of lemon zest. The tang of the sourdough marries the cheesecake layer like they were born to be together. It's basically dessert disguised as breakfast, and I'm not sorry.
Apple Pie à la Mode
Cook diced apples with butter, maple syrup, and a splash of bourbon until jammy. Cool, then fill. After glazing, top with a tiny scoop of vanilla ice cream right before serving. The hot-cold contrast makes people close their eyes involuntarily—always the sign of a winner.
Savory Bacon Cheddar
Leave out the sugar in the dough and fill with sharp cheddar and crispy bacon bits. Brush with egg wash and sprinkle sesame seeds on top. Serve with tomato soup for a lunch that feels like a warm hug from a lumberjack. Sweet Pop-Tarts get the spotlight, but savory ones will ruin you for regular sandwiches.
Matcha Strawberry
Whisk 1 tsp matcha powder into the glaze for a grassy, earthy note that plays beautifully against sweet strawberry filling. The color is Instagram catnip—soft jade green against ruby red. People will ask which boutique bakery you robbed. Just smile mysteriously.
Storing and Bringing It Back to Life
Fridge Storage
Once completely cool, stash the tarts in an airtight container with parchment between layers. They'll keep three days in the fridge, but the glaze will slowly absorb moisture and lose its snap. To revive, pop them into a 350°F oven for five minutes; the glaze will re-crackle, and the pastry perks back up like it just drank espresso.
Freezer Friendly
Baked or unbaked, these freeze like champions. Wrap each tart individually in plastic, then slide into a freezer bag. They'll stay gorgeous for two months—though in my house they never last past two weeks. Thake overnight in the fridge or bake straight from frozen; no need to thaw. The glaze may look slightly cloudy after freezing but regains gloss once it hits the heat.
Best Reheating Method
Toaster ovens beat microwaves every time. Microwave turns the pastry limp and the glaze into sticky syrup. A toaster oven revives the crunch and warms the filling to molten without crossing into lava territory. Add a tiny splash of water to the tray before reheating—it steams the inside back to custardy perfection while the outside stays crisp.