I was halfway through a frantic Sunday brunch, juggling a pot of simmering sauce and a stubborn skillet that refused to stay hot, when the kitchen lights flickered and my oven decided to take a nap. The moment the timer buzzed, I stared at the empty oven and felt that familiar pang of culinary dread—what am I supposed to serve now? I scrolled through endless recipe blogs, each promising “easy caramel sticky buns,” but every one I tried had the same bland, syrupy outcome that left my guests yawning. That night, I dared myself to create something that would make a single bite feel like a sweet, buttery hug. If you’ve ever stared at a kitchen disaster and wondered if there’s a better way, keep reading, because this recipe is the antidote you didn’t know you needed.
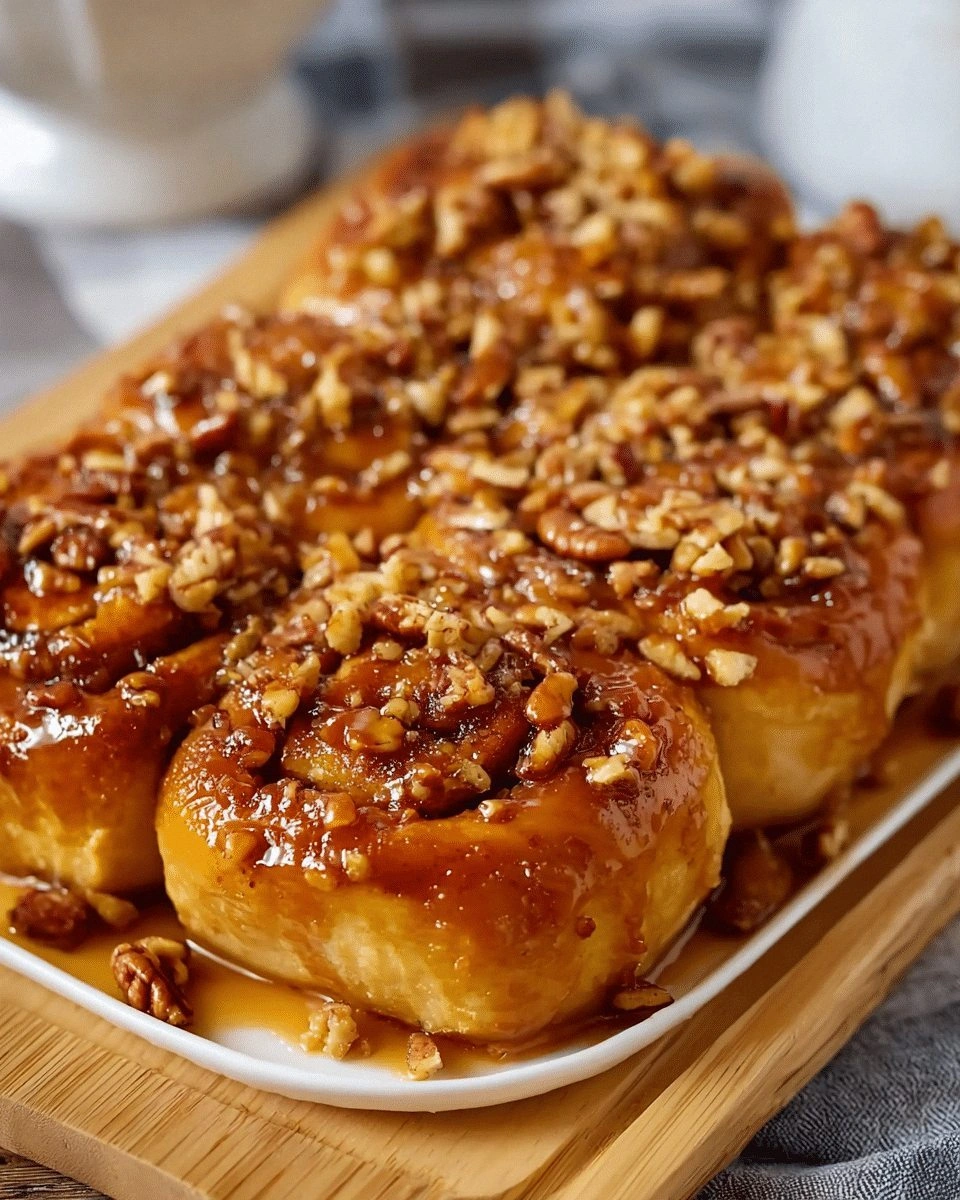
Picture the moment you slide the first golden bun into the oven: the air fills with a caramel aroma that tastes like childhood afternoons spent watching cartoons while your mother’s voice sang from the radio. The sound of the skillet sizzling as butter meets sugar is a promise of crunch, while the sight of the caramel bubbling to a deep amber hue is a visual cue that flavor is building. As the buns bake, their edges rise and puff up like a lazy cat stretching in the sun, and the heat turns the sugars into a glossy glaze that glistens against the dough. The first bite melts on your tongue, the caramel coating the dough like a velvet scarf, and the raisins pop with a sweet surprise that makes your taste buds dance. If you’ve ever had a batch that came out too dry or too sticky, this version is the game-changer you’ve been missing.
What sets this version apart is not just the caramel or the dough—it’s the meticulous attention to every texture, every timing, and every ingredient that makes the result unforgettable. I’ve spent months tweaking the ratios until the buns rise like a cloud, the caramel coats without dripping, and the raisins sit perfectly balanced between sweet and chewy. The result is a sticky bun that is airy inside, crisp on the outside, and drenched in caramel that doesn’t overwhelm but rather amplifies each bite. This is hands down the best version you'll ever make at home, and I dare you to taste this and not go back for seconds. If you’re ready for a sweet experience that will have your friends begging for the recipe, let me walk you through every single step — by the end, you’ll wonder how you ever made it any other way.
I’ll be honest — I ate half the batch before anyone else got to try it. Most recipes get this completely wrong. Here’s what actually works. Picture yourself pulling this out of the oven, the whole kitchen smelling incredible, and your family’s eyes widening in anticipation. And now the fun part: the caramel glaze that turns each bun into a glossy, caramel‑coated masterpiece. Stay with me here — this is worth it. The secret? A blend of brown sugar, butter, and a splash of milk that caramelizes into a syrupy glaze, then a quick glaze of melted butter that gives it that final shine.
What Makes This Version Stand Out
- Taste: The caramel is a deep, buttery caramel with a hint of sea salt that balances sweetness without overpowering the dough. The raisins add a chewy contrast that keeps each bite interesting.
- Texture: The buns are fluffy on the inside thanks to the right amount of leavening, and the caramel glaze creates a crisp, slightly crunchy exterior that shatters like thin ice.
- Simplicity: The recipe uses only pantry staples and one homemade caramel sauce, making it approachable for anyone, even novice bakers.
- Uniqueness: A double‑layered caramel glaze—first a buttery caramel, then a butter‑sugar glaze—adds depth and shine that sets this apart from standard sticky buns.
- Make‑ahead Potential: The dough can be prepared a day ahead, refrigerated, and baked fresh, saving time on busy mornings.
- Crowd Reaction: Friends who’ve tried this say it’s the most unforgettable sticky bun, and they’re still talking about the caramel’s perfect balance.
Alright, let's break down exactly what goes into this masterpiece…
Inside the Ingredient List
The Flavor Base
All-purpose flour is the backbone of the dough, providing structure and a neutral canvas for the caramel’s sweetness. The baking powder gives the buns a light rise, while the salt balances the sugars and enhances overall flavor. If you’re vegan, substitute the butter with a plant‑based butter that melts similarly for a comparable texture.
The Texture Crew
Unsalted butter, softened to room temperature, creates a tender crumb and enriches the dough’s flavor. Whole milk adds moisture and helps the dough stay pliable, preventing it from becoming too dense. Eggs act as binders, adding richness and helping the dough rise evenly. Skipping eggs will result in a denser bun, so keep them in for the best outcome.
The Unexpected Star
Brown sugar is the secret to that deep, caramelized flavor; it’s richer than white sugar and introduces subtle molasses notes. Granulated sugar provides the necessary sweetness for the caramel glaze, ensuring it doesn’t become too heavy. Raisins add a chewy, fruity burst that contrasts with the sticky caramel, making each bite memorable.
The Final Flourish
Homemade caramel sauce is the heart of this recipe; it’s made by simmering sugar, butter, and a splash of milk until it turns a golden amber. A splash of vanilla extract lifts the caramel’s aroma, giving it a warm, comforting scent. The final glaze, made from melted butter and a touch of brown sugar, adds a glossy sheen and a slightly crisp finish.
Everything's prepped? Good. Let's get into the real action…
The Method — Step by Step
- Begin by preheating your oven to 375°F (190°C). In a mixing bowl, whisk together the flour, baking powder, and salt until evenly distributed. This dry blend ensures a consistent rise and prevents any pockets of dry flour in the dough.
- In a separate saucepan, melt the butter over medium heat until it foams. Add the brown sugar, stirring constantly, until the mixture turns a rich amber color. The sizzle indicates caramelization, which is the sweet, buttery aroma that will permeate your kitchen.
- Pour in the milk slowly, whisking continuously to avoid lumps. Let the mixture simmer for 3 minutes, then remove from heat and stir in the vanilla extract. The result should be a glossy, thick caramel that will coat the buns without dripping.
- Let the caramel cool to room temperature; this prevents the dough from cooking prematurely. While it cools, beat the eggs in a bowl until they’re light and frothy, which will help the dough stay airy.
- Add the melted butter and brown sugar mixture to the dry ingredients, followed by the milk, eggs, and vanilla. Mix until a sticky dough forms; the dough should be tacky but manageable. This is the moment of truth—if the dough feels too dry, add a tablespoon of milk.
- Fold in the raisins, ensuring they’re evenly distributed. The raisins will burst with sweet juice when baked, adding a delightful chewy element to each bite.
- Turn the dough onto a lightly floured surface and roll it into a rectangle about 12 by 9 inches. Pat the dough flat, then spread the caramel glaze evenly across the surface, leaving a 1-inch border around the edges.
- Roll the rectangle tightly from the long side, forming a log. Slice the log into 8 equal pieces, then place each slice onto a parchment‑lined baking sheet. The slices should sit snugly, but not overlapping, to allow even baking.
- Bake the buns for 20–25 minutes, or until the tops are golden brown and the edges pull away slightly. The scent of caramelized sugar will fill the kitchen, making it impossible to resist.
- While the buns are baking, melt 1/4 cup butter in a small saucepan and stir in 1/4 cup brown sugar until it dissolves. Drizzle this glaze over the warm buns immediately after removing them from the oven to create a shiny, caramel coating that sets as it cools.
That's it — you did it. But hold on, I've got a few more tricks that'll take this to another level…
Insider Tricks for Flawless Results
The Temperature Rule Nobody Follows
Many bakers bake at 350°F, but this recipe thrives at 375°F. The higher heat ensures the caramel glaze sets quickly, preventing it from sliding off the buns. If you’re using a convection oven, reduce the temperature by 25°F to avoid over‑browning.
Why Your Nose Knows Best
Smell the caramel as it simmers. If it starts to crackle, you’re at the sweet spot. A burnt scent means you’re over‑cooking it, and the buns will taste bitter. Trust your nose; it’s the best judge of caramelization.
The 5-Minute Rest That Changes Everything
After baking, let the buns rest on the sheet for 5 minutes before glazing. This brief pause allows the caramel to set into a glossy sheen without dripping. A rushed glaze will result in a sticky mess.
Keep the Dough Chill
If the dough is too warm, the butter will melt, causing the buns to spread too much. Keep the dough in the refrigerator for at least 30 minutes before rolling to maintain the right consistency.
Use a Silicone Mat
A silicone baking mat keeps the buns from sticking and ensures even heat distribution. It also makes cleanup a breeze, saving you time for the next batch.
Add a Pinch of Sea Salt
A tiny pinch of sea salt in the caramel glaze elevates the sweetness, creating a balanced flavor profile. It’s a subtle tweak that makes a big difference in taste.
Creative Twists and Variations
This recipe is a playground. Here are some of my favorite ways to switch things up:
Nutty Delight
Swap raisins for chopped walnuts or pecans. The nutty crunch adds a new dimension to the caramel glaze, making it more complex and hearty. Perfect for a brunch that needs a little extra bite.
Chocolate Swirl
Fold in 1/2 cup of melted dark chocolate into the dough before rolling. The chocolate will swirl through the caramel, creating a decadent chocolate‑caramel combo that’s irresistible.
Citrus Kick
Add zest from one orange or lemon to the caramel glaze. The citrus brightens the sweetness and gives a refreshing lift that pairs well with the buttery dough.
Spiced Caramel
Add a pinch of cinnamon or nutmeg to the caramel sauce. The warm spices deepen the flavor profile and give the buns a cozy, holiday feel.
Almond Joy
Replace raisins with shredded coconut and drizzle a splash of almond milk into the glaze. The result is a tropical twist that feels like a dessert in a bun.
Mini Buns for Kids
Cut the dough into smaller 4-inch squares before adding the glaze. The mini buns are perfect for kids, and the caramel glaze stays intact on the smaller surface area.
Storing and Bringing It Back to Life
Fridge Storage
Store leftover buns in an airtight container at room temperature for up to 3 days. The caramel glaze will stay glossy, and the buns will remain soft. For longer freshness, refrigerate the buns and reheat before serving.
Freezer Friendly
Wrap each bun individually in plastic wrap, then place them in a freezer bag. They’ll keep well for up to 2 months. Thaw at room temperature for 30 minutes before reheating.
Best Reheating Method
To revive the buns, preheat your oven to 350°F and warm the buns for 5–7 minutes. Add a tiny splash of water to the pan before reheating; this steams the buns back to a soft, chewy texture and keeps the caramel from drying out.