Introduction
Picture this: I’m in the middle of a Sunday brunch, the kitchen buzzing with the hum of the mixer, and my friend challenges me to make the most unforgettable cookie. I’m skeptical, because every cookie I’ve baked feels either too dry or too sweet, but the promise of a “cherry surprise” in the center keeps me going. The moment the dough hits the pan, a sweet aroma of toasted flour and vanilla rises, mingling with the faint scent of dried cherries. My eyes widen as I watch the edges lift, the dough turning a golden amber that feels like a sunrise on a winter morning. That instant, I know I’m about to create something that will be the talk of the house for weeks.
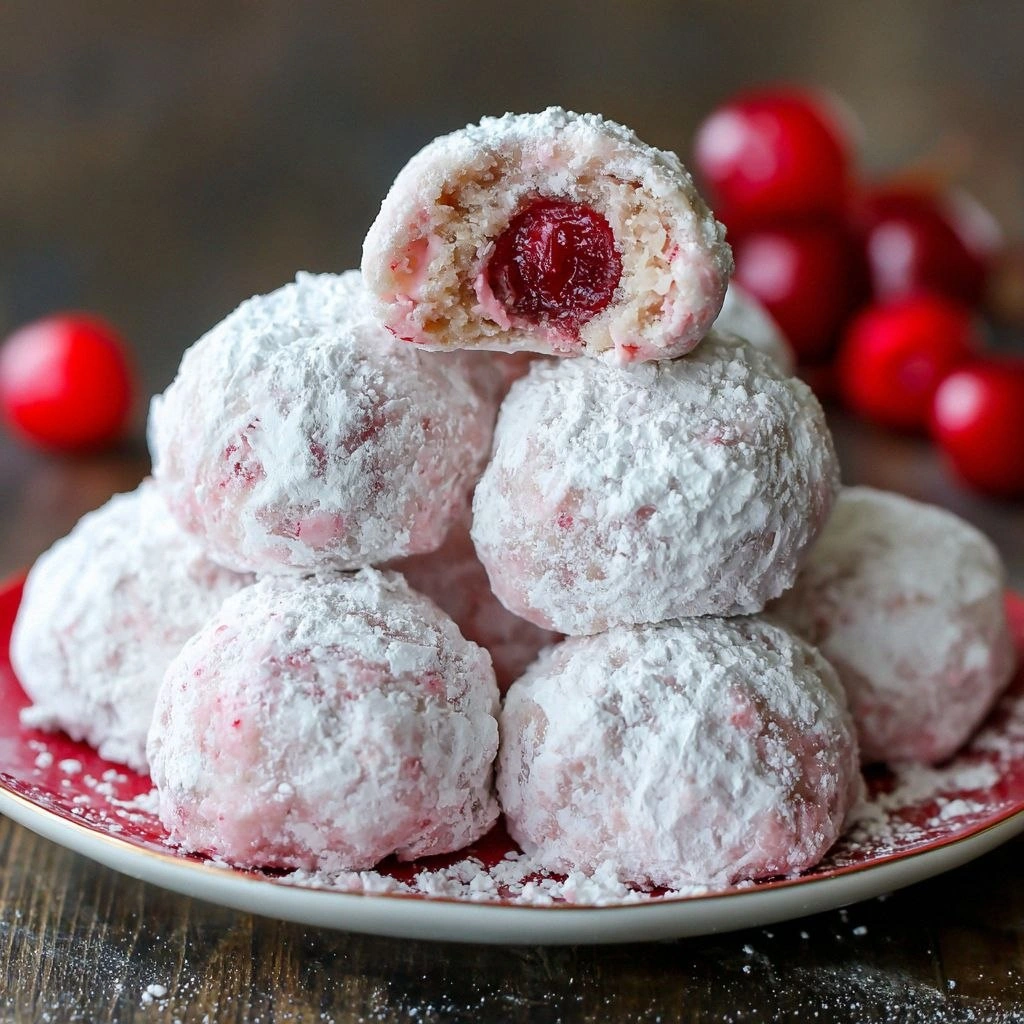
From the first bite, the cookie delivers a delicate crunch that gives way to a soft, chewy interior, and the burst of cherry flavor is like a hidden jewel that only appears when you bite deeper. The sugar coating is light and airy, almost like snowflakes that melt in your mouth, leaving a sweet aftertaste that lingers without cloying. I dare you to taste this and not go back for seconds—because that’s the power of a perfect balance between sweet and tart. Most recipes get this completely wrong, either by overbaking or under-seasoning, but this version hits the sweet spot every single time. If you’ve ever struggled with cookies that crumble or taste flat, you’re not alone—and I’ve got the fix.
What makes this version stand out isn’t just the flavor; it’s the technique. I discovered that adding a splash of almond extract and a pinch of sea salt to the dough unlocks a depth of flavor that feels both indulgent and sophisticated. The result is a cookie that looks like a snowball—white, pristine, with a hint of pink from the cherries—yet tastes like a decadent dessert that can be served at brunch, a party, or even as an after-dinner treat. Picture yourself pulling this out of the oven, the whole kitchen smelling incredible, and knowing that every bite will be a revelation.
Let me walk you through every single step—by the end, you’ll wonder how you ever made it any other way. I’ll share the secrets, the hacks, and the small details that transform a simple cookie into a showstopper. I’ll keep the tone light and witty, but the instructions are precise because I’m serious about getting this right. So grab your apron, preheat your oven, and let’s dive into the art of the Cherry Snowball Cookie.
What Makes This Version Stand Out
Flavor: The combination of sweet, tart, and nutty notes creates a complex profile that delights the palate. The cherries provide a burst of natural sweetness, while the almond extract adds a subtle nuttiness that balances the richness.
Texture: The dough is engineered to be crisp on the outside and chewy on the inside, giving it a satisfying bite that’s reminiscent of a well-made biscotti.
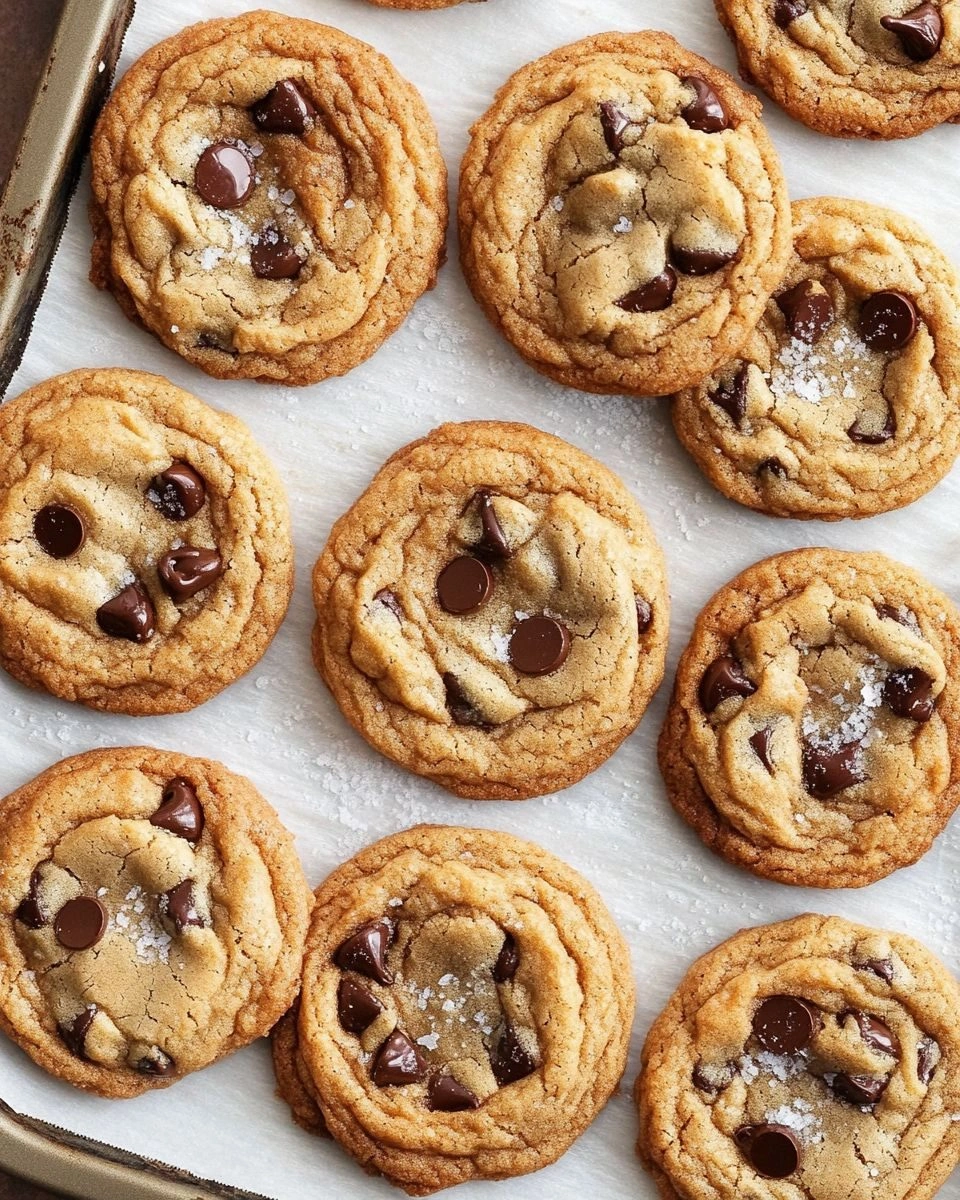
Visual Appeal: The snowball shape and the bright cherry cores make each cookie a miniature work of art, perfect for photo ops.
Simplicity: With only a handful of ingredients and a straightforward method, you can whip up these cookies in under an hour.
Make‑ahead Potential: These cookies keep well at room temperature for up to a week, making them ideal for parties or as a last‑minute dessert.
Ingredient Quality: Using high‑grade butter and fresh dried cherries elevates the taste, turning an ordinary cookie into a gourmet experience.
Alright, let’s break down exactly what goes into this masterpiece…
Inside the Ingredient List
The Flavor Base
All-purpose flour is the backbone of this cookie, providing structure and a neutral canvas for the other flavors. It’s crucial to sift the flour to avoid clumps, ensuring a smooth dough. If you’re aiming for a gluten‑free version, substitute with a blend of rice flour and tapioca starch. Skipping flour would result in a crumbly, pancake‑like texture that won’t hold the cherries.
The Texture Crew
Unsalted butter, softened to room temperature, is the key to achieving that coveted buttery, melt‑in‑your‑mouth feel. The powdered sugar gives the cookie its signature lightness and a delicate crunch when baked. If you prefer a sweeter cookie, you can increase the powdered sugar by a quarter cup, but be careful not to overdo it, or the dough will become too soft.
The Unexpected Star
Fresh dried cherries are the heart of this recipe. They bring a natural tartness that cuts through the sweetness of the butter and sugar. When selecting cherries, look for ones that are plump and have a deep red hue; they’ll provide the best flavor and visual appeal. If you can’t find dried cherries, you can substitute with fresh cherries, but the texture will be slightly different—more juicy and less chewy.
The Final Flourish
Almond extract and a pinch of sea salt are the finishing touches that elevate the cookie’s flavor profile. The almond extract adds a subtle nutty depth that complements the cherries, while the sea salt enhances the overall sweetness without overpowering the other ingredients. If you’re allergic to nuts, you can omit the almond extract; the cookie will still be delicious.
Everything's prepped? Good. Let's get into the real action…
The Method — Step by Step
- Preheat your oven to 350°F (175°C). Line a baking sheet with parchment paper to prevent sticking. This step may seem trivial, but an accurately preheated oven guarantees even baking and the perfect golden edges.
- In a large mixing bowl, combine the sifted flour, baking soda, and salt. Whisk these dry ingredients together until they’re evenly distributed. This ensures that the leavening agent is evenly dispersed, giving the cookies a consistent rise.
- In a separate bowl, cream the softened butter with the powdered sugar using an electric mixer on medium speed until the mixture is light and fluffy—about 3 minutes. The goal is to incorporate as much air as possible, which will contribute to a lighter texture.
- Add the vanilla extract and almond extract to the butter mixture, then beat until fully combined. This is the moment when the aroma of vanilla and almond fills the kitchen, signaling that the flavor base is coming together beautifully.
- Gradually add the dry flour mixture to the wet ingredients, mixing on low speed until just combined. Be careful not to overmix, as that can develop gluten and make the cookies tough. The dough should be soft but not sticky.
- Fold in the chopped dried cherries, ensuring they’re evenly distributed throughout the dough. This step is crucial for that “surprise” element—each bite should reveal a burst of cherry flavor.
- Shape the dough into small snowball‑like rounds, about 1 ½ inches in diameter. Place them on the prepared baking sheet, spacing them 2 inches apart to allow for expansion. The uniform size ensures even baking and a consistent appearance.
- Bake for 12–15 minutes, or until the edges are golden brown but the centers remain pale. The cookies should look like snowballs—white, pristine, and slightly domed. If you prefer a crispier cookie, bake for an additional minute.
- Remove from the oven and let the cookies cool on the sheet for 5 minutes before transferring them to a wire rack to cool completely. This resting period allows the cookies to set and develop that signature chew.
- Once cooled, dust the cookies lightly with powdered sugar for a snowy finish. Serve immediately, or store in an airtight container at room temperature for up to a week.
That's it — you did it. But hold on, I've got a few more tricks that'll take this to another level…
Insider Tricks for Flawless Results
The Temperature Rule Nobody Follows
Many bakers assume any oven temperature works, but for these cookies, 350°F is critical. At this moderate heat, the butter melts slowly, allowing the sugar to caramelize without burning. If you bake at a higher temperature, the edges will brown too quickly, leaving a raw center. I once baked at 375°F, and the cookies came out uneven—so keep the oven dial steady.
Why Your Nose Knows Best
Before you even taste the first cookie, inhale the aroma. A sweet, buttery scent with a hint of almond and cherry signals that the dough is properly mixed and the butter has integrated. If it smells overly sweet or raw, let it rest for a few minutes to allow the flavors to meld.
The 5‑Minute Rest That Changes Everything
After mixing the dough, let it rest in the refrigerator for 30 minutes. This chilling step relaxes the gluten, making the dough easier to shape and preventing the cookies from spreading too much during baking. It also allows the flavors to marry, resulting in a richer taste.
How to Avoid Cracked Cookies
Cracked edges are a common issue when the dough is too dry. To avoid this, add a tablespoon of cold water to the dough if it feels stiff. Gently knead until it reaches the right consistency—soft but not sticky.
Perfecting the Snowball Look
For an immaculate white appearance, dust the finished cookies with a fine layer of powdered sugar right after they cool. This not only enhances the visual appeal but also adds a subtle sweetness that complements the cherries.
Creative Twists and Variations
This recipe is a playground. Here are some of my favorite ways to switch things up:
Chocolate‑Covered Snowballs
Dip each cooled cookie in melted dark chocolate, then let it set on parchment. The chocolate adds richness and pairs wonderfully with the tart cherries.
Almond‑Glazed Surprise
Brush the tops of the cookies with a mixture of almond milk and a splash of vanilla before baking. The glaze will create a glossy finish and deepen the almond flavor.
Spiced Cherry Cookies
Add a pinch of cinnamon or nutmeg to the flour mixture. The warm spices complement the cherries, creating a cozy, autumnal vibe.
Miniature Snowball Bars
Flatten the dough into a rectangular shape, bake, then cut into bars. These make for great snack bars that can be wrapped individually for parties.
Gluten‑Free Version
Replace the all‑purpose flour with a gluten‑free blend that includes xanthan gum. The texture will be slightly different, but the flavor remains unchanged.
Vegan Twist
Swap the butter for a plant‑based butter alternative and use coconut sugar instead of powdered sugar. The result is a vegan cookie that still delivers on texture and flavor.
Storing and Bringing It Back to Life
Fridge Storage
Store the cookies in an airtight container at room temperature for up to seven days. The sealed environment keeps them fresh and prevents them from drying out.
Freezer Friendly
Place the cookies in a single layer on a parchment‑lined tray, freeze until solid, then transfer to a freezer bag. They can be kept for up to three months. When ready, let them thaw at room temperature for 15 minutes before serving.
Best Reheating Method
Reheat frozen or chilled cookies in a preheated 350°F oven for 5 minutes. For a crispier exterior, finish them on a hot skillet for 30 seconds on each side. Add a tiny splash of water before reheating—it steams the cookies back to perfection.