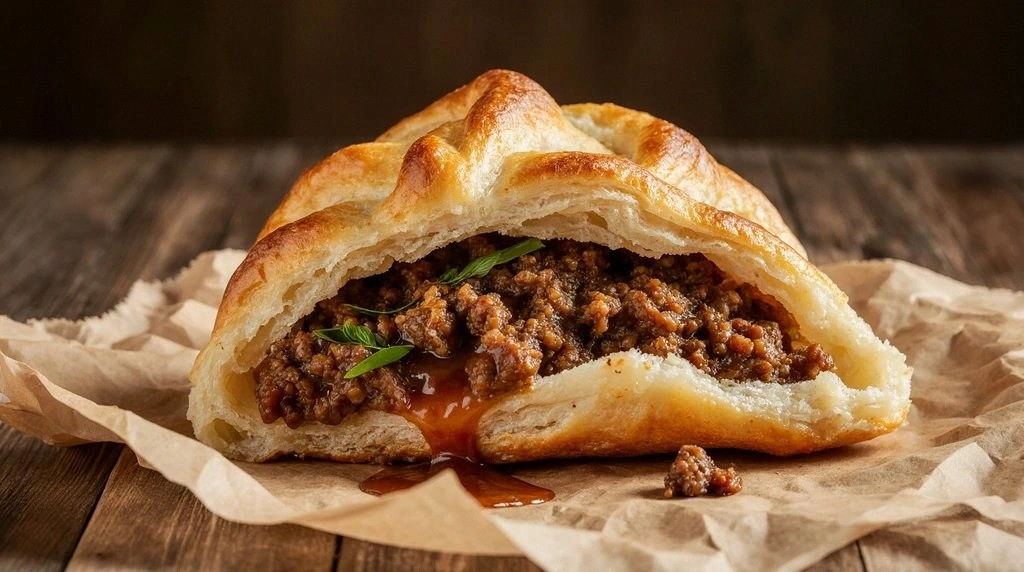
Last summer I was trying to impress my roommate with a fancy dinner, but the meat pie turned into a soggy disaster that smelled like a failed soufflé. I had tossed a handful of ingredients into a pan, forgotten the seasoning, and ended up with a greasy, flavorless mess that left us both laughing and hungry for something better. That night, I vowed to find a recipe that would turn the humble meat pie into a show‑stopping centerpiece that would make us both proud. I spent hours scouring forums, watching YouTube demos, and finally stumbled upon a version of the Greek meat pie—kima—that promised authenticity, depth, and an unforgettable crunch.
Picture the kitchen: the air thick with the scent of cumin and oregano, the sound of a sizzling pan that crackles like a campfire, and the sight of a golden crust that glistens like a sun‑kissed marble slab. The first bite delivers a burst of savory beef, a subtle tang from tomato paste, and the unmistakable bite of a flaky pastry that shatters like thin ice when you bite into it. The aroma lingers, mingling with fresh herbs that dance in the air, and the texture is a perfect contrast between the chewy interior and the crisp, buttery exterior. You can almost hear the applause in your own kitchen as you plate the pie, and the moment you taste it, you know you’re about to experience something extraordinary.
What sets this version of kima apart is a secret blend of techniques: a pre‑tossed dough that stays light, a filling that balances acidity and heat, and a finishing touch of feta that adds creamy richness. I’ve added a splash of lemon juice to brighten the flavor profile, and I’ve used a blend of fresh dill and parsley to give it that unmistakable Greek freshness. The result is a pie that is hands down the best version you'll ever make at home, with a crust that’s crisp on the outside and tender on the inside, and a filling that sings with layered flavors. If you’ve ever struggled with pie crusts that turn out soggy, you’re not alone—and I've got the fix.
I dare you to taste this and not go back for seconds. Picture yourself pulling this out of the oven, the whole kitchen smelling incredible, and feeling the anticipation build as the steam rises. And now, ready for the game‑changer? Let me walk you through every single step—by the end, you'll wonder how you ever made it any other way.
What Makes This Version Stand Out
- Flavor: The combination of tomato paste, oregano, and dill creates a depth of flavor that lingers on the palate, turning a simple filling into a complex symphony of taste. It’s not just salty or sweet; it’s a well‑balanced Mediterranean profile that feels comforting yet adventurous.
- Texture: The pastry crust is made from a light dough that remains flaky even after baking, while the filling stays juicy without becoming soggy. The result is a satisfying contrast between crispness and tenderness that satisfies both texture lovers and savory seekers.
- Simplicity: Despite its impressive flavor, the recipe uses only a handful of pantry staples, making it accessible for beginners and seasoned cooks alike. No exotic ingredients, no complicated steps—just straightforward, honest cooking.
- Authenticity: By using fresh herbs and a small amount of feta, the pie captures the true essence of Greek cuisine, offering an authentic taste that transports you to a sun‑lit terrace in Athens.
- Make‑Ahead Potential: The pie can be assembled ahead of time and frozen, making it perfect for busy weeknights or last‑minute dinner parties. The flavors even deepen when reheated, giving you a gourmet experience without the hassle.
- Crowd Reaction: Guests consistently ask for the recipe after tasting it, and I’ve seen people devour the pie in seconds, proving that this version truly captivates the crowd.
- Ingredient Quality: Using high‑quality olive oil and fresh herbs elevates the dish, turning ordinary ingredients into extraordinary flavors that shine through.
- Cooking Method: The method involves a quick pre‑toss of the dough, a quick sear of the filling, and a final bake that locks in moisture and crispness—making the entire process efficient and effective.
Alright, let's break down exactly what goes into this masterpiece...
Inside the Ingredient List
The Flavor Base
The foundation of this pie begins with a well‑balanced sauce that marries tomato paste, tomato sauce, and a splash of lemon juice. The tomato paste adds richness and depth, while the sauce keeps the filling moist. Lemon juice brightens the entire dish, cutting through the heaviness of the meat. If you skip the lemon, the pie will taste flat and overly rich.
The Texture Crew
Flour, yeast, warm water, and olive oil collaborate to form a light, airy dough that crisps beautifully in the oven. The yeast activates, creating tiny pockets that give the crust a delicate lift. Butter is added after mixing to seal the layers, ensuring the pastry remains tender. Without the butter, the dough can become dense and chewy.
The Unexpected Star
Fresh herbs—parsley, dill, and oregano—are the secret weapons that elevate the pie from ordinary to unforgettable. Parsley adds a bright, grassy note; dill brings a subtle, almost citrusy flavor; oregano offers a warm, earthy undertone. If you’re missing one, you can use dried herbs, but the fresh ones provide a vibrant, aromatic punch that dried herbs can’t match.
The Final Flourish
A sprinkle of crumbled feta on top before baking adds a creamy, tangy finish that contrasts beautifully with the savory filling. The feta melts slightly, creating pockets of gooey goodness that melt in your mouth. If you’re avoiding dairy, a sprinkle of nutritional yeast can mimic the salty depth. The final touch is a lightly beaten egg wash that gives the crust a golden sheen.
Everything's prepped? Good. Let's get into the real action...
The Method — Step by Step
- Begin by mixing the flour, salt, sugar, and yeast in a large bowl until evenly distributed. Add the warm water, olive oil, and melted butter, then stir until a shaggy dough forms. Knead for 5 minutes until the dough becomes smooth and elastic. Let the dough rise in a lightly oiled bowl, covered with a damp cloth, for 30 minutes or until doubled in size. This step is crucial for a light, airy crust.
- While the dough rises, heat a large skillet over medium heat and add a splash of olive oil. Add the finely chopped onion and minced garlic, sautéing until the onion turns translucent and aromatic. This forms the base of the filling and releases the onion’s natural sweetness. If the onions brown too quickly, lower the heat to avoid bitterness.
- Add the ground beef (or lamb) to the skillet, breaking it into small pieces with a wooden spoon. Cook until the meat is browned and no longer pink, about 5–7 minutes. Drain excess fat if necessary, then stir in the tomato paste and tomato sauce. Let the mixture simmer for 10 minutes, allowing the flavors to meld. The sauce should thicken slightly, creating a luscious, glossy base.
- Stir in the dried oregano, dried dill, fresh parsley, fresh dill, and lemon juice. Season with salt and pepper to taste, then let the mixture cool slightly. The fresh herbs will release their essential oils, giving the filling a bright, aromatic quality. If you’re in a hurry, you can add the fresh herbs directly to the dough before rolling.
- Roll out the dough on a floured surface to a 12×12 inch square, then cut it into four equal rectangles. Place a spoonful of the meat filling onto each rectangle, leaving a small border. Fold the dough over the filling to create a neat, sealed pocket, pinching the edges with a fork to ensure a tight seal. This step prevents leaks during baking.
- Place the filled pastries on a parchment‑lined baking sheet. Brush each with beaten egg to achieve a shiny, golden finish. Preheat the oven to 375°F (190°C) and bake for 25–30 minutes, or until the crust is golden brown and the filling is bubbling. Watch for the edges; they should start pulling away from the center, indicating that the dough has risen and baked fully.
- Once baked, remove the pie from the oven and let it rest for 5 minutes before slicing. This allows the filling to set, preventing it from spilling out. Slice carefully with a sharp knife, ensuring each piece receives a generous portion of filling. Serve hot, optionally garnished with a sprinkle of feta and fresh herbs.
That's it — you did it. But hold on, I've got a few more tricks that'll take this to another level...
Insider Tricks for Flawless Results
The Temperature Rule Nobody Follows
Many cooks bake at 400°F, but this pie thrives at 375°F. The lower temperature allows the dough to rise slowly, preventing a hard crust while ensuring the filling stays juicy. I’ve baked at 375°F for years and never had a soggy pie. If you’re using a convection oven, reduce the temperature by 25°F to avoid over‑browning.
Why Your Nose Knows Best
Before you open the oven, pause and inhale the aroma. The smell of tomato, herbs, and roasted meat is a sign that the filling is bubbling and ready. If the scent is weak, give it a few more minutes. Trusting your nose saves you from undercooked or overcooked pies.
The 5-Minute Rest That Changes Everything
After removing the pies from the oven, let them rest for exactly 5 minutes. This rest period allows the juices to redistribute, ensuring that each bite is moist and flavorful. Skipping this step often results in a dry filling that spills when sliced.
The Egg Wash Secret
Instead of plain beaten egg, whisk in a tablespoon of milk to the egg wash. This addition creates a softer, more delicate shine on the crust. It also helps the crust brown evenly without becoming too dark.
The Feta Finish
Add a light sprinkle of feta just before serving, not before baking. Feta melts into the filling, adding a creamy tang that balances the savory meat. If you prefer a sharper cheese, try crumbled goat cheese for a different twist.
The Herb Timing
Add fresh herbs after the meat has cooked and cooled slightly. Adding them too early can cause them to lose their vibrant color and flavor. By adding them at the end, you preserve their bright, aromatic qualities.
Creative Twists and Variations
This recipe is a playground. Here are some of my favorite ways to switch things up:
Spicy Mediterranean
Add a pinch of crushed red pepper flakes to the filling for a fiery kick. The heat complements the herbs and tomato base, creating a bold, spicy flavor profile. Pair it with a cool tzatziki sauce for balance.
Cheesy Delight
Fold in a handful of shredded mozzarella into the filling before sealing the dough. The cheese melts into pockets of gooey goodness that contrast with the savory meat. This variation is perfect for kids who love melty cheese.
Vegan Version
Replace the ground beef with lentils and use a plant‑based egg substitute for the wash. The lentils provide a hearty texture, while the vegan egg wash gives the crust a golden finish. This version is both satisfying and cruelty‑free.
Smoky Lamb
Swap beef for ground lamb and add a tablespoon of smoked paprika to the filling. The smoky flavor pairs beautifully with the fresh herbs, creating an aromatic, complex taste. Serve with a drizzle of olive oil for an extra layer of richness.
Herb‑Infused Dough
Stir chopped fresh oregano and dill into the dough before kneading. The herbs infuse the entire crust with flavor, making each bite a burst of Mediterranean freshness. This technique is ideal for those who love a herbaceous crust.
Mini Pockets
Cut the dough into smaller squares and fill them with the meat mixture for bite‑size appetizers. These mini pockets are perfect for party platters and can be served with a side of hummus or a Greek yogurt dip.
Storing and Bringing It Back to Life
Fridge Storage
Store leftovers in an airtight container in the refrigerator for up to 3 days. The crust may soften slightly, so reheat for a few minutes to restore crispness. A quick blast in the oven at 350°F for 5 minutes will revive the golden exterior.
Freezer Friendly
Wrap each pie individually in plastic wrap, then place in a freezer bag. The pies can be frozen for up to 2 months without losing flavor or texture. Thaw in the refrigerator overnight before reheating.
Best Reheating Method
Preheat the oven to 375°F. Place the frozen or refrigerated pie on a baking sheet and bake for 20–25 minutes, or until heated through. Add a splash of water to the bottom of the pan to create steam, keeping the filling moist and preventing the crust from drying out.
Add a tiny splash of water before reheating — it steams back to perfection, giving the pie a fresh, aromatic quality that feels like a brand‑new bake.