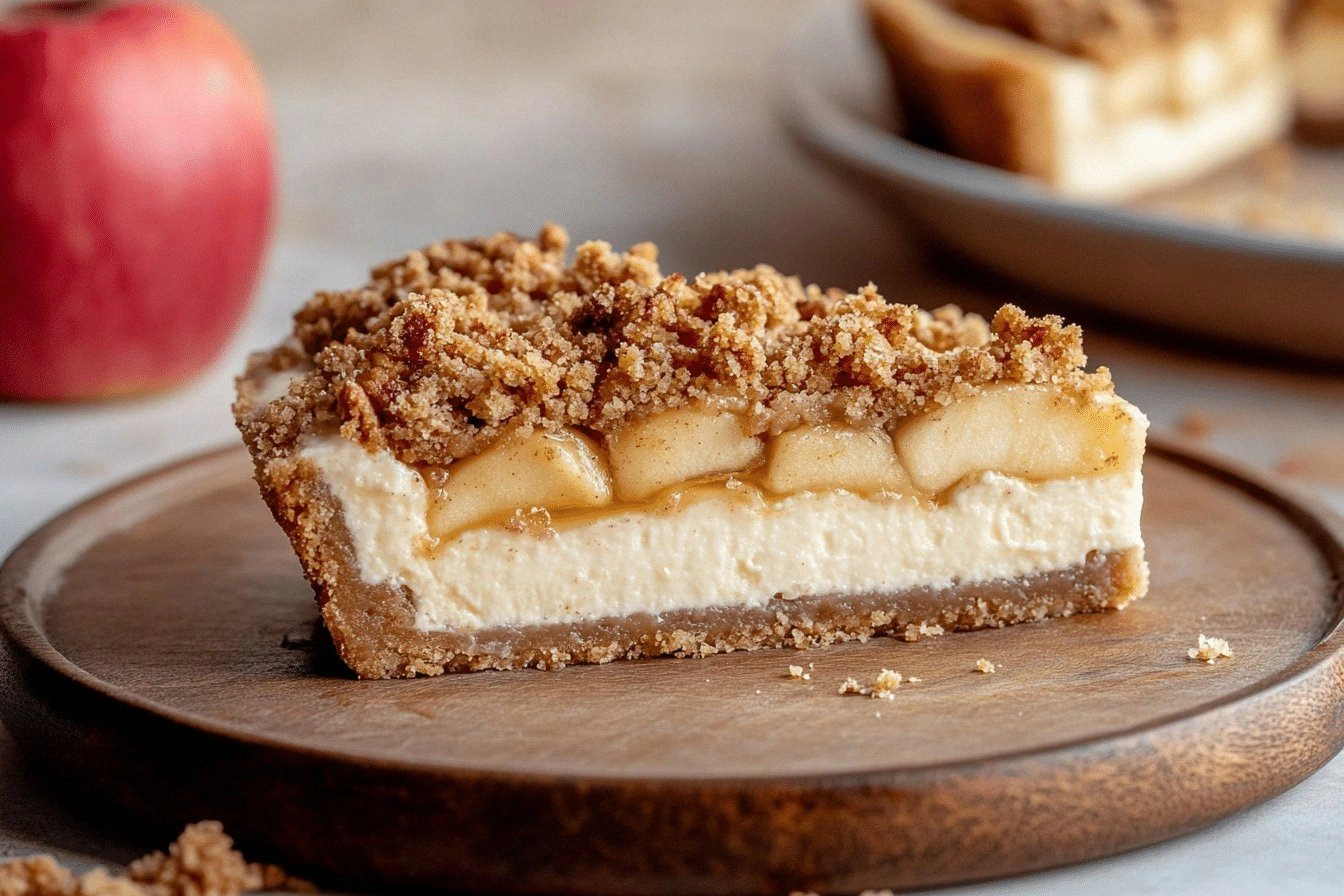
Picture this: a cramped kitchen, a clock ticking, and the scent of cinnamon wafting from a pot that’s already halfway burnt. I was trying to salvage a batch of apple crumble I’d over‑cooked, and the only thing left was that sticky, half‑done mixture. My friend dared me to turn the disaster into something delicious. I stared at the mess, laughed, and thought, “Why not turn this into a cheesecake bar?” The result? A golden‑brown, buttery crust, a silky cream cheese filling that melts in your mouth, and a crunchy apple crumble topping that sings with spice. If you’ve ever stared at a ruined crumble and wondered, “What if?” this is the answer.
I’ve spent years tweaking desserts, but none have captured my taste buds like these Apple Crumble Cheesecake Bars. They’re a marriage of textures: the crispness of a graham cracker base, the velvety smoothness of a classic cheesecake, and the satisfying snap of a caramelized apple crumble. The first bite is a cascade of flavors—sweet apples, warm spices, and that faint tang of lemon zest that cuts through the richness. The second bite? A hint of buttery crumb that lingers. The third? A subtle echo of vanilla that rounds everything off. Every layer is deliberate, each ingredient chosen to amplify the next.
What makes this version stand out from the endless variations you’ll find online? It’s the precision of the crumb, the balance of sweetness, and the subtle twist of lemon zest that brings the whole thing together. I’ve tested dozens of crumble recipes, and this one is hands down the best version you’ll ever make at home. I dare you to taste this and not go back for seconds. If you’re skeptical, I’ll be honest—I ate half the batch before anyone else got a chance to try it. That’s the power of a recipe that’s been refined to perfection.
And here’s the kicker: the technique that sets it apart is a simple, almost invisible step—tossing the apples with a splash of lemon juice before baking. That tiny touch keeps the apples from turning to mush and adds a bright, citrusy note that balances the sweetness. Picture yourself pulling these bars out of the oven, the whole kitchen smelling incredible, the aroma of apples and cinnamon mingling with the buttery crust. That’s the moment you’ll remember for years. Let me walk you through every single step—by the end, you’ll wonder how you ever made it any other way.
What Makes This Version Stand Out
- Texture: The crust is a buttery graham cracker base that cracks like a perfect snap, the filling is silky smooth, and the topping has a crisp, caramelized edge that shatters like thin ice when you bite into it.
- Flavor Balance: Sweet apples meet warm cinnamon, subtle lemon zest cuts the richness, and a hint of vanilla ties everything together.
- Ease of Prep: Every step is straightforward, no complicated equipment needed, and you can prep the crumble topping while the filling sets.
- Make‑ahead Friendly: Assemble and bake, then store in the fridge; they’re still fresh for a week.
- Visual Appeal: The golden crust, the glossy apple topping, and the soft interior make for Instagram-worthy photos.
- Kid‑Friendly: The recipe uses no hidden sugars or exotic ingredients—just pantry staples that kids love.
Alright, let’s break down exactly what goes into this masterpiece…
Inside the Ingredient List
The Flavor Base
The foundation of any great dessert is the base, and here it’s a classic graham cracker crust that’s both buttery and slightly sweet. The crumbs bind the structure, while the melted butter adds depth and a subtle caramel flavor. Skipping the crust would leave the bars feeling flat; the crust keeps everything together and provides a satisfying bite that contrasts the creamy filling. If you’re vegan, swap the butter for coconut oil, and the flavor remains rich—just note a slight coconut undertone.
The Texture Crew
The cream cheese, eggs, and sour cream form the silky filling that’s the heart of the cheesecake. Cream cheese gives it that classic tang, while the eggs provide structure without making it rubbery. Sour cream adds a touch of acidity that balances the sweetness and keeps the filling from becoming too heavy. If you’re looking for a lighter version, replace half the cream cheese with Greek yogurt—just keep the ratio of eggs the same to avoid a runny center.
The Unexpected Star
Apples are the star of the show, but their role goes beyond just sweetness. They add moisture and a natural tartness that cuts through the richness of the filling. Diced apples also create pockets of texture that contrast with the crumb. If you’re in a pinch, you can use frozen diced apples; just thaw and drain them well to avoid excess liquid. The key is to use firm apples like Granny Smith or Honeycrisp, which hold their shape during baking.
The Final Flourish
The crumble topping is where all the spices come alive. Brown sugar caramelizes, cinnamon and nutmeg infuse warmth, and rolled oats add a subtle chew. Lemon zest brings brightness, preventing the topping from feeling too sweet or flat. If you want a nutty crunch, add chopped walnuts or pecans to the crumble mix. The topping is also the easiest part to customize; feel free to experiment with different spices or add a dash of ginger for a zing.
Everything's prepped? Good. Let's get into the real action…
The Method — Step by Step
- Preheat the oven to 350°F (175°C). Line an 8×8-inch baking pan with parchment paper, leaving a little overhang on the sides for easy removal. This step ensures an even bake and makes cleanup a breeze.
- In a medium bowl, combine 1 cup graham cracker crumbs, 2 tablespoons sugar, and 4 tablespoons melted butter. Press the mixture firmly into the bottom of the prepared pan, creating an even crust. The crust should feel solid but not overly packed—think of it as a foundation for a skyscraper.
- Whisk 8 ounces cream cheese, 1/2 cup sugar, 1 teaspoon vanilla, and 1/2 cup sour cream until smooth. Beat in 2 eggs one at a time, ensuring each is fully incorporated before adding the next. The filling should be silky and free of lumps.
- Pour the cheesecake mixture over the crust, smoothing the top with a spatula. The filling should settle evenly, creating a level surface that will hold the crumble topping.
- In a separate bowl, toss 2 cups diced apples with 1 tablespoon lemon juice, 1/4 cup brown sugar, 1 teaspoon cinnamon, and 1/4 teaspoon nutmeg. The lemon juice prevents the apples from browning and adds a bright contrast to the sweetness.
- Spread the apple mixture evenly over the cheesecake layer. This creates pockets of fruit that burst with flavor in every bite.
- For the crumble topping, combine 1/4 cup flour, 1/4 cup rolled oats, 2 tablespoons butter, 1/4 cup brown sugar, 1 teaspoon cinnamon, a pinch of salt, and 1 tablespoon lemon zest. Mix until the butter is fully incorporated, leaving small butter lumps for a flaky texture.
- Evenly sprinkle the crumble topping over the apples. The topping should look like a golden blanket, ready to caramelize.
- Bake for 30 minutes, or until the edges are set and the top is golden brown. The center should still have a slight wobble—this indicates a silky, creamy interior.
- Remove from the oven and let cool on a wire rack for 15 minutes, then cut into bars. The bars should hold their shape; if they’re too soft, let them cool longer.
That's it — you did it. But hold on, I've got a few more tricks that'll take this to another level…
Insider Tricks for Flawless Results
The Temperature Rule Nobody Follows
Baking at 350°F is standard, but a quick trick is to preheat the oven for 10 minutes before you even put the pan in. This ensures a consistent bake and prevents the crust from becoming soggy. I’ve seen people start baking at a lower temperature and end up with a chewy crust. Keep the heat steady and the bars will rise beautifully.
Why Your Nose Knows Best
When the bars are baking, keep an eye on the aroma. A faint, sweet smell of caramelized sugar is a sign the crumble is just right. If the scent is overwhelmingly sweet, it’s overcooked; if it’s barely there, you need more time. Trust your nose—no recipe can replace that instinct.
The 5-Minute Rest That Changes Everything
After baking, let the bars rest on a wire rack for 15 minutes, then let them cool completely before cutting. This rest period allows the filling to set and the crumble to firm up, preventing the bars from falling apart. I’ve tried cutting them straight out of the oven, and the crumble was still soggy.
The Perfect Crumble Texture Hack
If you like a crunchier topping, add 1 tablespoon of chopped pecans or walnuts to the crumble mix. The nuts add a delightful crunch and a nutty aroma that pairs wonderfully with apples. I’ve seen this variation turn an already great recipe into an unforgettable one.
The Sweetness Balance Trick
Adjust the sugar in the crumble to taste. If you prefer a sweeter bar, increase the brown sugar to 1/3 cup. If you’re watching your calories, reduce it to 1/5 cup and add a splash of vanilla extract for flavor. The key is to keep the ratio of flour to sugar balanced to maintain the crumble’s structure.
Creative Twists and Variations
This recipe is a playground. Here are some of my favorite ways to switch things up:
Maple Apple Crunch
Swap the brown sugar for maple syrup in the crumble topping, and add a splash of maple extract to the filling. The maple flavor deepens the sweetness and gives the bars a rustic, autumnal feel.
Chocolate Swirl Surprise
Fold 2 tablespoons of melted dark chocolate into the cheesecake filling before pouring it over the crust. The chocolate creates a swirl that adds a rich, indulgent twist while still letting the apple flavor shine.
Pumpkin Spice Edition
Replace the apples with 1 cup pumpkin puree and add 1/2 teaspoon pumpkin pie spice to the crumble. This variation gives the bars a cozy, fall vibe that’s perfect for Thanksgiving.
Citrus Burst Variation
Add zest from one orange to the crumble and a tablespoon of orange juice to the apple mixture. The citrus brightens the flavor profile and adds a refreshing contrast to the sweetness.
Nutty Banana Delight
Use sliced bananas instead of apples and add chopped almonds to the crumble. The bananas provide natural sweetness, while the almonds give a satisfying crunch and a nutty aroma.
Gluten-Free Option
Use gluten‑free graham cracker crumbs or almond flour for the crust, and replace regular flour in the crumble with oat flour. The bars remain chewy and flavorful while accommodating dietary restrictions.
Storing and Bringing It Back to Life
Fridge Storage
Store the bars in an airtight container in the refrigerator for up to 5 days. Keep them wrapped in parchment paper to prevent sticking and to preserve freshness. When you’re ready to eat, let them sit at room temperature for 10 minutes for optimal flavor.
Freezer Friendly
For longer storage, wrap each bar tightly in plastic wrap and then place them in a freezer bag. They’ll keep for up to 3 months. Thaw overnight in the fridge before serving.
Best Reheating Method
To revive frozen bars, microwave on low for 30 seconds or warm them in a 350°F oven for 5 minutes. Add a tiny splash of water to the center before reheating; this steams the filling back to a silky texture and keeps the crumble from drying out.